Voted Travelers' Choice 2023

Find Your Next Adventure
Where Will You Go Next?
Find Your Next Adventure
Where Will You Go Next?
Resources For Photographers
About Our Company
JOIN OUR FREE FACEBOOK GROUP - THE BCJ TRIBE
How To: Welcome to Photography
by BCJ Staff
I’ve had the distinct privilege of working with many different photographers over the last few months, each of varying degrees of experience. It has been a really neat experience, and has left me with a feeling of great pride in my work and the community in which I have become a part of. My guests have been nothing if not incredible. Supportive, passionate and eager to learn would be a few ways to describe each of the amazing groups of people that I have had the pleasure of working with.

A great group of photographers in the Zion Narrows!
As 2018 comes to a close, as a way of saying thanks to all that you have given me, I would like to give something back. As we step into 2019, we here at Backcountry Journeys would like to begin to offer a series of “How To” articles, geared at everyone on our trips, from the iPhone photo novice, to the expert with decades of experience and thousands of dollars worth of photo equipment, and (perhaps more likely) everyone in between. I’ve often said that the best gift is knowledge, so I’m happy to share mine with you.
To begin our “How To” series, I’d like to start with a few tips to help the beginner photographers get up to speed. If you consider yourself a seasoned veteran of the photo world, don’t worry, there will be plenty to learn as we move through the next few weeks. But today I’d like to help our new friends of photography understand a few things that will have us all speaking the same language and utilizing similar aspects of our equipment. This will help to streamline our blog posts moving forward, and act as an anchor for future posts by providing everyone with something to look back on when or if they find themselves in over their heads. So bear with me, and if you consider yourself well versed in the language and practice of photography, check back next week as we begin to tackle some of the specifics.
As a new photographer, you may find yourself with more questions than answers; and what answers you do have are likely only raising more questions. What is ISO? What does F-Stop mean? Why did I spend so much money on this stuff? Am I ever going to take a photo that I’m happy with?
These are some of the questions I found myself asking as I took the leap into photography, and I’ve had many different guests ask me the same questions. In the coming weeks, we’ll dive in to the specifics around aperture, ISO, shutter speed, white balance and a whole host of shooting methods and techniques. If you don’t know what those are, don’t worry. We’ll get you caught up. In the meantime, we’ll move forward under the impression that you have used a camera phone in the past, but have just unboxed a nice new DSLR or Mirrorless camera and now know only where the shutter button and viewfinder are on your new camera and will be shooting on the “auto” setting.
What am I looking at?
To begin, take a look through the viewfinder almost any camera and you’ll notice a few things. There will likely be a square or box of sorts in the frame. This will be your camera’s autofocus area, and by overlaying this box onto your subject, you will ensure your camera will focus on your subject, and your photo will be clear. By pressing your shutter button halfway, your camera will autofocus for you, allowing you to see what will be in focus, without taking the photo. Something I find myself telling even some seasoned veterans is that at any point in the camera’s menu or settings or anywhere you find yourself making adjustments, if you would like to go back to taking photos, simply half press your camera’s shutter button, and it should bring you back to your primary photo taking setting.
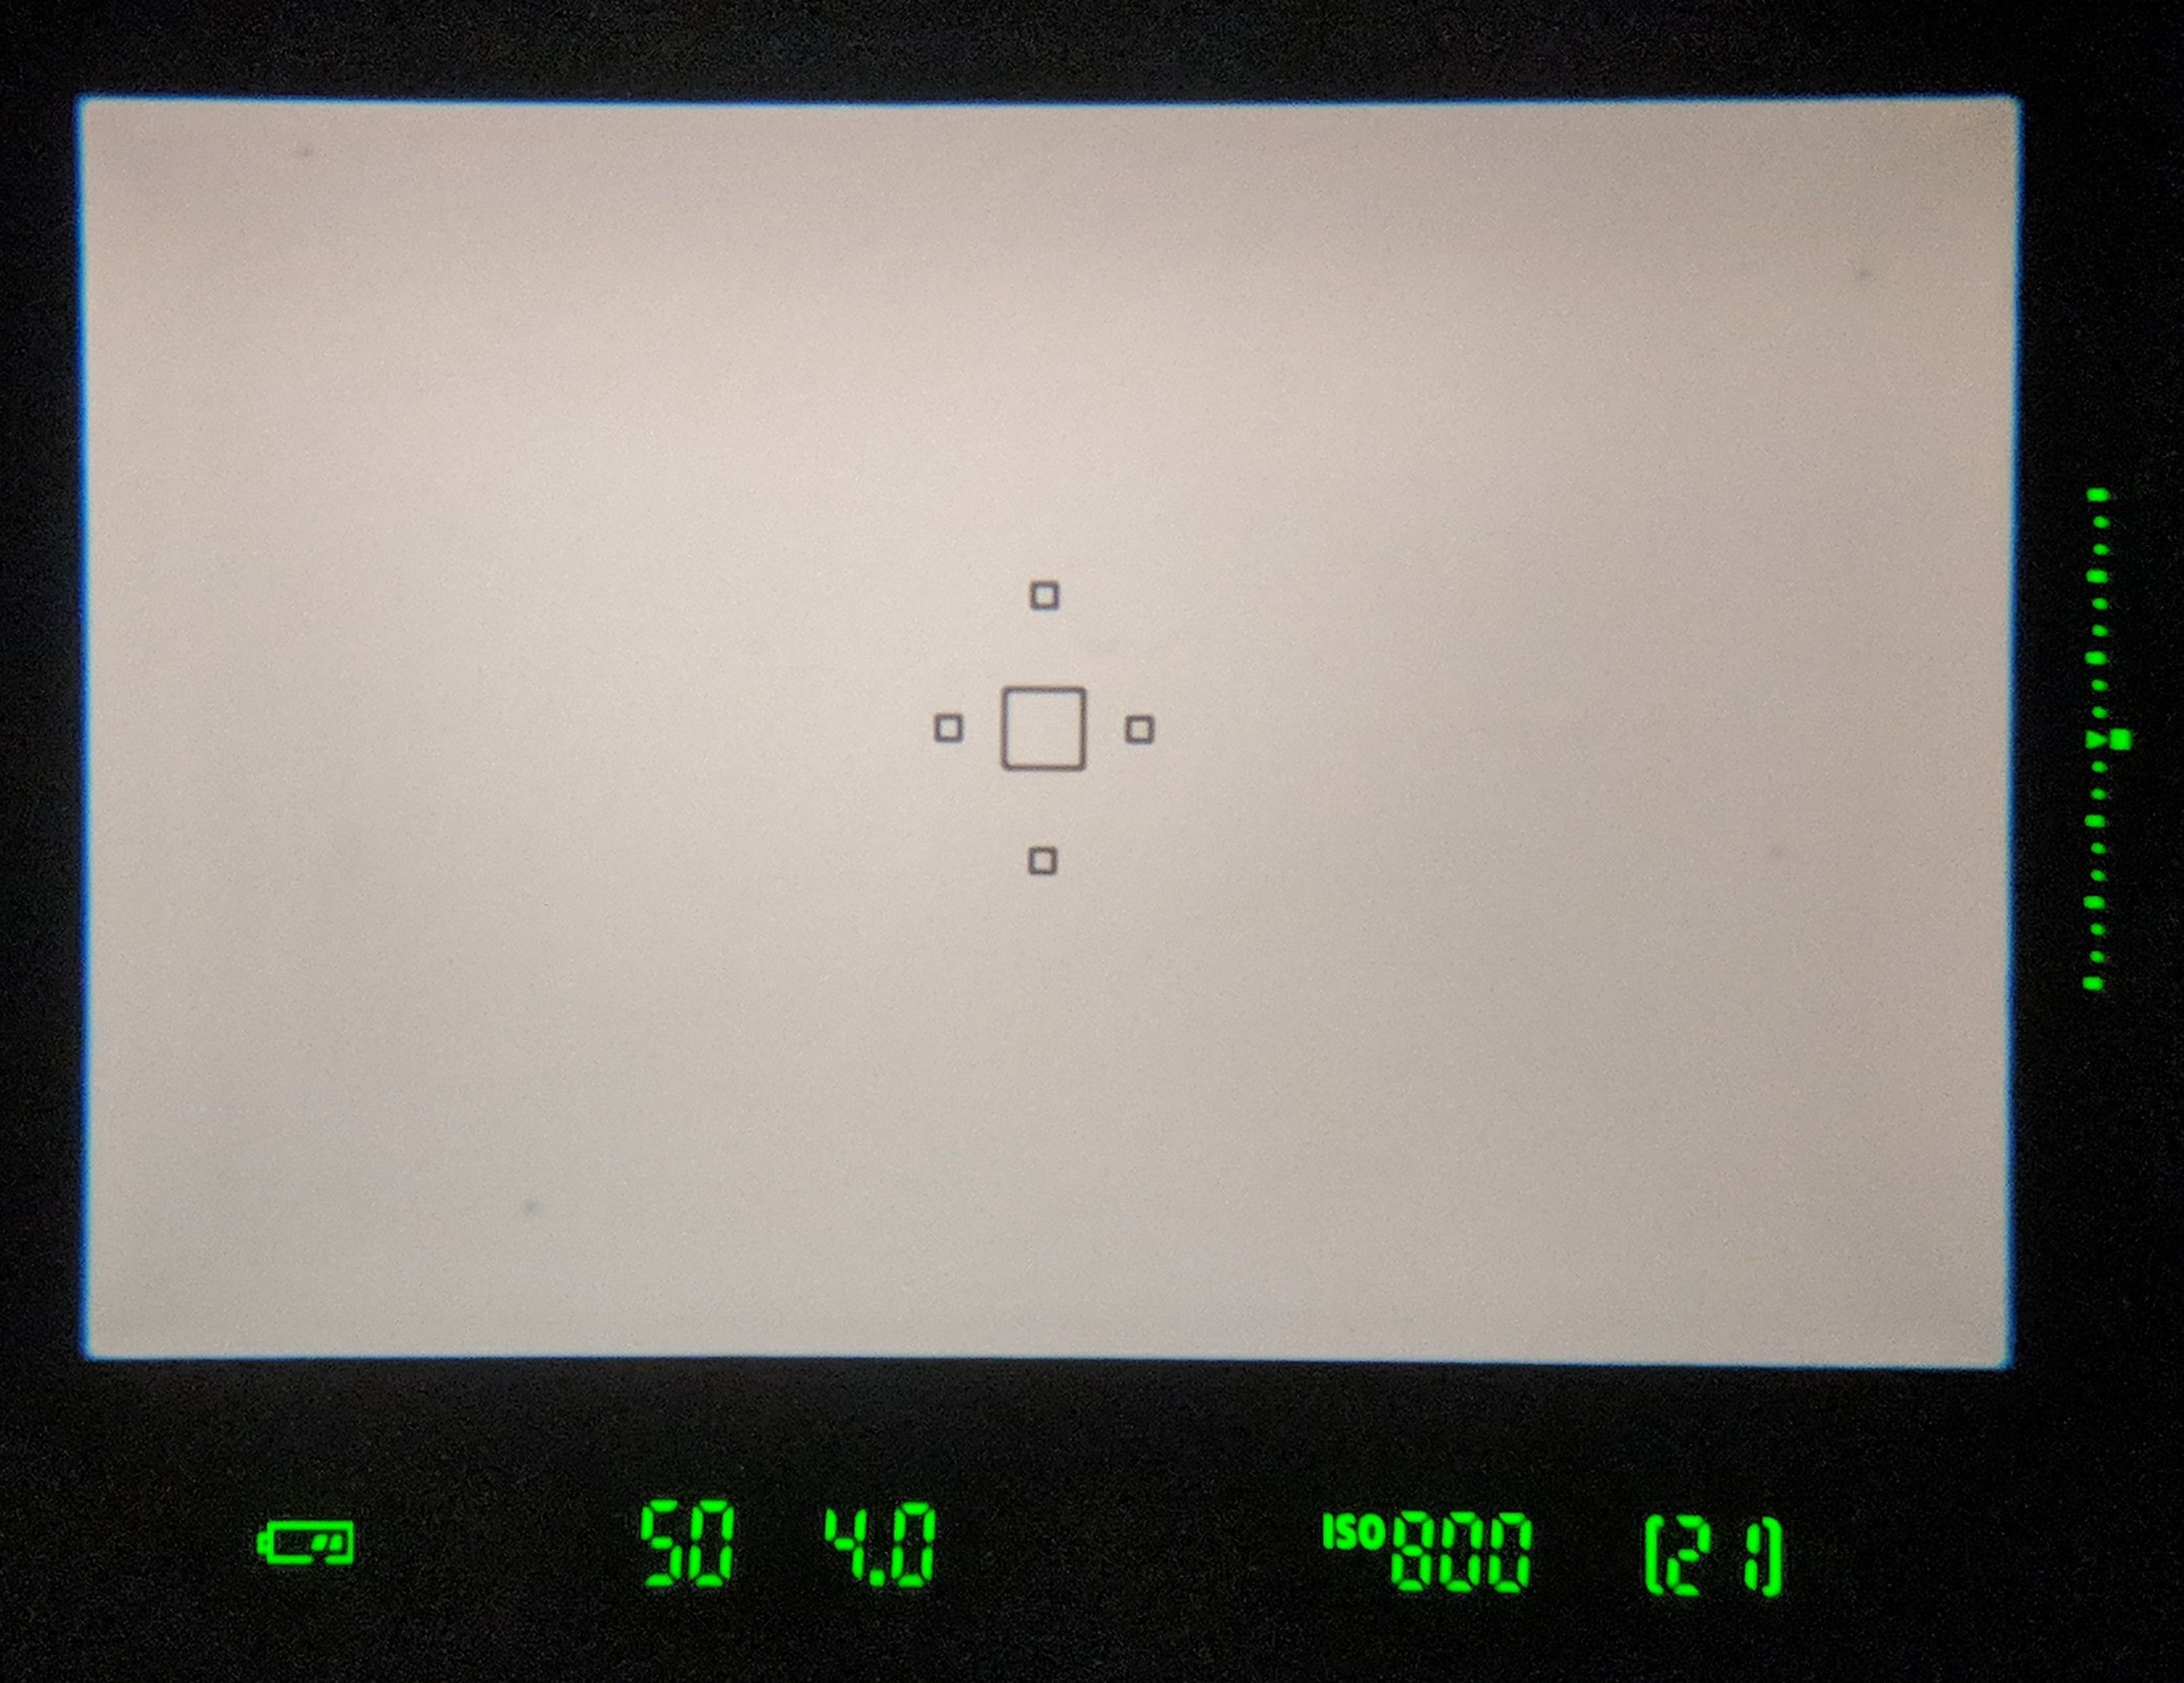
Looking through the viewfinder of my Canon 7D Mkii with a shutter speed of 1/50, aperture of f/4.0 and ISO 800]
Another thing that you might notice in the display (depending on the camera), is that a few numbers will be visible, typically along the bottom or top of the display (if looking through the viewfinder). These numbers will indicate your Aperture, ISO and Shutter Speed. Aperture will be a number with a decimal, such as 2.8, 4.0, 5.6, 8.0 or 11.0. Depending on your camera, these numbers may also carry the prefix “f/” or simply a capital F (such as f/2.8 or F11). ISO is going to be a whole number typically equal to or greater than 100, and depending on the camera, anywhere as high as 6400, 10000 or greater. Shutter speed will (in most cases) be displayed as a fraction: 1/500, 1/30, 1/2500, or a whole number if ISO is labeled. The only time that shutter speed will not be displayed as a fraction is when you have set your camera to a shutter speed slower than around 1/3 or 1/4. In this case, you may see your shutter speed displayed as a number with a quotation mark after it, such as 5”, 15” or 30”. This is to indicate that your shutter speed is 5, 15 or 30 seconds long respectively. You may also see 0”5, 1”3 etc, indicating that your shutter speed is 0.5 seconds, or 1.3 seconds. You get the idea. This format is used to differentiate between shutter speed and aperture values. If you’re still not sure what you’re looking at, dig out your camera’s manual and there will be a lovely diagram defining each item in the viewfinder. We’ll be discussing each of the three components of what is known as the “Exposure Triangle” in the coming weeks, but if you would like to get a jump start on learning, check out Kenton’s blog post “Understanding the Exposure Triangle” from a few weeks ago.
How do I take a decent photo?
Now that you know what you’re looking at with your new camera, let’s take a look at using that camera to take a decent photo. I’ll be discussing composition and camera settings in the coming weeks in detail as well, but for now, I’ll give you an insight into some of the basics and what I encourage all of my guests to do when looking for that “perfect photo”.
First of all, and perhaps most importantly, to quote a famous self-help book from the late 80’s, “Begin with the end in mind.” I feel like this comes up on every trip I guide with Backcountry Journeys, no matter how experienced our guests happen to be. As you’re shooting, you need to think about what you want out of your camera, and consequently, out of your photograph. Know that if you’re on our Bald Eagles of Alaska tour and want to capture a photo of a Bald Eagle taking flight while perfectly frozen in the frame, you’ll need to have very different settings (faster shutter speed, higher ISO, and perhaps a low aperture) than you would photographing the northern lights at night on our Ultimate Northern Lights trip.

Bald Eagle In Flight. Settings: f/8.0, ISO 800, 1/4000 sec at 600mm on Canon 7D Mkii
If you want to shoot a high megapixel wide angle panorama to print large enough to go over the living room couch, you’ll need to plan ahead and shoot differently than if you’re looking for a nice sunset photo to post to social media. My best advice to new photographers is to think about what you want your photo to look like before shooting the photo. This will ensure an intentional approach to shooting that is only going to help you increase the caliber of your work.
Secondly, understand that there are a few “rules” to composition. While some folks say that rules are meant to be broken, I’d say start by knowing the rules, so that in the future, you know when to break them.
Secondly, understand that there are a few “rules” to composition. While some folks say that rules are meant to be broken, I’d say start by knowing the rules, so that in the future, you know when to break them.

The Rule of Thirds displayed with red lines
The primary rule of composition is the “Rule of Thirds” which encourages you to place the emphasis of your photo on one of the “thirds” lines, created by dividing your frame into thirds, from top to bottom and from left to right. Your “power point” is generally located at any of the four intersections of these thirds lines, as seen in the photo below. By placing your subject here, the eye is naturally drawn to it, and thus allows for a more compelling or “powerful” photograph. We’ll discuss some more advanced composition techniques in future posts, but utilizing the rule of thirds is a great way to start improving your photography today, with absolutely no increased monetary cost to the photographer.

Before and after some editing work in Lightroom
Finally, understand that all digital photos can (and in my opinion, should) be edited. Editing a photo does not necessarily mean that you are changing it in any significant manner, but rather modifying the color to bring about what you saw with the naked eye. The old days of film meant that in between taking a photo and displaying it for all to see, there was a substantial post processing step that resulted in the photographer chasing an end product. Even Ansel Adams carried out significant post processing work to achieve the incredibly powerful images that he was so famous for. There was a wide variety of techniques necessary to come up with a desired result. And now, just because we have gone digital, for some reason people have come to believe that if you snap a photo, whatever the computer inside your camera decides to give you, is the photo you get. This works fine for taking photos of the kids on Christmas morning, or snapping a shot of your friends during a night out, but if you want to go from a “picture taker” to a “photographer”, you’re going to have to edit your photos. Stay tuned for a “How To” article on the basics of editing. Note: I am not condoning adding or subtracting from an original photo to create a scene that was not ever there. There are ethical boundaries that can be pushed one way or another regarding the editing of your work, and it is up to each individual photographer to determine where that boundary lies. We may have a blog post regarding the editing ethics of Backcountry Journeys in the future.
So there you have it. A few things to keep in mind as we move towards our weekly “How To” series. At first, it may feel a bit like drinking from a firehose, but stick with it and keep researching and learning and it will soon become second nature. My hope is that as these posts become more and more detailed, you may follow along with the best of them, learning and growing as a photographer. Know that photography at its best is very simple, and yet can be incredibly complex if you want it to be. If you have any questions, feel free to leave them in the comments below and I’ll happily get back to you as soon as I can! Now get out and use that new camera (or old camera) and see what you can come up with. Happy shooting!
So there you have it. A few things to keep in mind as we move towards our weekly “How To” series. At first, it may feel a bit like drinking from a firehose, but stick with it and keep researching and learning and it will soon become second nature. My hope is that as these posts become more and more detailed, you may follow along with the best of them, learning and growing as a photographer. Know that photography at its best is very simple, and yet can be incredibly complex if you want it to be. If you have any questions, feel free to leave them in the comments below and I’ll happily get back to you as soon as I can! Now get out and use that new camera (or old camera) and see what you can come up with. Happy shooting!

arrow_drop_down_circle
Divider Text
AUTHOR
SEARCH THE BLOG
clear


Join our free photo-travel community group on Facebook. A great place to swap stories & share images with fellow photographers!

Live events & webinars from the comfort of your own home. Free webinars on a variety of photography related topics – from photo editing to composition & more.

Check out the BCJ Trip Calendar for all of our upcoming Photography Tours, Workshops & Safaris!

FEATURED TRIP:
Brown Bears of Alaska: Beyond Brooks
Immerse yourself in the Alaskan wilderness and capture stunning images of Brown Bears!
Brown Bears of Alaska: Beyond Brooks
Immerse yourself in the Alaskan wilderness and capture stunning images of Brown Bears!


UPCOMING TRIPS WITH AVAILABILITY
[Block//Web Spots Left]
Price: [Block//Current Price]
Dates: [Block//Start Date %n/j/Y%+0] to [Block//End Date %n/j/Y%+0]
READ OUR NEWSLETTER FOR NEW TRIPS, ARTICLES, & PROMOS
BACKCOUNTRY JOURNEYS
"Backcountry Journeys offers guests the unique opportunity to explore our natural world from behind their own lens. We run a selection of hand-crafted Photo Tours, Workshops & Safaris connecting passionate people to exceptional experiences. Locations include Yosemite, Alaska, Yellowstone, Glacier National Park, Hawaii, Utah as well as Botswana & Costa Rica."
- Russ Nordstrand, Backcountry Journeys Founder & Director
- Russ Nordstrand, Backcountry Journeys Founder & Director
TRIP CATALOG
Download our Trip Catalog for detailed information on our many destinations for photography tours, workshops, and safaris.
All Images & Content are property of Backcountry Photography Tours, Workshops & Safaris LLCs - Copyright 2024
BACKCOUNTRY JOURNEYS
"Backcountry Journeys offers guests the unique opportunity to explore our natural world from behind their own lens. We run a selection of hand-crafted Photo Tours, Workshops & Safaris connecting passionate people to exceptional experiences. Locations include Yosemite, Alaska, Yellowstone, Glacier National Park, Hawaii, Utah as well as Botswana & Costa Rica."
All Images & Content are property of Backcountry Journeys Photography Tours, Workshops & Safaris LLC - Copyright 2024
TRIP CATALOG
Download our Trip Catalog for detailed information on our many destinations for photography tours, workshops, and safaris.