Mon - Fri: 8 am - 4 pm MT

About Backcountry Journeys
Why Choose Backcountry Journeys
If you're considering a photography trip, hear why Backcountry Journeys delivers the best experience in the industry.Frequently Asked Questions
If you're new to photography trips, or new to BCJ, you can find our common travel questions here.Fitness Levels
Our trips vary on physical intensity, and by reviewing our fitness levels, you can find out which trips may be more challenging, or aligned more closely with your comfort level.Meet The Crew
We've built an amazing team of experienced guides, and dedicated office staff that elevate your travel experience. Get to know their backgrounds, and hear their stories.Loyalty Program
We reward our frequent photo adventurers with exclusive discounts on amazing photography trips.Contact Us
If you need to get in touch with our office staff, or have additional business inquiries, you can find our information here.Refer a Friend
Know someone perfect for one of our tours? Recommend them through this quick form.Stay Up To Date On All Things
Backcountry Journeys
Backcountry Journeys
Our Photography Community
Our Webinars
Our regularly hosted webinars provide photography instruction from our own guides on a wide range of topics.Our Education Portal
Explore our library of articles that cover everything from common questions, to in-depth guides on how to achieve that perfect shot.Community Testimonials
We're proud to foster an amazing group of photo travelers, and here you can find their stories from their past adventures.Resources For Photographers
About Our Company
Resources For Photographers
About Our Company
Behind the Shot: Discover the Camera Settings and Creative Decisions that Make an Image
Published May 10, 2024
Photography is a wonderful form of individual expression. I find it absolutely incredible that we have the ability to take a camera and lens and capture something new, unique, emotional, and inspiring. With these tools, we can freeze a moment in time allowing it to live on forever. We can capture a scene exactly as we saw it and share it with others.
But how exactly should we be capturing the scenes before us? How can we best convey our own personal experiences of events and places? Of course, there is no simple answer to either of these questions and ultimately it will depend on your own creative vision and the decisions you make as an artist. There are so many different elements, compromises, and factors that go into creating a photograph. Whether that’s your choice in camera settings, focal length, overall composition, shot location, or a myriad of other things, it really can’t be overstated how complex this process is. Ultimately there are seemingly countless decisions that we must make as photographers and this can often feel quite overwhelming, especially for those of us just starting out on our photography journeys.
Here at BCJ, we get asked all the time, how exactly an image was created. Whether it’s a stunning wildlife or landscape shot from a trip report, a long-exposure star trail image from a webinar, or an aerial photo from a social media post, people are constantly curious to know exactly how an image was captured. We’re constantly asked what settings and gear were used to create a specific image.
Because of this, I’ve decided to put together an article attempting to tackle this exact topic. The idea here is to share a collection of 10 diverse images along with the story behind them and the camera settings that were used. Of course, there is no one right way to go about doing any of this and all of the factors that go into creating an image are fluid. You will always have to adapt to changing environments and circumstances and you’ll ultimately have to make these decisions for yourself. That being said, this article is designed to hopefully provide people with some insights and ideas. I hope that by explaining how I managed to capture these images, things can start to make more sense and potentially provide some direction.
Alright, let’s get right into it! Here are 10 images I’ve captured over the years along with camera settings that were used and decisions that were made to create them.

Bighorn Sheep in Yellowstone
Camera Settings:
Focal Length: 600mm
Shutter Speed: 1/1250
Aperture: f/7.1
ISO: 2500
Shot Location: Old Yellowstone Trail, Yellowstone NP
This image was captured during the late fall / early winter in Yellowstone National Park while I was guiding the ‘Yellowstone’s Lamar Valley in Winter’ workshop. We were driving along the Old Yellowstone Trail, just outside of the Northern Entrance and encountered a large group of bighorn sheep. These animals are quite common in this location during this time of year, and this is also during their rut or mating season. This meant that they were very active. We got to observe the rams, or males, fighting with one another for mating rights and chasing after females in heat. They were putting on quite the show.
I noticed this lone ram slowly walking towards the group and observed that the background was quite far behind him (he was on a small hill). I knew that this would lead to a great shot because I could easily blur the background and isolate the subject. I was shooting with my Sigma 60-600mm lens and really liked the close-up composition I was able to get at 600mm. For this shot, I chose a shutter speed of 1/1250th of a second. I didn’t need to select a faster shutter speed as the subject wasn’t moving too quickly. I chose my lens’s widest aperture of f/7.1 to blur the background as much as I could and ended up using an ISO of 2500 to achieve the proper exposure. I’m really happy with how this image turned out and it goes to show that even without an f/4 super-telephoto you can still achieve nice blurred backgrounds at longer focal lengths.

Frazier Meadows Sunrise
Camera Settings:
Focal Length: 16mm
Shutter Speed: 1/640
Aperture: f/16
ISO: 1600
Shot Location: Bridger Mountains, Montana
This Image was captured just outside of my hometown of Bozeman, Montana. A friend and I woke up early and headed out into the Bridger Mountain Range to enjoy the sunrise. We hiked for a little over an hour and ended up on top of one of the foothills on the eastern side of the range. To our joy, we realized that the conditions were just perfect with some clouds in the sky and the sunrise on the way.
I searched for an ideal composition for quite some time and ended up choosing the shot you see here. A trick I like to use frequently when shooting landscapes is walking around with my camera handheld and simply testing out different compositions before setting up my tripod and other gear. This is a great reason to always arrive at your shot locations early so that you have time to get fully set up. I really enjoyed this vertical, wide-angle composition because it not only featured some very interesting foreground elements, but it also showed quite a bit of the sky and clearly portrayed the mountains in the background.
For this image, I chose a focal length of 16mm because I wanted a nice wide-angle composition showing the entire scene before me. Because it was quite windy on top of this ridge, I opted for a relatively fast shutter speed of 1/640th of a second to freeze the movement of the foliage in the foreground. I used a narrow aperture of f/16 to keep both my foreground and the background in focus and opted for a relatively high ISO of 1600 because my shutter speed was a bit on the fast side. Overall, I’m really happy with how this image turned out.

Black Bear in Yellowstone
Camera Settings:
Focal Length: 600mm
Shutter Speed: 1/1000
Aperture: f/7.1
ISO: 12800
Shot Location: Yellowstone National Park
This is one of my favorite wildlife images to date and was captured during an absolutely incredible encounter with a very large black bear in Yellowstone National Park. Fellow BCJ guide Casey Mannes and I ventured into the park, during the fall, in search of wildlife subjects. We found this bear and managed to observe and photograph it for over two hours. This was one of the best wildlife encounters I’ve ever had and I’m lucky to have captured some nice images like this one.
This image was definitely a tricky one to capture due to the environmental conditions, but I’ll walk you through my thought process. It was a relatively dark and overcast day in the park, and on top of that, we were in a relatively dense forest meaning that there was not much environmental light. For this shot, I was using my go-to wildlife lens, the Sigma 60-600mm which only has a maximum aperture of f/7.1 at 600mm. Luckily the bear wasn’t moving a ton so I knew that I wouldn’t have to use a super-fast shutter speed. I also knew that due to the low-light situation, I would have to opt for a very high ISO, but luckily with modern mirrorless cameras and super noise reduction software, I was hopeful I could pull it off. I zoomed all the way in to 600mm, selected my maximum aperture of f/7.1, opted for a shutter speed of 1/1000th a second, and ended up shooting at a super high ISO of 12,800. Nonetheless, with the noise reduction software in Adobe Illustrator, I was able to get some great images!

Fairy Falls
Camera Settings:
Focal Length: 50mm
Shutter Speed: 10 (with ND filter)
Aperture: f/16
ISO: 100
Shot Location: Fairy Falls, Yellowstone NP
This is one of my favorite long-exposure waterfall images to date. It was captured at the iconic Fairy Falls in Yellowstone National Park just west of the Grand Prismatic Spring while I was scouting for the ‘Yellowstone & Grand Teton in Autumn (Hiker)’ trip. After hiking up the trail I arrived at the waterfall and immediately knew I wanted to capture a long-exposure shot using my neutral density filter. The waterfall was in the shade which was great because I didn’t have to worry about any harsh light. The biggest pain about shooting mid-day is trying to compensate for super bright highlights and super dark shadows. This is why shooting either early or late in the day or with overcast skies is often desirable.
To find my composition, I began walking all around the area with my camera in hand to test out different angles. I tried out a lot of shots with foreground elements but ultimately this image, with just the waterfall, was what I liked the best. I set up my tripod exactly where I wanted it, selected a focal length of 50mm to really isolate and focus on the waterfall, and started to choose my settings. Because I wanted the classic soft motion blur of the waterfall, I put on my variable ND filter and began experimenting with the darkness of the filter and different shutter speeds. Eventually, I found that a shutter speed of 10 seconds looked quite nice. I chose an aperture of f/16 to keep everything in focus and to allow for a longer exposure and was able to shoot at ISO 100. I’m really happy with how this image turned out. It’s pretty incredible what you can achieve with a Neutral Density filter.

Bonsai Tree Astro
Camera Settings:
Focal Length: 16mm
Shutter Speed: 20
Aperture: f/2.8
ISO: 12800
Shot Location: Zion National Park
This image was captured right around midnight on a clear summer night in Zion National Park. This is a relatively popular shot location that is often referred to as the “Bonsai Tree” and I had captured many images here before during the day. I had always wanted to capture some night sky images in Zion because I knew that with the dark skies, dry air, and lack of light pollution, there would be some great opportunities. After doing some research and discovering that the Milky Way would be in just the right part of the sky, I set out for the Bonsai Tree to see what I could find. A great app that is incredibly useful in planning shoots like this and identifying the locations of celestial objects is PhotoPills. I strongly recommend it for all photographers.
When I arrived at the shot location, I switched my headlamp over to the red light setting so that I could clearly see both the night sky and my surroundings. After finding my ideal composition by slowly moving around with my camera and tripod and capturing many images, I managed to line the Milky Way galaxy up perfectly with the Bonsai Tree and started to dial in my settings. Of course, I wanted to capture as much light as possible, so I opted to use my Canon 16-35mm f/2.8 lens. I chose a focal length of 16mm to capture both the intriguing rock formations in the foreground and also a good chunk of the night sky. I then opted for a wide-open aperture of f/2.8 to allow as much light in as possible. After this, I selected a shutter speed of 20 seconds to allow as much light in as possible without getting too much motion blur on the stars. And then I opted for a very high ISO of 12,800 to achieve the brightness I wanted. Yes, this is a very high ISO but with great noise reduction tools readily available I was confident I could correct this. At the end of the day, I’m very happy with this shot.

Old Faithful – Long Exposure
Camera Settings:
Focal Length: 16mm
Shutter Speed: 5 (with ND filter)
Aperture: f/16
ISO: 100
Shot Location: Old Faithful Geyser, Yellowstone
This image was captured while guiding a BCJ trip in Yellowstone National Park. I had seen and photographed the world-famous Old Faithful Geyser countless times, so I really wanted to capture a new and unique image. I decided to attempt a long exposure shot in broad daylight to portray the passage of time as steam slowly vents out of the geyser. I also wanted to capture an image during its dormant period between eruptions. Another thing I wanted to accomplish was to capture an image without any trace of human impact or development. If you’ve ever been to Old Faithful, you’ll likely know that is almost impossible. Nonetheless, I started walking around the geyser in search of a shot.
I ended up finding this composition that I liked without any people or signs of development in the frame. I opted to use my wide-angle lens and a focal length of 16mm to capture a broader scene. I set my ISO to 100 because I knew I was using a tripod and longer shutter speeds and opted to shoot at an aperture of f/16 to keep the whole scene in focus. After experimenting with different shutter speeds and darkness settings on my variable ND filter, I settled on a shutter speed of 5 seconds. I really like the motion blur on the steam as it’s rising out of the geyser.
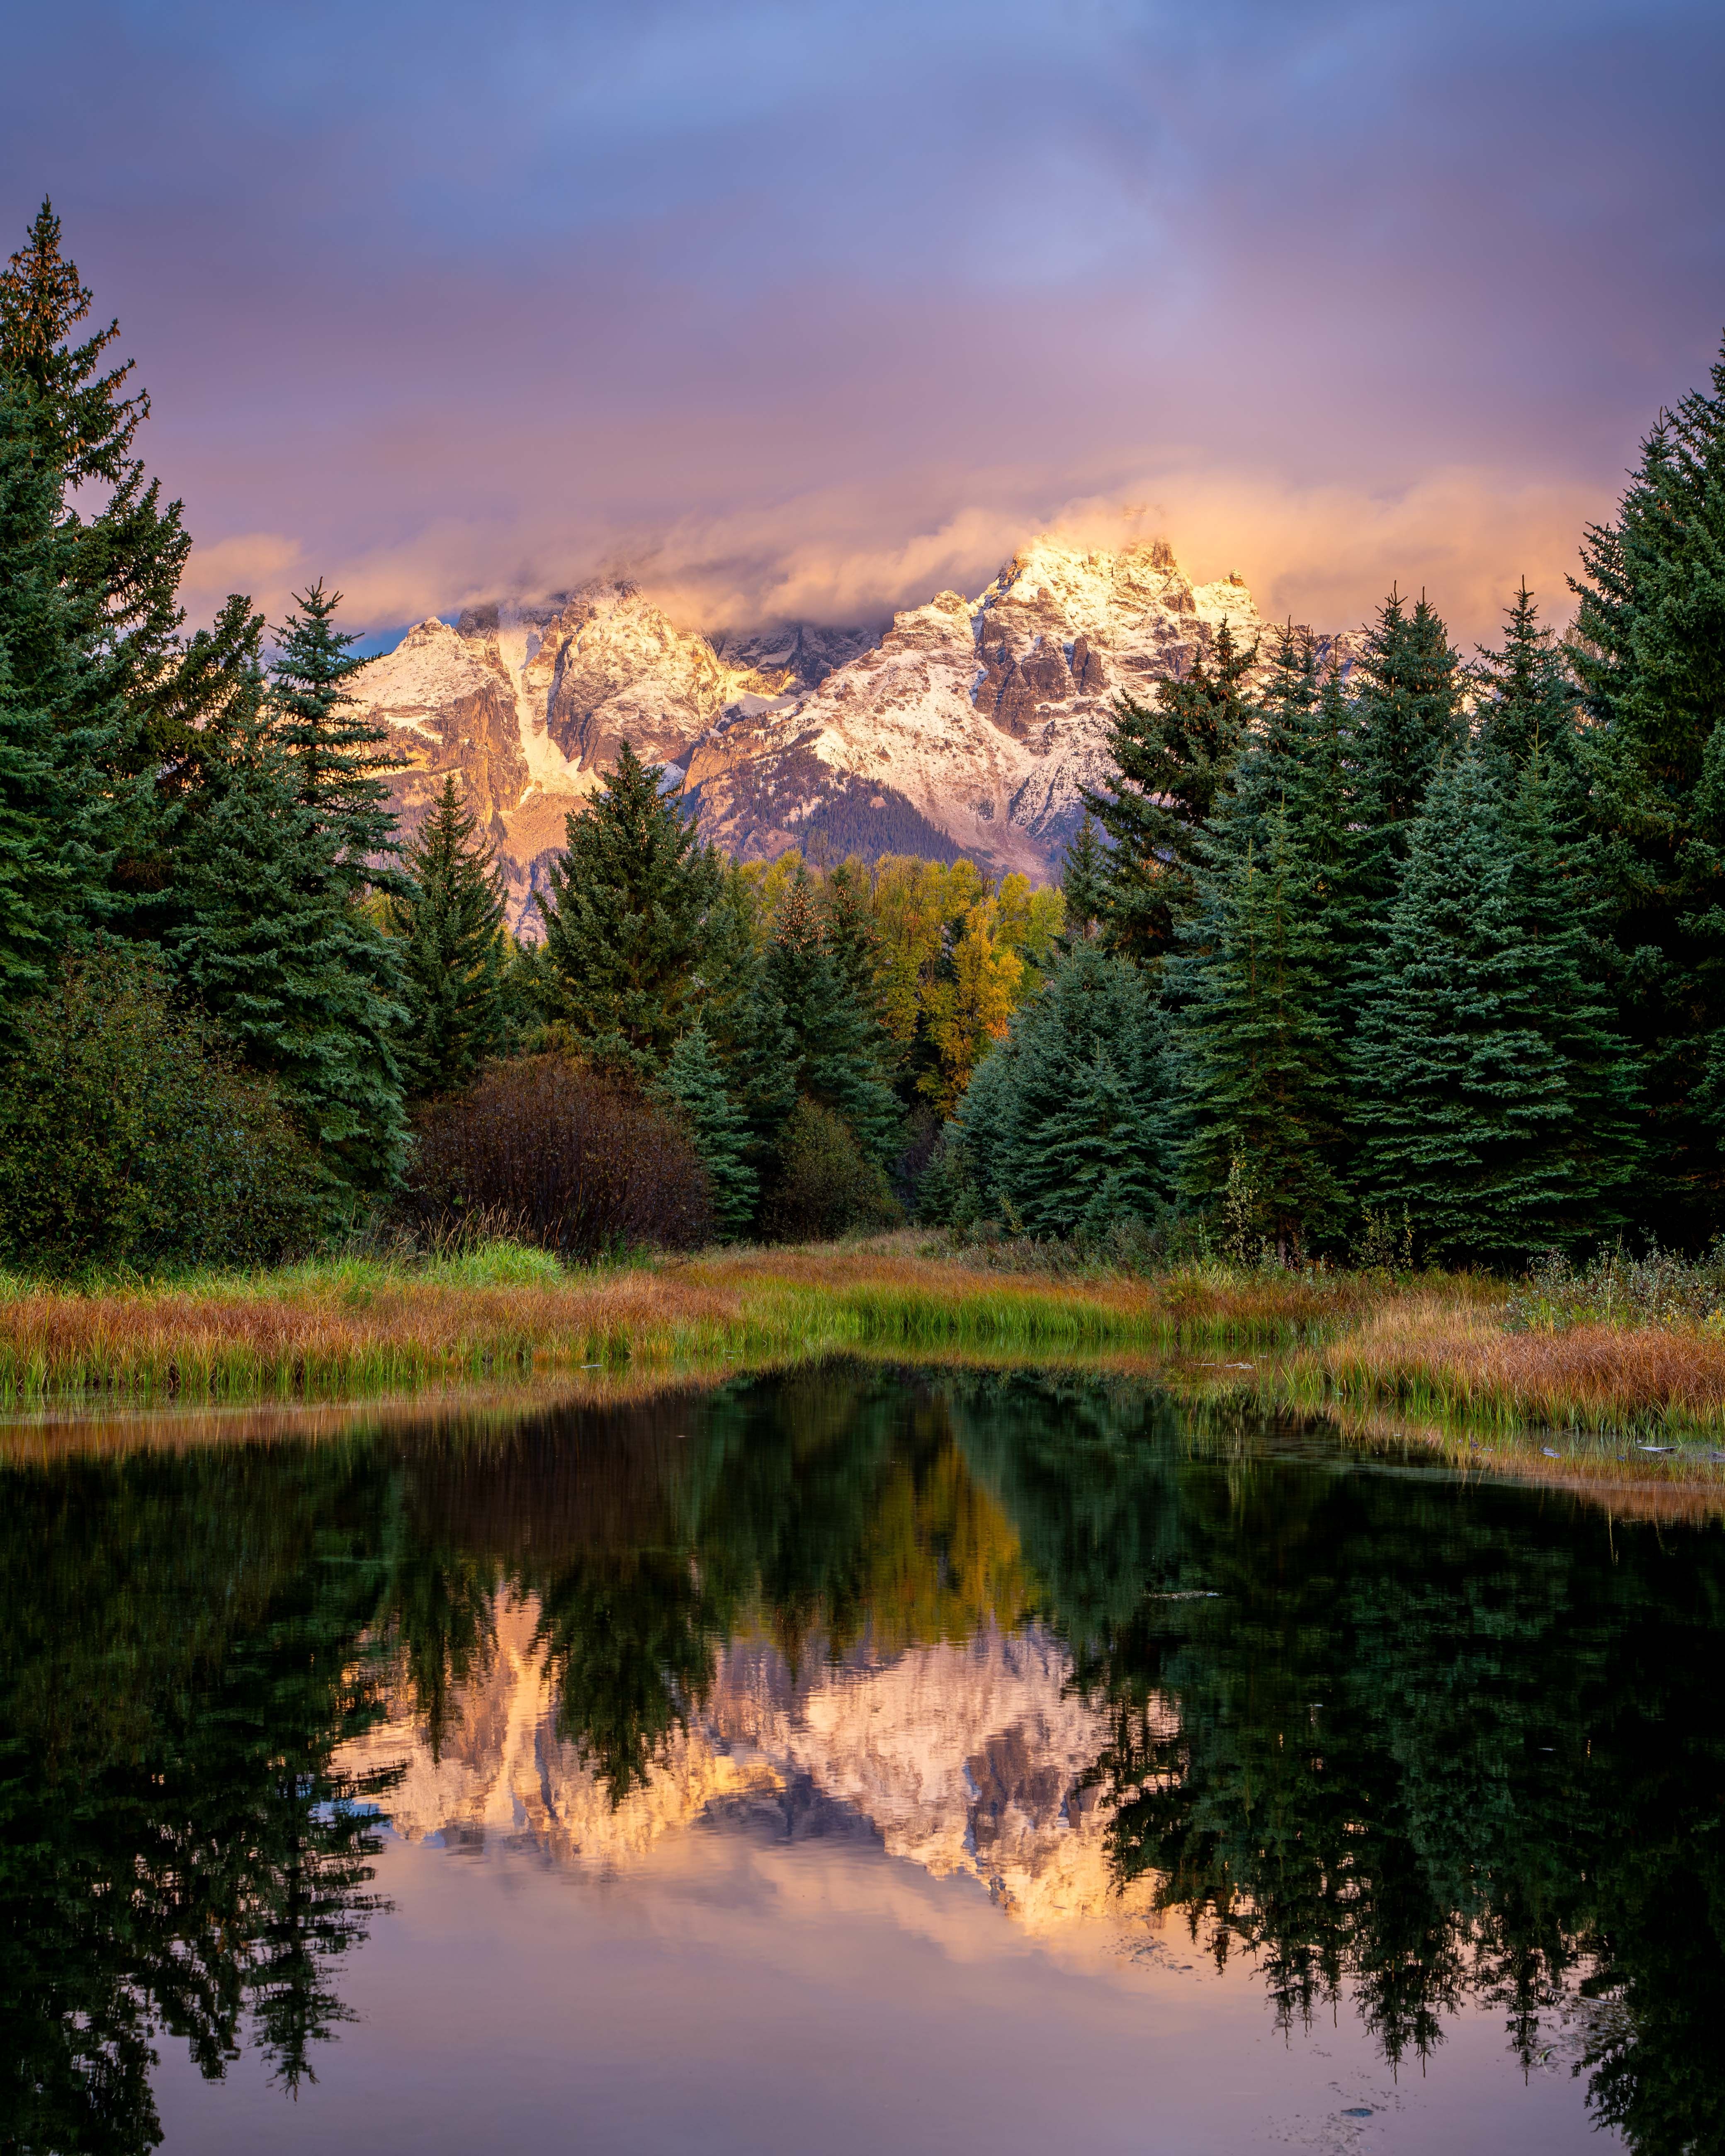
Schwabacher Landing Sunrise
Camera Settings:
Focal Length: 55mm
Shutter Speed: 1/15
Aperture: f/11
ISO: 500
Shot Location: Schwabacher Landing, Grand Teton National Park
This image was captured at one of my favorite photography locations in Grand Teton National Park: Schwabacher Landing. This iconic spot is the perfect place to capture sunrise photos of the Tetons. And if there isn’t wind you can get pristine and crystal-clear reflections on a pond. I got up super early to beat the crowds and started driving into the park. I parked my car, walked a short distance to the location, and knew exactly where to set up my tripod due to the scouting I had done the day before. After a while, quite a few other photographers had arrived, but I had secured my place and therefore my composition. This is yet another reason to arrive at your shot locations early.
For this image, I opted for a focal length of 55mm Because I wanted to zoom in a bit and really focus on the mountains in the background. I didn’t want a ton of foreground elements to distract the viewer from the subject. Because I was using a tripod and there wasn’t any wind moving the foliage and water around, I chose a shutter speed of 1/15th of a second. I opted for an aperture of f/11 to keep the entire scene in focus and sharp and ended up using an ISO of 500. Overall, I got pretty lucky with conditions and the colors on the snow-capped mountains and clouds. I’m really happy with how this one turned out.

Northern Pygmy Owl
Camera Settings:
Focal Length: 840mm (600mm + 1.4x TC)
Shutter Speed: 1/2000
Aperture: f/9
ISO: 2500
Shot Location: Yellowstone National Park
This image was captured just a few weeks ago near the Northeast Entrance of Yellowstone National Park. While I was driving back and forth searching for wildlife I happened to spot this tiny little Northern Pygmy Owl perched on the branch of a dead tree. I pulled over just down the road and started walking back to this location. I love owls and had been wanting to photograph one for quite a while, so I was absolutely elated when I saw this guy. I had to remind myself to calm down, take a few deep breaths, and relax before I started shooting. The number of times I’ve gotten overly excited about wildlife and rushed into shooting only to make a big mistake is honestly embarrassing.
So, after taking a breath, and finding a nice composition that allowed the owl to pop, I started figuring everything out. Luckily this owl was perched on a bare branch and the background was very far off in the distance. I knew that even with a narrower aperture I could get some nice bokeh and background blur. Because these owls are quite small, and this one was maybe 50 yards away, I opted to use my 60-600mm lens with a 1.4x teleconverter giving me a focal length of 840mm. I don’t use my teleconverter often, but this was definitely a situation where I’m glad I did. The extra reach was worth the minor drop in sharpness and image quality. Due to my high focal length and the fact that the owl’s feathers were being blown in the wind, I opted for a shutter speed of 1/2000th of a second. The widest aperture I could achieve with my lens and the teleconverter was f/9, but this wasn’t an issue because the background was so far away. I selected an ISO of 2500 to get my exposure just right and managed to capture some nice images.

Bryce Canyon Sunrise
Camera Settings:
Focal Length: 24mm
Shutter Speed: 1/5
Aperture: f/22
ISO: 100
Shot Location: Bryce Canyon National Park
This image was captured during a sunrise shoot in Bryce Canyon National Park while guiding our ‘Canyons of Utah: Zion and Bryce’ workshop. Bryce Canyon is an incredible location for sunrise photography as all of the main amphitheaters and landscapes face east toward the rising sun. This trip took place in the early spring so, due to the relatively high elevations in the park, there was still quite a bit of snow on the ground and temperatures were quite cold.
Upon arriving at our shot location, I started to find a composition I liked and began to set up my tripod and camera. I really liked the perspective from this vantage point and ended up choosing a focal length of 24mm to achieve this composition. The main feature I wanted to include in this image was a Sunstar or Starburst right as the rising sun emerged over the horizon. To achieve this effect, you need to use a very narrow aperture. I opted for an aperture of f/22 (the smallest my camera could go) and began to select my other settings. I chose an ISO of 100 because I was using a tripod and could shoot at slower shutter speeds. As soon as the sun hit the horizon, I quickly figured out which shutter speed looked the best and ended up shooting this at 1/5th of a second. Timing is crucial when it comes to capturing Sunstars and I’m really happy with how this image turned out.

Grand Prismatic Boardwalk
Camera Settings:
Focal Length: 179mm
Shutter Speed: 1/800
Aperture: f/11
ISO: 320
Shot Location: Yellowstone National Park
For the 10th and final image in today’s series, I decided to choose this shot of the iconic Grand Prismatic Spring in Yellowstone National Park. This is one of the most recognizable and famous landmarks in the United States, and perhaps even the world. Because of this, there are countless images out there portraying this landscape. As usual, I never like to simply recreate images that already exist, and I really try to make an effort to capture something unique. Especially with subjects as popular as this one. We hiked up to the scenic overlook to get a nice vantage point and started capturing images while busting around in the massive crowds. This is a tricky place to shoot as there are always a lot of people and it can be hard to maneuver through the crowds and find nice compositions.
After capturing a ton of mediocre shots that I wasn’t crazy about, I found this composition portraying both the spring and landscape as well as a thin strip of the boardwalk with some people on it. I usually try to hide any elements of human development in my images but in this case, I think the boardwalk and the people really add to this image. They provide a great sense of scale and almost frame the image.
For this shot, I used a telephoto lens to zoom in from a distance and settled on a focal length of 179mm. I opted for an aperture of f/11 to keep everything in focus and to achieve a tack-sharp image. For shutter speed, I chose 1/800th of a second to freeze the motion of the people walking across the boardwalk and ended up at an ISO of 320. This is one of the few landscape shots I have with people in it, and I really like the way it turned out.
Conclusion
Alright, if you’ve made it to this point then thank you for sticking it out. I know this has been a long article, but I sincerely hope it has provided you with some valuable insights and information. As I mentioned in the beginning these are simply settings that I chose given the specific and ever-changing scene in front of me. Ultimately you will have to choose the “correct” settings for yourself depending on the gear you’re using and the situation you find yourself in. I hope this article has been helpful and informative and, if anything, that it might give some of you some ideas of how to make your own decisions.
I’ll see you on the next one and happy shooting!

We offer world-class travel photography
experiences around the world.
Each tour is bundled with lodging, meals, and transportation between workshops included, allowing you to focus on photography instead of the stress of traveling.
experiences around the world.
Each tour is bundled with lodging, meals, and transportation between workshops included, allowing you to focus on photography instead of the stress of traveling.
Get Our Trip Catalog
Receive a trip catalog that highlights all of our upcoming photo tours and workshops.Schedule a Trip Consultation
Meet with a photo experience coordinator, and experience a personal touch to your booking experience.Landscape Guide
Receive a FREE Landscape Cheat Sheet Written By a Pro Photographer.Webinars
Our regularly hosted webinars provide photography instruction from our own guides on a wide range of topics.Education Portal
Explore our library of articles that cover everything from common questions, to in-depth guides on how to achieve that perfect shot.
Backcountry Journeys
Connecting Passionate People To
Exceptional Experiences.
Exceptional Experiences.
Business Hours:
Mon-Fri, 8AM-4PM MT
928-478-1521
adventure@backcountryjourneys.com
Mon-Fri, 8AM-4PM MT
928-478-1521
adventure@backcountryjourneys.com
arrow_drop_down_circle
Divider Text
All Images & Content Are Property Of Backcountry Journeys Photography Tours, Workshops & Safaris LLC - Copyright 2026
About Us
Receive a Digital Trip Catalog
Find an upcoming photography tour with our interactive catalog.