Mon - Fri: 8 am - 4 pm MT

About Backcountry Journeys
Why Choose Backcountry Journeys
If you're considering a photography trip, hear why Backcountry Journeys delivers the best experience in the industry.Frequently Asked Questions
If you're new to photography trips, or new to BCJ, you can find our common travel questions here.Fitness Levels
Our trips vary on physical intensity, and by reviewing our fitness levels, you can find out which trips may be more challenging, or aligned more closely with your comfort level.Meet The Crew
We've built an amazing team of experienced guides, and dedicated office staff that elevate your travel experience. Get to know their backgrounds, and hear their stories.Loyalty Program
We reward our frequent photo adventurers with exclusive discounts on amazing photography trips.Contact Us
If you need to get in touch with our office staff, or have additional business inquiries, you can find our information here.Refer a Friend
Know someone perfect for one of our tours? Recommend them through this quick form.Stay Up To Date On All Things
Backcountry Journeys
Backcountry Journeys
Our Photography Community
Our Webinars
Our regularly hosted webinars provide photography instruction from our own guides on a wide range of topics.Our Education Portal
Explore our library of articles that cover everything from common questions, to in-depth guides on how to achieve that perfect shot.Community Testimonials
We're proud to foster an amazing group of photo travelers, and here you can find their stories from their past adventures.Resources For Photographers
About Our Company
Resources For Photographers
About Our Company
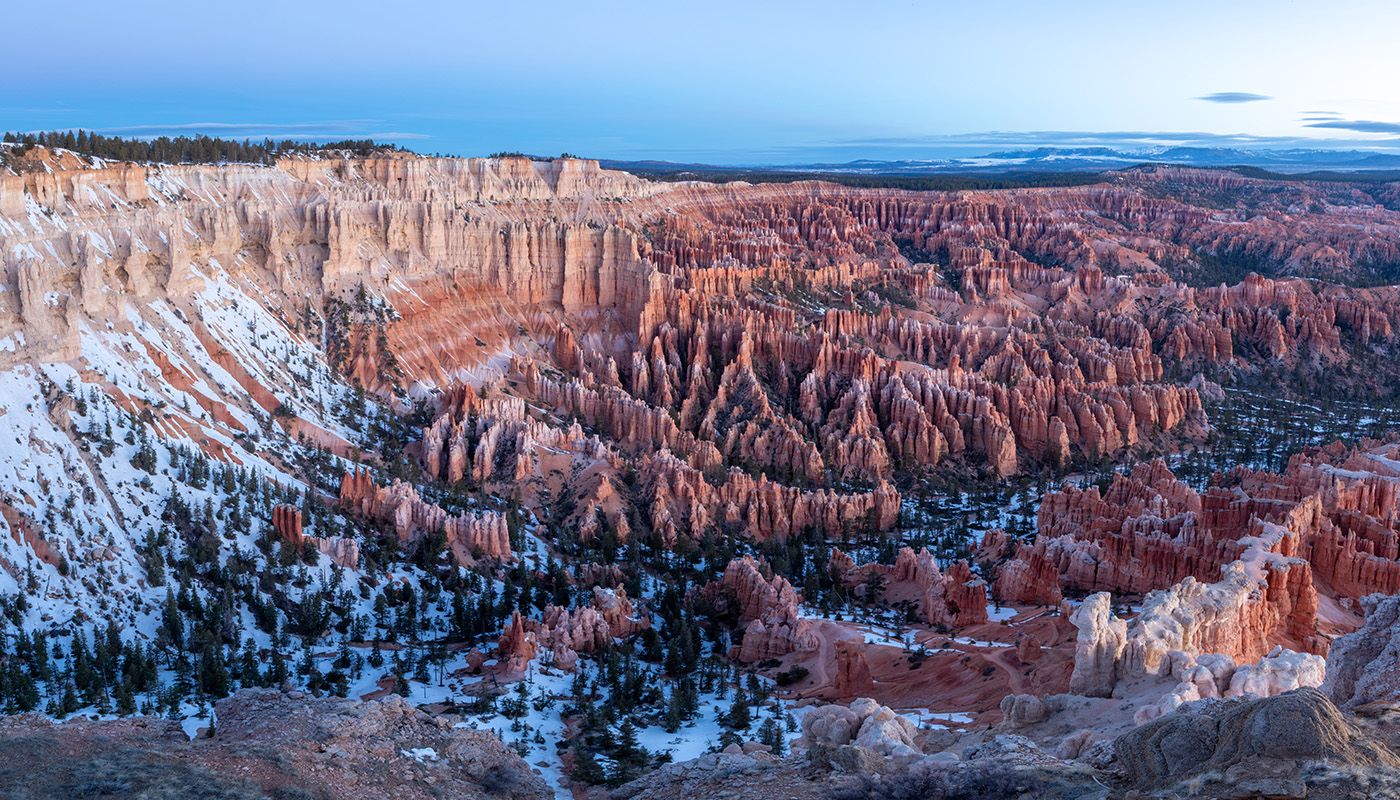
How to Make Stunning Panoramic Landscape Images
Published July 21, 2023
When it comes to capturing a wide-open scene in all its detail, one of the best and most popular approaches is to create a panorama. A panoramic photo captures a wide, sweeping view that extends far beyond the typical aspect ratio or field of view in a standard photograph. These breathtaking images can showcase expansive landscapes, city skylines, or really any scene that demands a wider perspective.
But how can you create a panorama with your camera and computer? What are the necessary steps involved? In this in-depth guide, we will explore the process of creating stunning panoramic landscape photos by combining multiple images together into one cohesive composition. From capturing the photographs on your camera to stitching them together with software on your computer we’ll cover all the basics and show you how to make stunning panoramic landscape images.
It's also worth noting that BCJ guide Russell Graves put together an excellent video on creating panoramic images that covers all this information. Definitely give that a watch! Alright, without further ado, Let’s get into it!
What is a Panoramic Image?
Let’s start with the basics. What exactly is a Panorama? You can easily make one on any smartphone by panning or rotating it but what is actually happening behind the scenes?
A panoramic image is essentially an elongated image, made by combining multiple photographs together, that covers a wider field of view than a traditional photo. By keeping your camera level and capturing multiple photos that slightly overlap while rotating it you can then combine those images into one super wide, high-resolution composition. This is exactly what is happening when you capture a panorama on your smartphone but in that case, your phone seamlessly combines the images together automatically. With DSLRs and mirrorless cameras, you’ll have to do this part yourself after taking the photos.
I often shoot panoramas when I want to capture a very high-resolution image, expand my field of view, or create an image with a very elongated aspect ratio.
Panoramas allow photographers to capture and convey the grandeur of vast landscapes, seascapes, or urban cityscapes in a single frame. The allure of panoramic photography lies in its ability to encapsulate the feeling of being immersed in the scene, drawing viewers into a breathtaking world they can explore without limitations. Panoramas are a beautiful form of photography that I believe every photographer should at least try out.
Now that we’ve established what a panoramic image is, let’s discuss the steps you’ll need to take to create one
Capturing the Photographs
In order to create a panoramic image, the first step is, of course, capturing a series of images that you will later combine. This may sound straightforward, and for the most part, it is, but there are a few key factors to take into consideration.
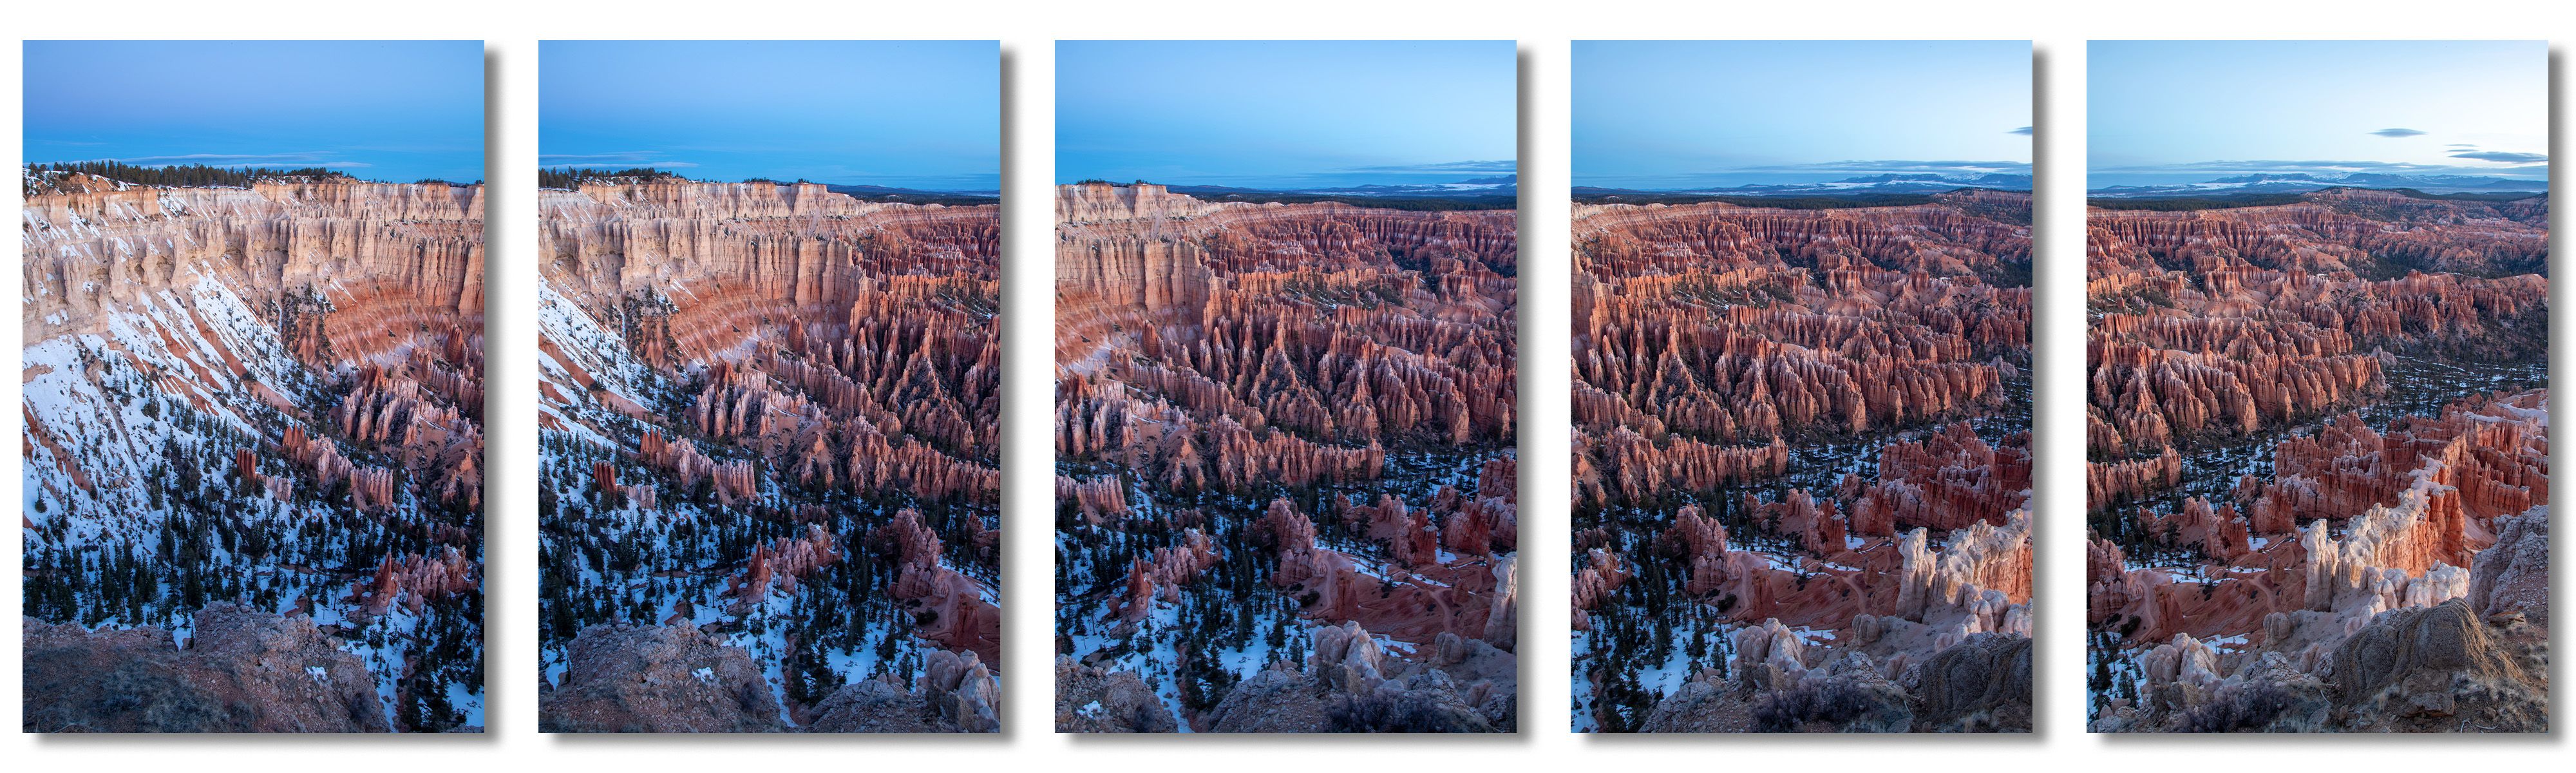
To start out you’ll want to capture a series of images that encompass the scene you’re photographing. Let’s say you want to create an image of a mountain sunset that stretches from one end of the sky to the other. This is the perfect opportunity for a panorama as you’re trying to capture a very wide field of view. To achieve this, you would aim your camera at one end of the scene and capture the first image in the sequence. You would then slowly rotate or pan your camera across the entire scene while capturing images throughout.
These images will need to overlap, ideally by about 20-30% of the frame, so that the software will know how to stitch them together. Your camera will also have to be in manual mode so that the settings don’t change as your panning across your scene. If the exposure changes between images they won’t look good when you go to stitch them together. Another very useful tool is a tripod, which will allow you to keep your camera level throughout the series of images and will make the process of combining them much easier and cleaner. You can shoot panoramas handheld, but you might have to distort or crop the final image to end up with clean edges.
And that’s really all there is to it. Of course, it’s always a good idea to review your images once you’ve captured them to make sure everything looks good and that there are no gaps. Once you’ve done this, you’re ready to take them over to the computer and stitch them together.
In order to create a panoramic image, the first step is, of course, capturing a series of images that you will later combine. This may sound straightforward, and for the most part, it is, but there are a few key factors to take into consideration.
To start out you’ll want to capture a series of images that encompass the scene you’re photographing. Let’s say you want to create an image of a mountain sunset that stretches from one end of the sky to the other. This is the perfect opportunity for a panorama as you’re trying to capture a very wide field of view. To achieve this, you would aim your camera at one end of the scene and capture the first image in the sequence. You would then slowly rotate or pan your camera across the entire scene while capturing images throughout.
These images will need to overlap, ideally by about 20-30% of the frame, so that the software will know how to stitch them together. Your camera will also have to be in manual mode so that the settings don’t change as your panning across your scene. If the exposure changes between images they won’t look good when you go to stitch them together. Another very useful tool is a tripod, which will allow you to keep your camera level throughout the series of images and will make the process of combining them much easier and cleaner. You can shoot panoramas handheld, but you might have to distort or crop the final image to end up with clean edges.
And that’s really all there is to it. Of course, it’s always a good idea to review your images once you’ve captured them to make sure everything looks good and that there are no gaps. Once you’ve done this, you’re ready to take them over to the computer and stitch them together.

Stitching Your Images Together
So, now that you have a series of stunning images how exactly do you combine them? As it turns out there are many options but for today’s article, we’re going to focus on one of the easiest, most popular, and most widely used: Adobe Lightroom. This photo editing software seems to do just about everything you need it to and it’s a great tool for creating panoramic images as well.
So, now that you have a series of stunning images how exactly do you combine them? As it turns out there are many options but for today’s article, we’re going to focus on one of the easiest, most popular, and most widely used: Adobe Lightroom. This photo editing software seems to do just about everything you need it to and it’s a great tool for creating panoramic images as well.
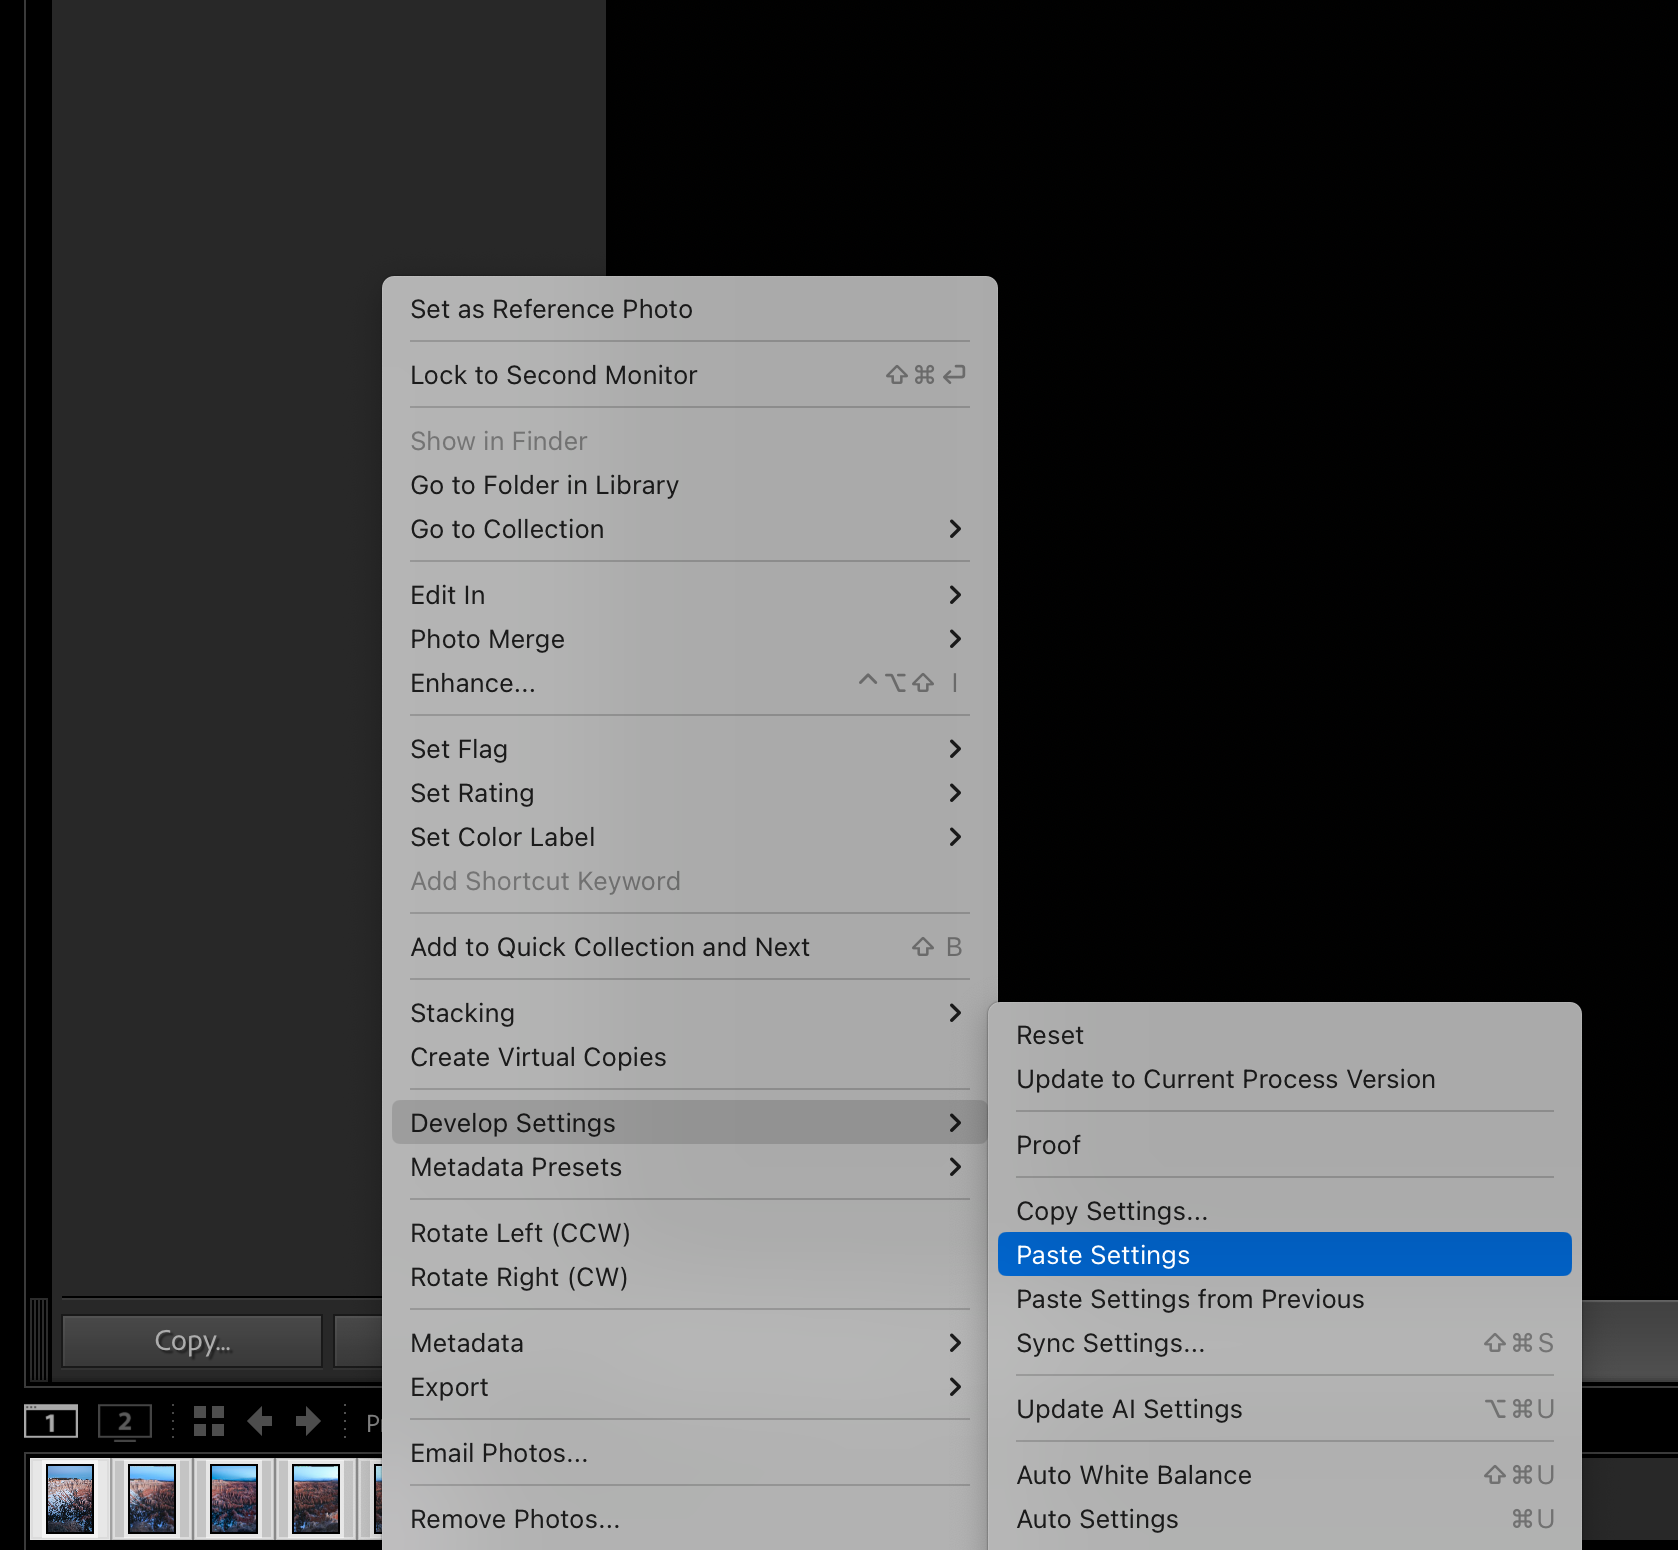
To start you’ll import your selected images into Lightroom. Once imported, you should then choose one image in the sequence and edit it to your liking. Once you have edited an image select the “Copy” button in the bottom lefthand corner of your Lightroom window and copy all the preselected settings. You can then paste these settings to the other images in the sequence. You can do this by selecting all the images in the sequence and right-clicking on them. Then click “Develop Settings” and “Paste Settings” to apply the edit to all the images.
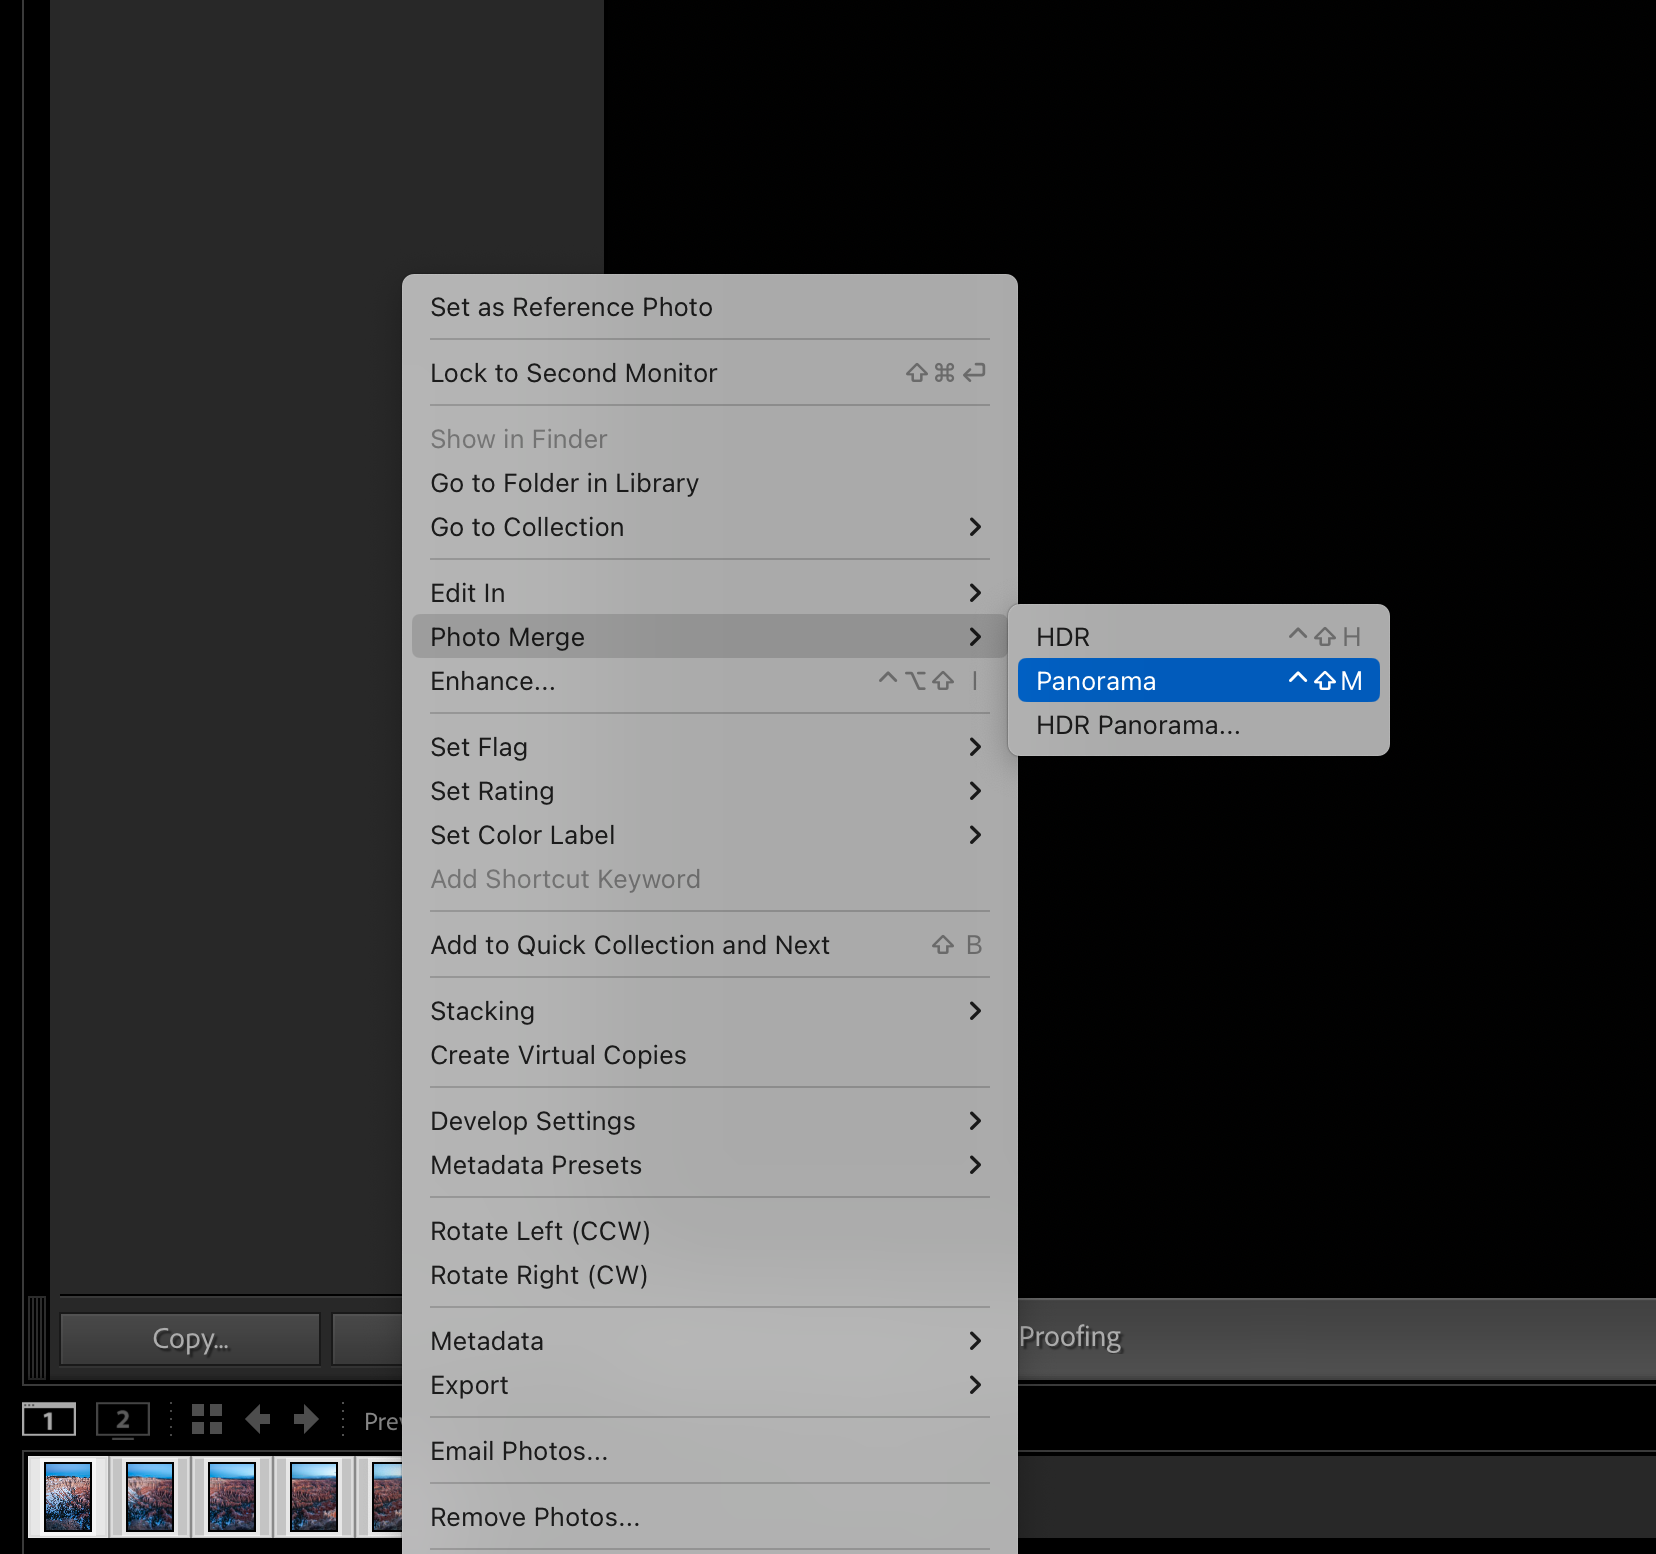
Now it’s time for the magic. Select all the images in your sequence and again right-click on them. You’ll then click “Photomerge” and “Panorama…” which will trigger a pop-up preview window to appear. This window will have several options to choose from. The first three buttons titled “Spherical, Cylindrical, and Perspective” determine how the software stitches the images together and how they are portrayed. You can click on each of these to see how their respective projections differ from one another.

The next option is a slider titled “Boundary Warp:” which will determine how much Lightroom will warp or distort the edges of your image to create a clean and straight border. If you slide the slider all the way to 100 the image will now fully fill the area and have straight edges and 90-degree corners, but you might notice some severe distortions in the image. You’ll have to decide what looks best as this is a personal preference. I like to distort my image as little as possible and ideally can crop the panorama to get nice clean edges. This isn’t always possible so you’ll have to decide what’s best for the given scenario.
Below the slider is a button titled “Fill Edges” which will attempt to fill the empty/white space around the edges by drawing information from the image. I almost never use this as the results usually don’t look great, especially if you’re attempting to fill a large area. But feel free to experiment with it yourself. If you’re just filling a tiny sliver on the edge, it may work great.
Below this are the “Auto Crop” and “Auto Settings” buttons. The crop option will automatically crop your image to get rid of empty space around the edges and the settings option will automatically change the settings of your image based on what Lightroom thinks looks the best. I rarely click either of these but they can be handy if you’re trying to save some time. And the last button titled “Create Stack” will simply stack both the new panoramic image and the original images together.
Once the preview looks good and you have the desired settings you can click the merge button at the bottom right-hand corner of the pop-up window and you now have a stitched together panoramic image. It’s worth noting that the new Panoramic image is now a DNG file instead of a RAW or JPEG file. This really isn’t a concern as this file type retains all the data and still allows you to edit as you normally would.
And that’s it! You now have a panoramic image that is ready to go. I hope this article has been informative and has inspired some of you to get out there and create some panoramas of your own. I capture and create panoramas all the time and it’s a great skill to have in your arsenal.
And definitely watch this short video with Russell Graves covering this exact topic if you haven't already.
Until next time!
And definitely watch this short video with Russell Graves covering this exact topic if you haven't already.
Until next time!

We offer world-class travel photography
experiences around the world.
Each tour is bundled with lodging, meals, and transportation between workshops included, allowing you to focus on photography instead of the stress of traveling.
experiences around the world.
Each tour is bundled with lodging, meals, and transportation between workshops included, allowing you to focus on photography instead of the stress of traveling.
Get Our Trip Catalog
Receive a trip catalog that highlights all of our upcoming photo tours and workshops.Schedule a Trip Consultation
Meet with a photo experience coordinator, and experience a personal touch to your booking experience.Landscape Guide
Receive a FREE Landscape Cheat Sheet Written By a Pro Photographer.Webinars
Our regularly hosted webinars provide photography instruction from our own guides on a wide range of topics.Education Portal
Explore our library of articles that cover everything from common questions, to in-depth guides on how to achieve that perfect shot.
Backcountry Journeys
Connecting Passionate People To
Exceptional Experiences.
Exceptional Experiences.
Business Hours:
Mon-Fri, 8AM-4PM MT
928-478-1521
adventure@backcountryjourneys.com
Mon-Fri, 8AM-4PM MT
928-478-1521
adventure@backcountryjourneys.com
arrow_drop_down_circle
Divider Text
All Images & Content Are Property Of Backcountry Journeys Photography Tours, Workshops & Safaris LLC - Copyright 2026
About Us
Receive a Digital Trip Catalog
Find an upcoming photography tour with our interactive catalog.