2024 Travelers' Choice

About Backcountry Journeys
Why Choose Backcountry Journeys
If you're considering a photography tour, hear why Backcountry Journeys delivers the best experience in the industry.Frequently Asked Questions
If you're new to photography tours, or new to BCJ, you can find our common travel questions here.Fitness Levels
Our trips vary on physical intensity, and by reviewing our fitness levels, you can find out which trips may be more challenging, or aligned more closely with your comfort level.Meet The Crew
We've built an amazing team of experienced guides, and dedicated office staff that elevate your travel experience. Get to know their backgrounds, and hear their stories.Gift Certificates
Give the gift of photo adventure! We offer gift certificates that can be applied to any of our upcoming tours.Loyalty Program
We reward our frequent photo adventurers with exclusive discounts on amazing photography tours.Contact Us
If you need to get in touch with our office staff, or have additional business inquiries, you can find our information here.Stay Up To Date On All Things
Backcountry Journeys
Backcountry Journeys
Our Photography Community
Our Webinars
Our regularly hosted webinars provide photography instruction from our own guides on a wide range of topics.Our Education Portal
Explore our library of articles that cover everything from common questions, to in-depth guides on how to achieve that perfect shot.Community Testimonials
We're proud to foster an amazing group of photo travelers, and here you can find their stories from their past adventures.Resources For Photographers
About Our Company
Resources For Photographers
About Our Company
Avoid These ‘Easy-to-Avoid’ Beginner Mistakes
Published May 4, 2020
We were all beginners at some point. Many of us still are. The journey into nature photography is a learning process in itself, as well as a creative process.
I have worked with many photographers of all skill types during my time leading Backcountry Journeys Photography Tours & Workshops, and I tend to see beginner photographers consistently make the same mistakes. That is not to say that more experienced photographers do not make mistakes, they do, as do I. I just happen to see novices do things in the field that are easily correctable (or learnable) and I wanted to share those things in this piece.
I have compiled a list of ‘mistakes’ I see in the field with the hope that it might act as a shortcut for some of you out there. It is my belief that some of the best learning moments and lessons in photography come as the result of a mistake. I think you learn best from a mistake in the field, and you are able to learn and react differently the next time you are out on a shoot. I fixed a lot of my focusing and exposure issues pretty quickly after coming back from shoots to see that my files were unsalvageable or unusable. But, would I have liked to realize those things beforehand so I didn’t blow my chance at what could have been an amazing shot, absolutely!
Thus, this article is aimed at you photographers out there who might have just picked up a camera or are still battling with the exposure triangle, things like that. I hope it also spurs further research into the topics listed because most are essential to progressing as a photographer.
Let’s get into the fun, shall we?
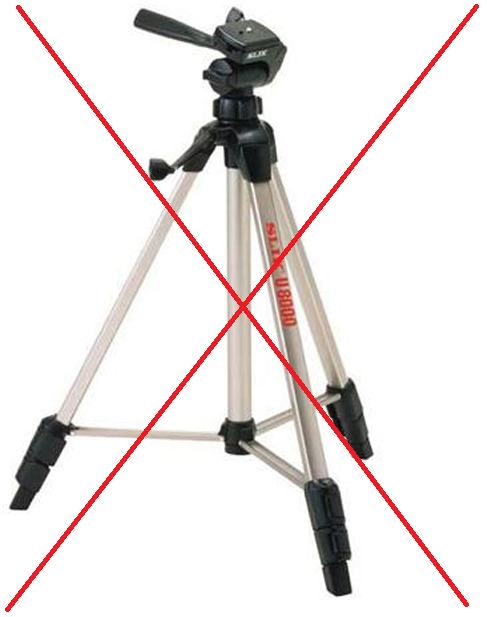
Using a Cheap Tripod or No Tripod at All
Most beginners hate using a tripod and do not see a tripod as a worthwhile investment. I don’t like using a tripod either, but it is undoubtedly an absolutely necessary accessory, and one of the most important in your gear arsenal. I went through the tripod growing pains myself, I wasted a bunch of money on budget tripods and lower-tiered tripods. Those tripods either eventually broke or were such a hassle to setup that I gave up on them. If you have read previous articles, I swear by Really Right Stuff and that is all I use. The reason? I see way too many beginners trying to use a flimsy cheapo tripod. And the result? It takes forever to set up for a shot, arrange a composition, and stabilize the camera. Using those tripods can be frustrating and can deter future tripod use, and as I said, if you want the highest quality landscape shots (think sunrise/sunset when light levels are low and shutter speeds are slow), you need a tripod. This is less of an issue for wildlife photography where we spend a lot of time shooting handheld, but if you are serious about landscape photography…buy a decent tripod. RRS is high end, but you can get other reliable options for a lower cost too.
Focusing Too Much on Gear
Everybody has some form of GAS (Gear Acquisition Syndrome). As lovers of photography, we all love new gear and newly released items. The truth, though, is that you don’t need a ton of gear to create compelling shots and to be a good photographer. I see a lot of people that bring a lot of gear on trips, and some bring the newest and best. That is all fine and good, but know that you do not need to have ALL, or the BEST, camera equipment to make fantastic shots. Composition, understanding your camera settings, and improving your post-processing all will do way more for you than new camera gear. I mainly shoot landscapes and get by with one camera body, two lenses, and one tripod. Sometimes less is more.
Crooked Horizon Lines
I see a lot of crooked and uneven horizon lines during workshops. This one is easily fixable and just requires a little focus on the photographer’s end. A crooked horizon line makes it difficult to set up a composition and its one of the first things you should correct before taking a photo. Most DSLRs and Mirrorless cameras these days have a built-in virtual horizon feature. I would encourage you to enable that feature on your own camera. It helps you level your camera and straighten your horizon from the get-go. That means not having to crop during post-processing and maintaining the highest resolution possible for your image.
Too high of an ISO
A high ISO can ruin a shot. Cameras continue to get better and better at controlling noise, but the comparison of a scene shot at ISO 64 versus ISO 3200 is still night and day. Essentially, ISO is how sensitive your cameras’ sensor is to light. The higher the increase is ISO, the more light your sensor will pick up. The trade-off is, the higher the ISO, the more noise that is introduced into your image. There are many times while shooting wildlife where you need to increase your ISO so you can also increase your shutter speed. But, I see a LOT of people shoot a static landscape with their camera mounted on a tripod, with their ISO way above the base value of their camera. If you are on a tripod and shooting a static scene, there is no reason your ISO should not be at its lowest possible value. ISO is generally changed to accommodate faster shutter speeds. When your camera is mounted on a tripod and there is nothing moving in the scene, there is no reason to bump up your ISO. There are exclusions of course – but a good rule of thumb is to be at your lowest ISO value when on a tripod.
Not Shooting in RAW
Many photographers who are just starting out do not know much about the different file types that cameras are able to record, I’m talking JPG versus RAW. Many do not see the benefit of shooting in RAW and thus are hesitant to try it. A RAW file records the maximum value of data, while a JPG is compressed and lacking data when compared to the original RAW file. A RAW file contains more data pertaining to dynamic range and color among other things, and it can be pushed much further during post-processing than a JPG. When ‘JPG’ is selected as the file type, the camera will process the image within the camera. I like to have total control over my images and I shoot RAW. I would recommend all photographers out there to shoot in RAW to have that same control.
Not Double Checking Focus
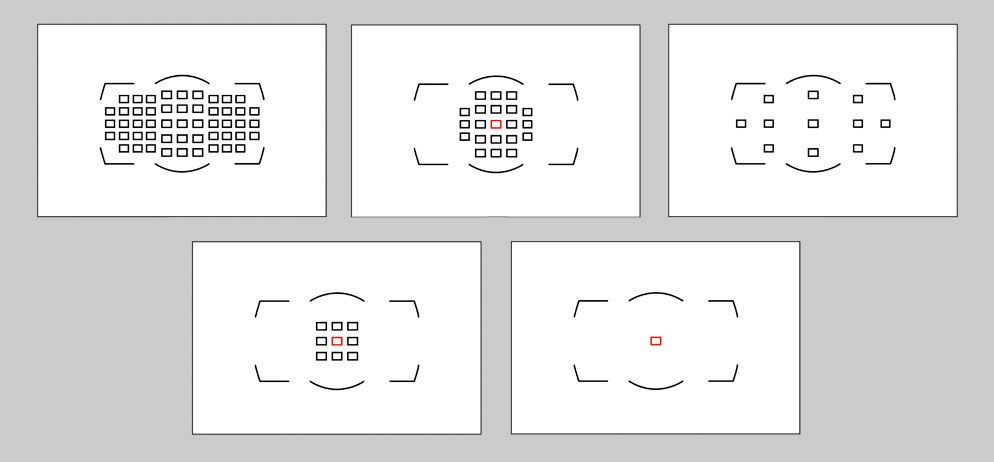
Acquiring focus is another issue that I see come up. A situation I see a lot is a photographer firing off countless shots, but never checking to see if the focus is dialed in. We might go back to process images and when I bring them up on the big screen, it is easy to see that a majority of the images are out of focus. It might be due to user or camera error, but it is easily correctable. I recommend reviewing your images after every few shots or so. Go into playback and zoom in on your images to see if they’re sharp, in-focus, etc. I also see many photographers shooting on focus modes that auto select focus points. I do not recommend that. When shooting landscapes, I exclusively use single-point selections and when shooting wildlife, I will use a cluster (usually 9) of focus points.
Acquiring focus is another issue that I see come up. A situation I see a lot is a photographer firing off countless shots, but never checking to see if the focus is dialed in. We might go back to process images and when I bring them up on the big screen, it is easy to see that a majority of the images are out of focus. It might be due to user or camera error, but it is easily correctable. I recommend reviewing your images after every few shots or so. Go into playback and zoom in on your images to see if they’re sharp, in-focus, etc. I also see many photographers shooting on focus modes that auto select focus points. I do not recommend that. When shooting landscapes, I exclusively use single-point selections and when shooting wildlife, I will use a cluster (usually 9) of focus points.
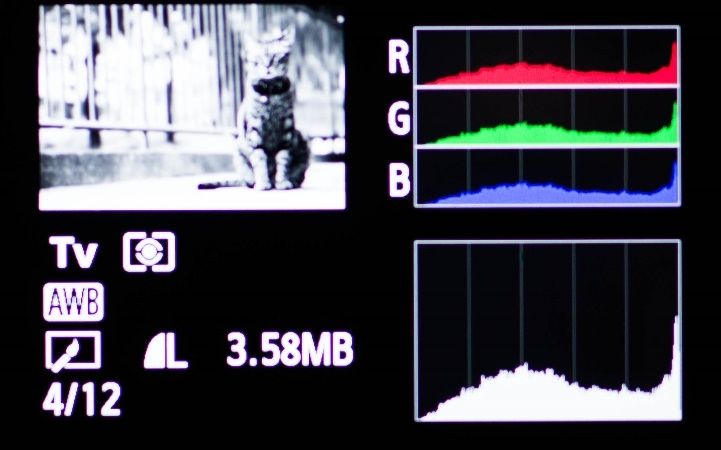
Blowing out the Highlights
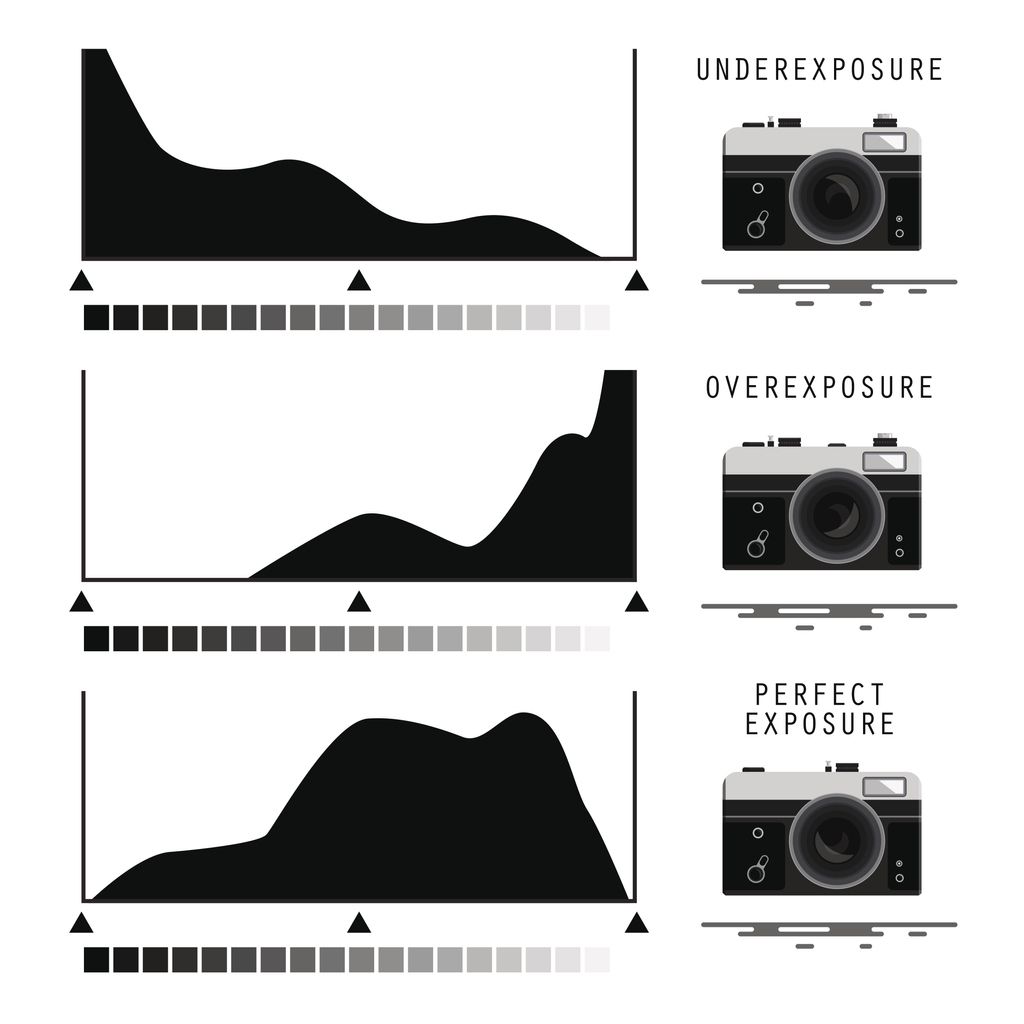
This could be the #1 mistake I see in the field. Blowing out your highlights simply means you have pixels in your image that are 100% white and have no other color data. When you blow out pixels in your image, you cannot recover any of the data from those areas and it can ruin an image. There tends to be a lot of dynamic range (lots of shadows and highlights) during sunrise/sunset scenes so blowing out your highlights could potentially ruin some really nice light. This can be tied back into not understanding how to analyze a histogram. I turn on two playback options to help prevent this – a highlight notification and a histogram. A histogram can be complicated at first, but it is actually quite simple. Think of it as a football goal post, you want all your data between the two ends. After I capture an image, I always check my histogram to make sure there is no ‘clipping’ or data piling off on either edge of the histogram. The highlight notification on my camera will also flash during playback for any pixels that are blown out, and that option is available on most cameras.
Not Thinking About Composition
Composition is difficult, yet it is everything when it comes to the quality and impact of a photograph. The more you shoot and the more you critically look at photos, the better you become at recognizing and setting up a composition in the field. However, I find that most starting out in photography do not think about their composition. Even if you are a beginner, you should be thinking about some basic things while taking a photo. What is the focal point? Does the eye go to the focal point? Is there a foreground element? Are there distractions in my frame? Are there leading lines or diagonals? Does the rule of thirds apply? If you just got a camera and don’t know where to start, I would recommend reading some basic articles on composition. It is the glue for our photos.
Not Asking for Help
I think this is a universal issue across a lot of different hobbies and professions. People are often scared to ask for help. You should ask questions, it is one of the best ways to digest new info and learn. If you are on a workshop and have a hard time understanding something with your camera or compositions, ask! If you are at home, post on forums, or do some Google’ing research. When I was starting out, I found a lot of useful questions and answers on photography forums. I like the forums on Reddit, DPReview, and Fred Miranda.
Being Intimidated by Camera Settings (Shooting in Automatic)
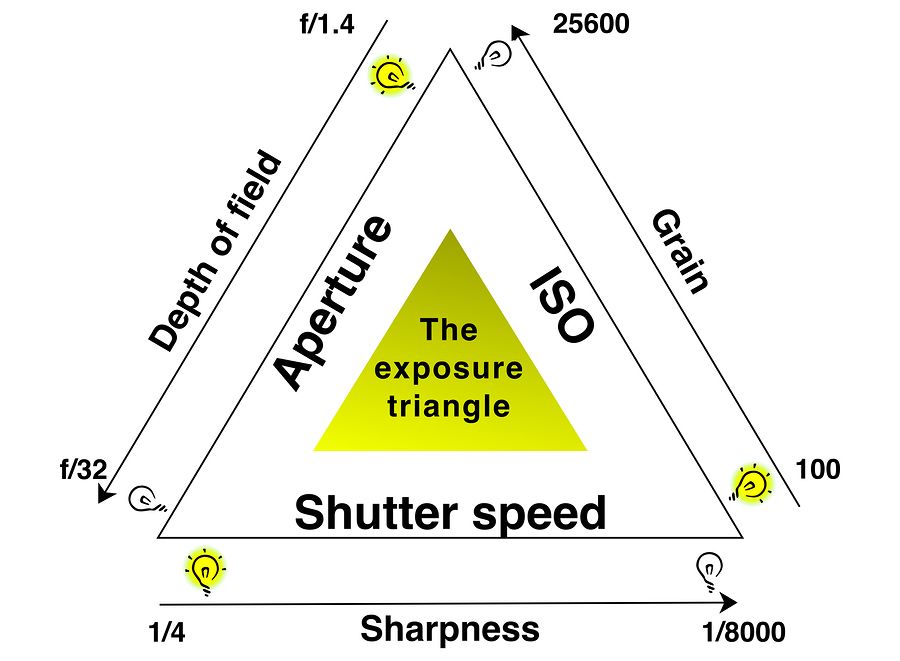
In my opinion, when you are starting out you should be determined to learn two things first, how the exposure triangle works and how to read a histogram. I see far too many photographers who are scared off by camera settings and often revert to shooting in Automatic or Program mode. But, the core of the issue is not understanding the exposure triangle – aperture, shutter speed, and ISO. It is crucial that every photographer understands the function of each of those, as well as the associated trade-offs. I feel like the graphic below helps to visualize how each exposure setting works.
In my opinion, when you are starting out you should be determined to learn two things first, how the exposure triangle works and how to read a histogram. I see far too many photographers who are scared off by camera settings and often revert to shooting in Automatic or Program mode. But, the core of the issue is not understanding the exposure triangle – aperture, shutter speed, and ISO. It is crucial that every photographer understands the function of each of those, as well as the associated trade-offs. I feel like the graphic below helps to visualize how each exposure setting works.
Not Using Playback Enough
This ties in with blowing out highlights and missing focus. I am constantly reviewing my images on the back of my cameras LCD via playback mode. I am looking at my settings, my composition, my histogram, and my focus. It is a good habit to get into and it is something I hardly ever see beginner photographers do. Usually, playback is just used for quick image review, but there is so much information there. I can see right away when my highlights are blown out, I can zoom in to 100% to see if my whole frame is sharp and in focus, I can see my settings and determine if I need to change anything…it is so useful. Bottom line – look into some playback display options you have and make it a habit to inspect your images.
Hand Holding With Too Slow of a Shutter Speed
To tie everything together, let’s look back at #1, first-time photographers do not like to use tripods, which leads to a lot of hand-holding situations. I handhold a lot, but I am very conscious of my shutter speed, ISO, and I constantly review images in playback to make sure they are sharp. I see novices handhold without realizing that their shutter speed is way too slow for their focal length. A good general rule of thumb is that your shutter speed should be double your focal length (1/2*X, where X is your focal length). So, if I am shooting a scene at 24mm, I’d like my shutter speed to be around 1/50th of a second. If I’m at 50mm, I’d like my shutter speed to be 1/100th. With image stabilization, I feel comfortable shooting at a shutter speed equal to my focal length. So, if I am shooting a scene at 24mm, I’d like my shutter speed to be around 1/25th of a second. If I’m at 50mm, I’d like my shutter speed to be 1/50th. Remember, if you are hand-holding…make sure to watch your shutter speed to ensure you get a tack sharp image.

We offer world-class travel photography
experiences around the world.
Each tour is bundled with lodging, meals, and transportation between workshops included, allowing you to focus on photography instead of the stress of traveling.
experiences around the world.
Each tour is bundled with lodging, meals, and transportation between workshops included, allowing you to focus on photography instead of the stress of traveling.
Get Our Trip Catalog
Receive a trip catalog that highlights all of our upcoming photo tours and workshops.Schedule a Trip Consultation
Meet with a photo experience coordinator, and experience a personal touch to your booking experience.Trip Calendar
View our trip calendar and filter upcoming departures by interest or seasonality.Webinars
Our regularly hosted webinars provide photography instruction from our own guides on a wide range of topics.Education Portal
Explore our library of articles that cover everything from common questions, to in-depth guides on how to achieve that perfect shot.BACKCOUNTRY JOURNEYS
"Backcountry Journeys offers guests the unique opportunity to explore our natural world from behind their own lens. We run a selection of hand-crafted Photo Tours, Workshops & Safaris connecting passionate people to exceptional experiences. Locations worldwide.
- Russ Nordstrand, Backcountry Journeys Founder & Director
- Russ Nordstrand, Backcountry Journeys Founder & Director
TRIP CATALOG
Download our Trip Catalog for detailed information on our many destinations for photography tours, workshops, and safaris.
All Images & Content are property of Backcountry Photography Tours, Workshops & Safaris LLCs - Copyright 2025
BACKCOUNTRY JOURNEYS
"Backcountry Journeys offers guests the unique opportunity to explore our natural world from behind their own lens. We run a selection of hand-crafted Photo Tours, Workshops & Safaris connecting passionate people to exceptional experiences. Locations worldwide.
All Images & Content are property of Backcountry Journeys Photography Tours, Workshops & Safaris LLC - Copyright 2025
TRIP CATALOG
Download our Trip Catalog for detailed information on our many destinations for photography tours, workshops, and safaris.