2024 Travelers' Choice

About Backcountry Journeys
Why Choose Backcountry Journeys
If you're considering a photography tour, hear why Backcountry Journeys delivers the best experience in the industry.Frequently Asked Questions
If you're new to photography tours, or new to BCJ, you can find our common travel questions here.Fitness Levels
Our trips vary on physical intensity, and by reviewing our fitness levels, you can find out which trips may be more challenging, or aligned more closely with your comfort level.Meet The Crew
We've built an amazing team of experienced guides, and dedicated office staff that elevate your travel experience. Get to know their backgrounds, and hear their stories.Gift Certificates
Give the gift of photo adventure! We offer gift certificates that can be applied to any of our upcoming tours.Loyalty Program
We reward our frequent photo adventurers with exclusive discounts on amazing photography tours.Contact Us
If you need to get in touch with our office staff, or have additional business inquiries, you can find our information here.Stay Up To Date On All Things
Backcountry Journeys
Backcountry Journeys
Our Photography Community
Our Webinars
Our regularly hosted webinars provide photography instruction from our own guides on a wide range of topics.Our Education Portal
Explore our library of articles that cover everything from common questions, to in-depth guides on how to achieve that perfect shot.Community Testimonials
We're proud to foster an amazing group of photo travelers, and here you can find their stories from their past adventures.Resources For Photographers
About Our Company
Resources For Photographers
About Our Company
Common Lightroom Mistakes and How to Avoid Them

Published January 27, 2022
For photographers of any skill level, programs like Lightroom or Adobe Camera Raw are critical tools for post-processing workflow. Not only is Lightroom a powerful photo editing program, but it is also a valuable organizational tool.
There is a lot of information to learn in Lightroom, and it takes practice to become efficient. While Lightroom can do a lot to improve the look of our photos, it can also do a lot to make our photos look worse. This post is not intended to be an exhaustive guide for learning to process in Lightroom, but rather to focus on common “Lightroom faux pas” and how we can avoid them.
There is a lot of information to learn in Lightroom, and it takes practice to become efficient. While Lightroom can do a lot to improve the look of our photos, it can also do a lot to make our photos look worse. This post is not intended to be an exhaustive guide for learning to process in Lightroom, but rather to focus on common “Lightroom faux pas” and how we can avoid them.
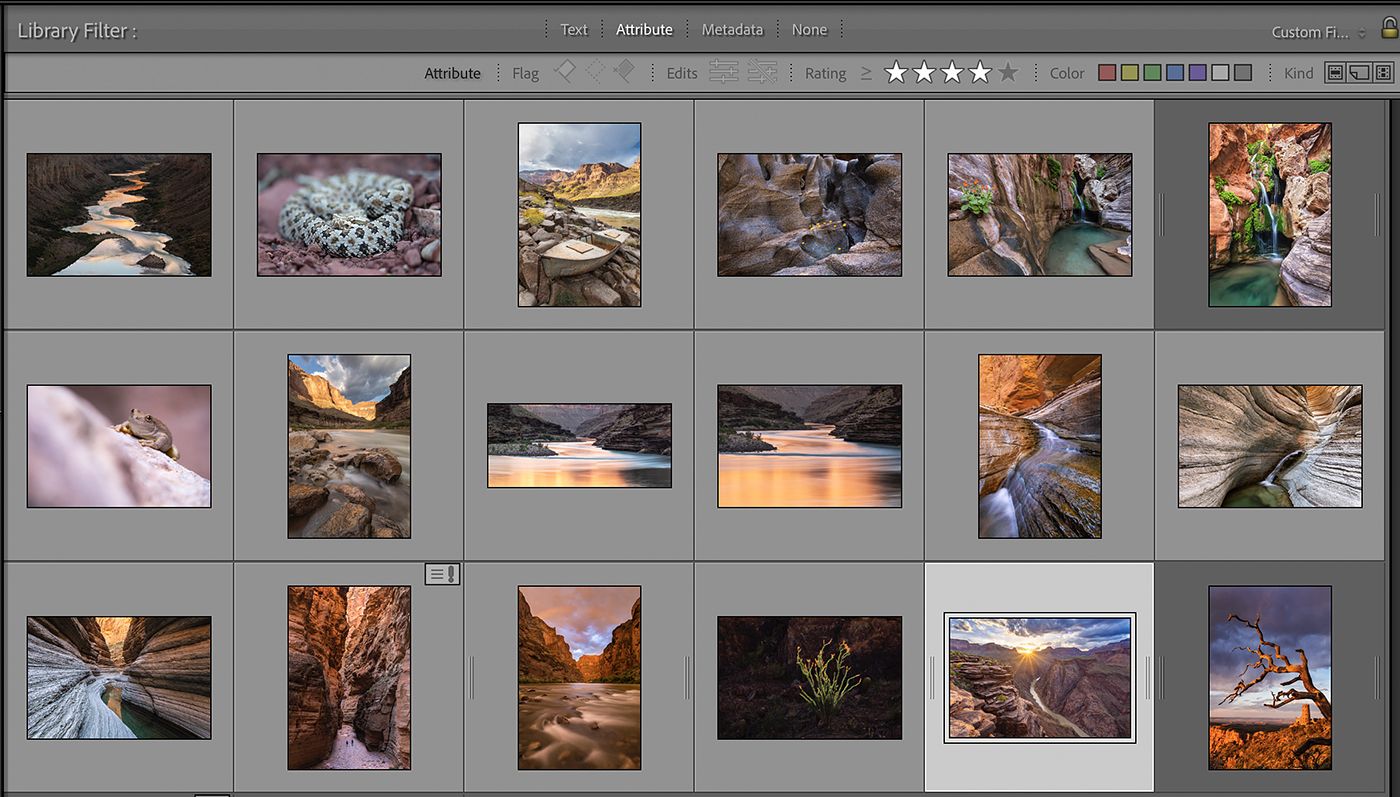
Not Organizing Your Images
Lightroom is great for organizing photos and making them easy to find. Keeping photos in separate folders, using keywords, and having some sort of rating system is a good place to start. If you are new to photography, or just don’t shoot that frequently, it can be tempting to just throw your photos in one big folder called “photos.” That’s what I did when I was starting out and it worked great for a while. The problem was I eventually had amassed so many photos that it became frustrating and time-consuming to find what I was looking for. Today, with several hundred thousand photos in my catalog, I can easily search for and find any of my images.
No organization strategy is the “right” one. What works for me may not work for you. The key is to adopt some sort of plan for organizing your images. It may not seem like a big deal now, but good organizational practices now will save you a headache down the road.
Moving Photos Outside of Lightroom
The most common Lightroom complaint I hear is “Lightroom can’t find my photos, where are they?” There can be several causes for this, but the most common is that the photos were moved outside of Lightroom.
The thing to remember is Lightroom doesn’t actually store our full-resolution files. What you see in Lightroom is a preview of the image alongside the saved adjustments you have made. The photo itself is stored on a hard drive (either the computer itself or an external) of your choosing. When you import photos into Lightroom, it makes a map of where those photos live. If you go back to your computer and move the photos or change the file name, Lightroom no longer knows where the photos are. This is when the dreaded “!” icon will appear in the corner. There are a couple of ways around this. First, you can make any movements from within Lightroom. This will move the photos on your hard drive and Lightroom will know their new location. Second, you can move the photos and then go in and tell Lightroom where their new location is.
If you have to move your photos, it is probably best to do it from within Lightroom. The disadvantage is that it is slow and though unlikely, if Lightroom were to crash during the transfer, there could be some loss of images. This is another reason why having a solid organizational strategy can pay off. If you have a system from the import, there will be little reason to move photos around and fewer opportunities to run into frustration.
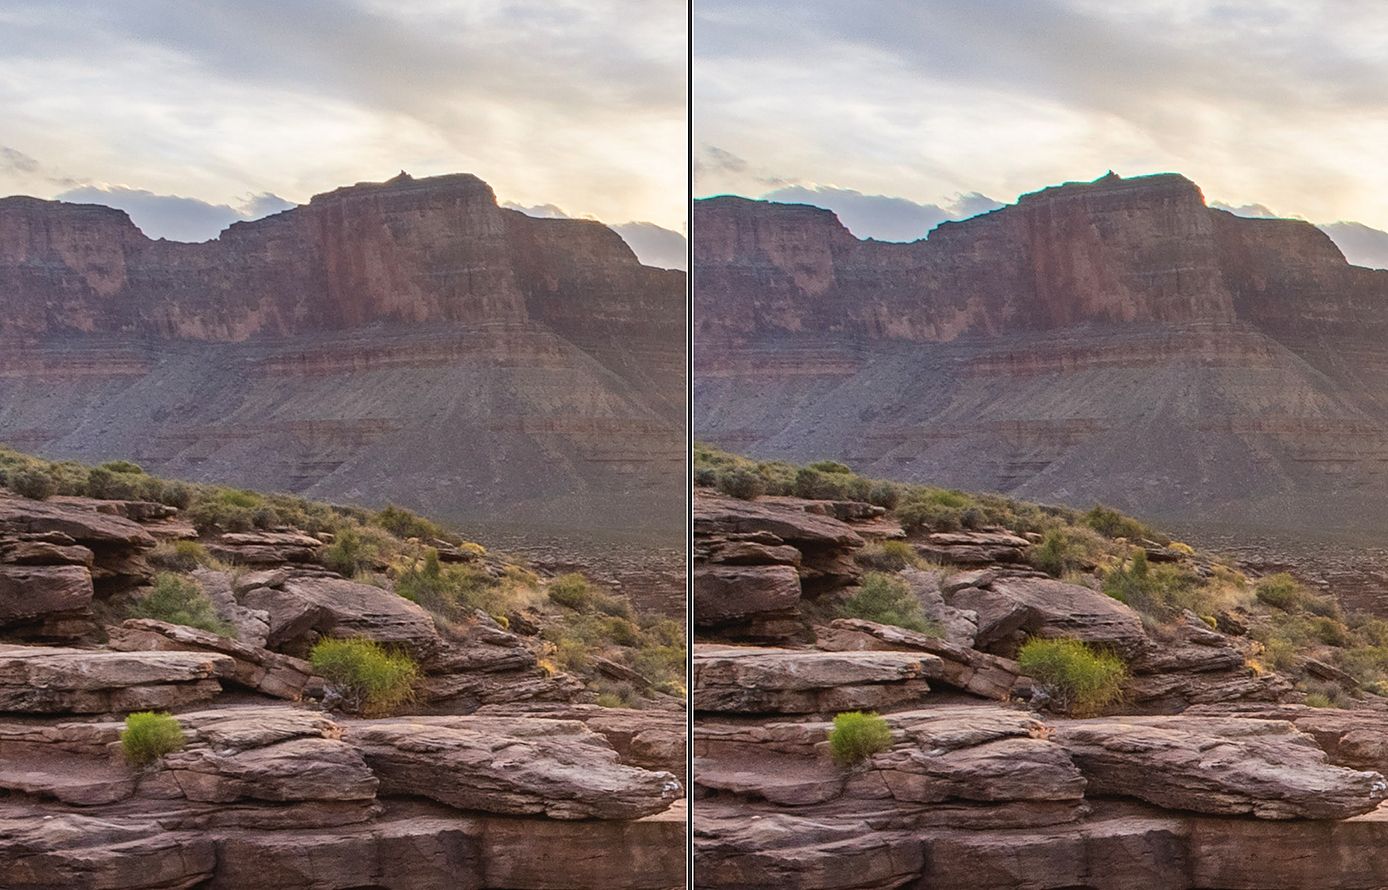
Chromatic Aberration
Chromatic aberration (also known as color fringing) is an unwanted color artifact that occurs on the edges of objects in a photo. There are several types of aberrations, all caused by the way the various wavelengths of light travel through the lens. It commonly presents as red-green or magenta-purple halos on the edges of objects, especially in the corners of images. Wide-angle lenses, zoom lenses, and lower-end lenses are especially susceptible. Not only does it add unwanted color, but it also slightly softens your images. Thankfully, Lightroom makes it extremely easy to get rid of these color artifacts. In the Lens Correction panel in the Develop module, you can a box called “Remove Chromatic Aberration.” Just click that box and watch your photo magically lose its color fringing. It is also possible to go in and manually remove it if the auto removal didn’t get all of it. It is so easy to do, there really is no reason not to do this on all your photos.
Chromatic aberration (also known as color fringing) is an unwanted color artifact that occurs on the edges of objects in a photo. There are several types of aberrations, all caused by the way the various wavelengths of light travel through the lens. It commonly presents as red-green or magenta-purple halos on the edges of objects, especially in the corners of images. Wide-angle lenses, zoom lenses, and lower-end lenses are especially susceptible. Not only does it add unwanted color, but it also slightly softens your images. Thankfully, Lightroom makes it extremely easy to get rid of these color artifacts. In the Lens Correction panel in the Develop module, you can a box called “Remove Chromatic Aberration.” Just click that box and watch your photo magically lose its color fringing. It is also possible to go in and manually remove it if the auto removal didn’t get all of it. It is so easy to do, there really is no reason not to do this on all your photos.
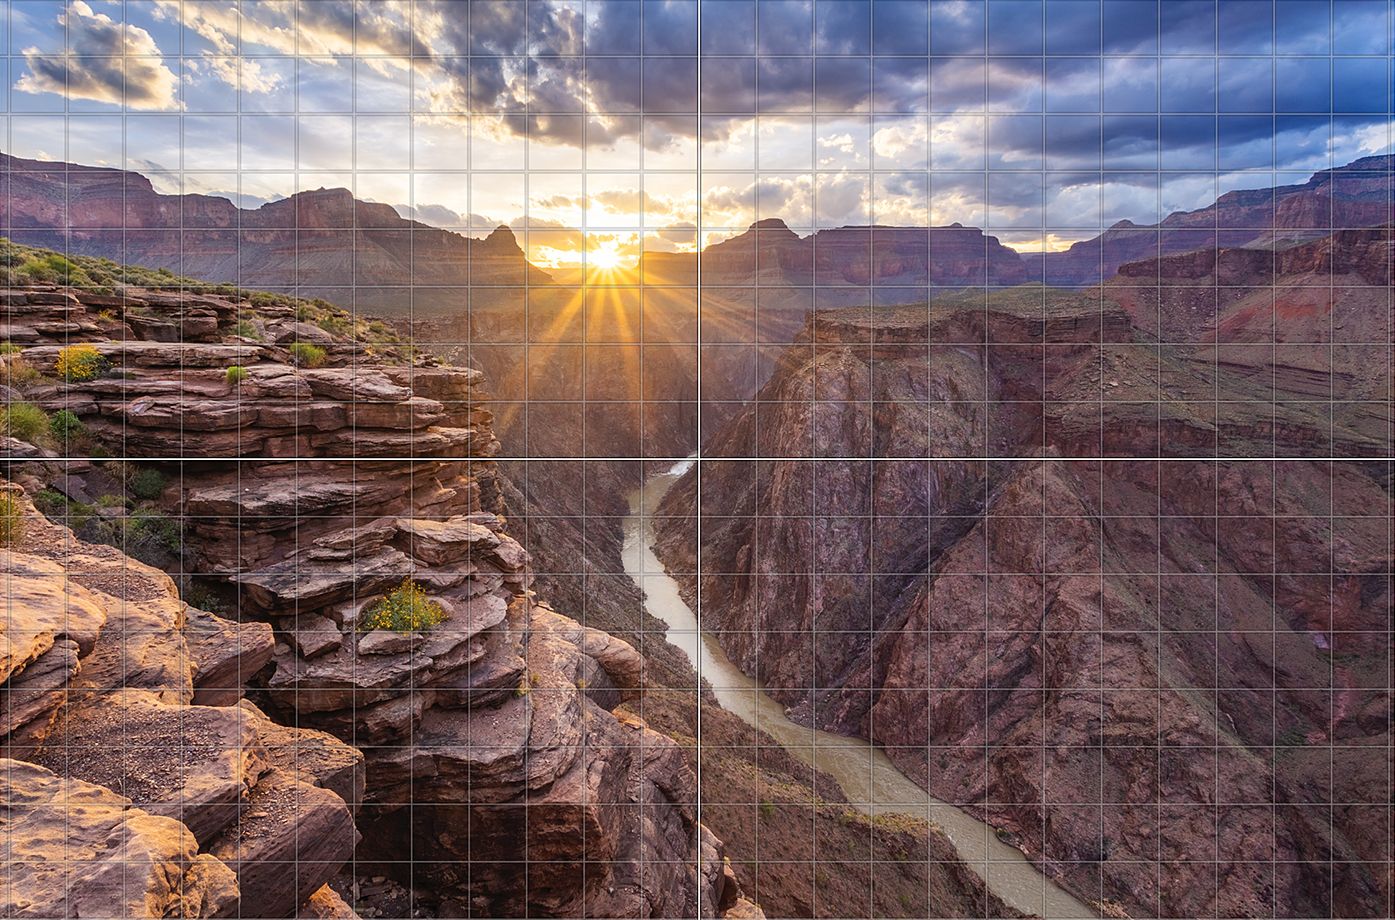
Straighten the Horizon
It may sound obvious, but you would be surprised at how many photos make it into the world with tilted horizons. Thankfully, Lightroom makes this super easy to fix as well. There are several ways to accomplish this: grabbing the corner of the crop tool and using the grid lines to manually rotate, clicking the angle tool (also under the crop drop-down menu) to draw a straight line that automatically crops the image, or using the rotate slider in the Transform menu. If your horizon has some arc to it, you may need to remove some of the lens distortions first.
I personally like to straighten using the crop tool. Not all horizons are as simple as an ocean scene, so I like to do it manually photo by photo.
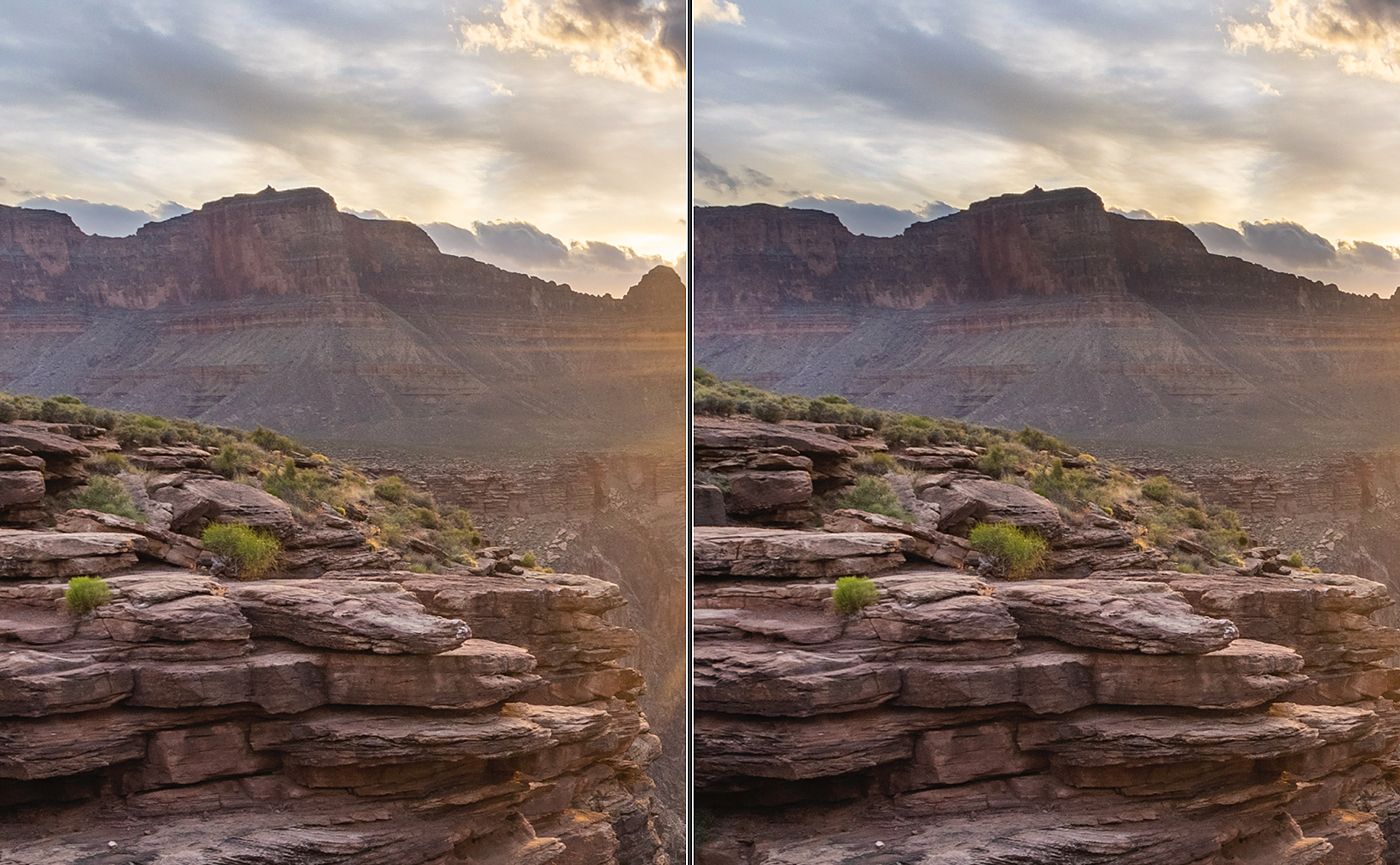
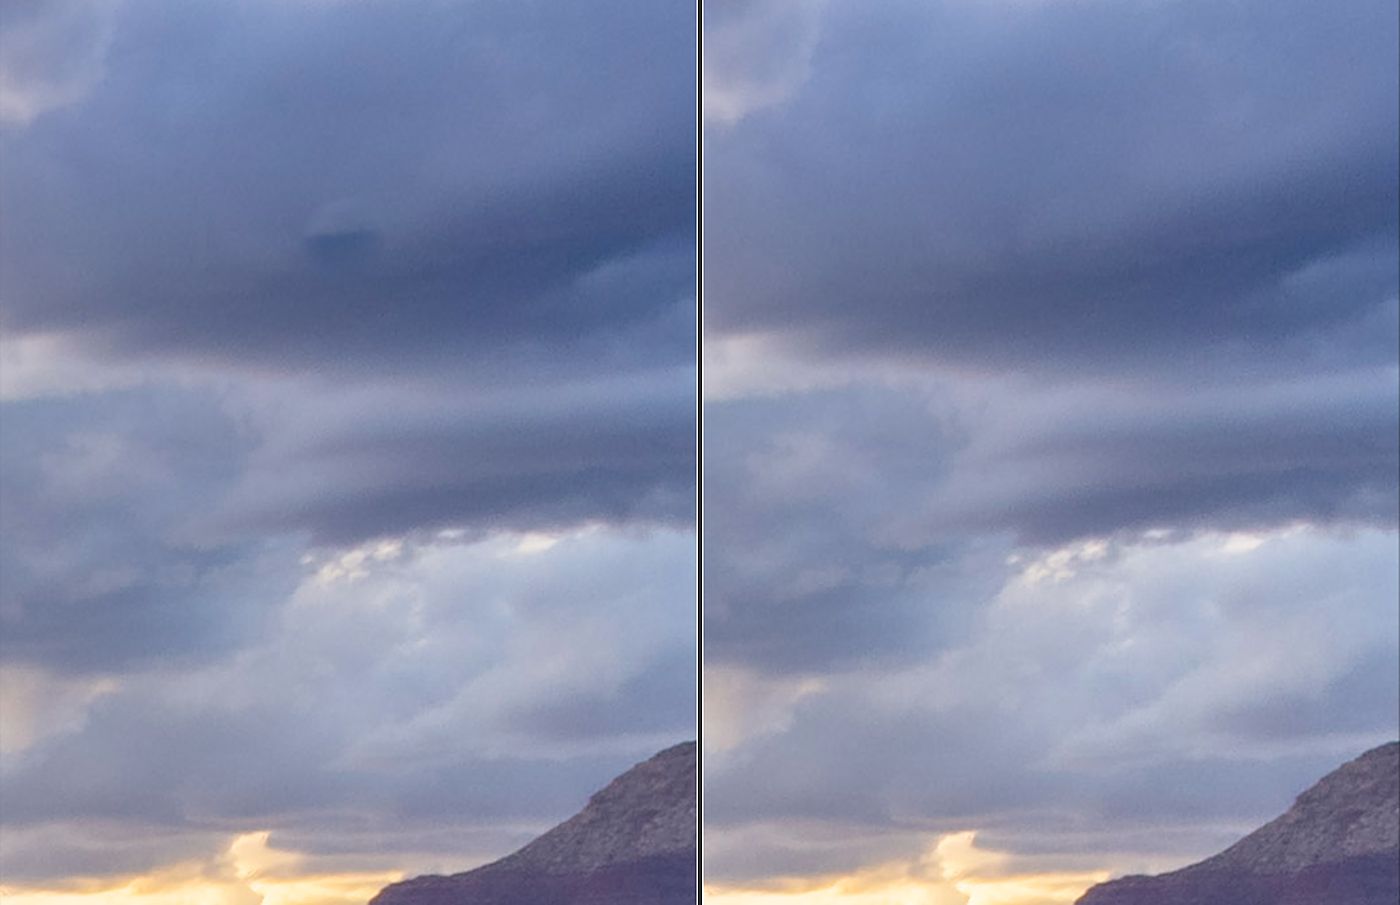
Sloppy Mask Edges
One of the most common editing faux pas I see is sloppy mask edges. When you are making localized adjustments with the brush tool, it is important to be precise with your brush strokes. For instance, let’s say you are using a broad brush to darken the sky around a mountain in your photo. If you use too broad of a brush or just aren’t careful where you paint in the adjustment, you can inadvertently darken the mountain next to the sky, creating some weird-looking tones.
There are several ways for making selections and localized adjustments in Lightroom. Whatever way you choose, it is important to have strong attention to detail and not leave any artifacts that distract from your photo.
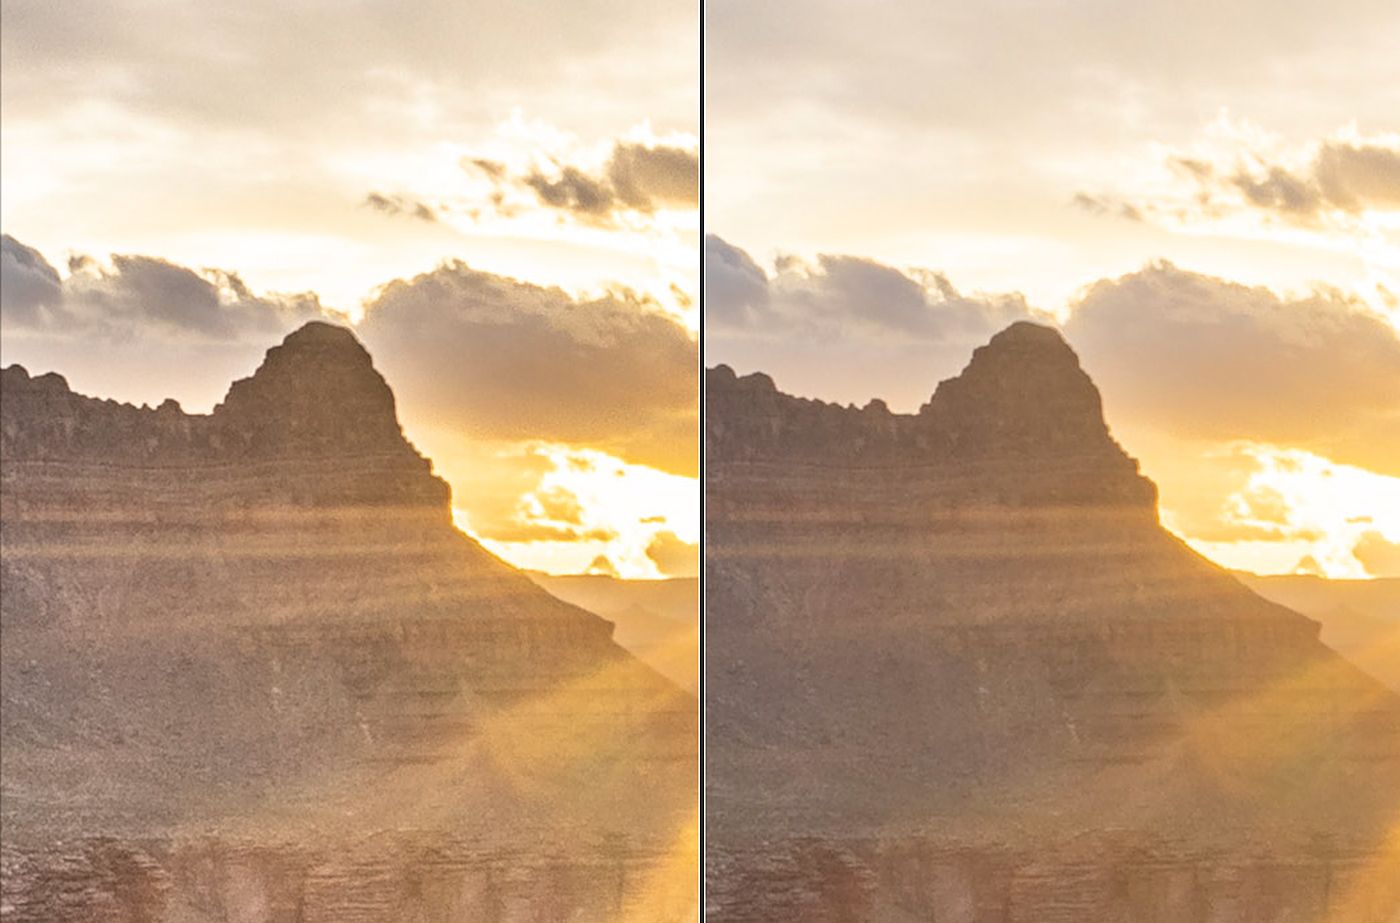
Overuse of Sliders
Although processing style is largely a personal choice, I try not to be too heavy-handed when it comes to adjusting some of Lightroom’s sliders. While there is nothing wrong with making significant edits to a photo, I always want to be careful not to push sliders so far that they introduce artifacts. Adjusting sliders too far can introduce excess noise, banding in skies, halos around objects, and push colors out of printable gamuts. The saturation, clarity, and dehaze sliders are especially susceptible and should be treated with a light touch. Sometimes a “less is more” strategy can help to avoid some of these processing pitfalls.
Although processing style is largely a personal choice, I try not to be too heavy-handed when it comes to adjusting some of Lightroom’s sliders. While there is nothing wrong with making significant edits to a photo, I always want to be careful not to push sliders so far that they introduce artifacts. Adjusting sliders too far can introduce excess noise, banding in skies, halos around objects, and push colors out of printable gamuts. The saturation, clarity, and dehaze sliders are especially susceptible and should be treated with a light touch. Sometimes a “less is more” strategy can help to avoid some of these processing pitfalls.
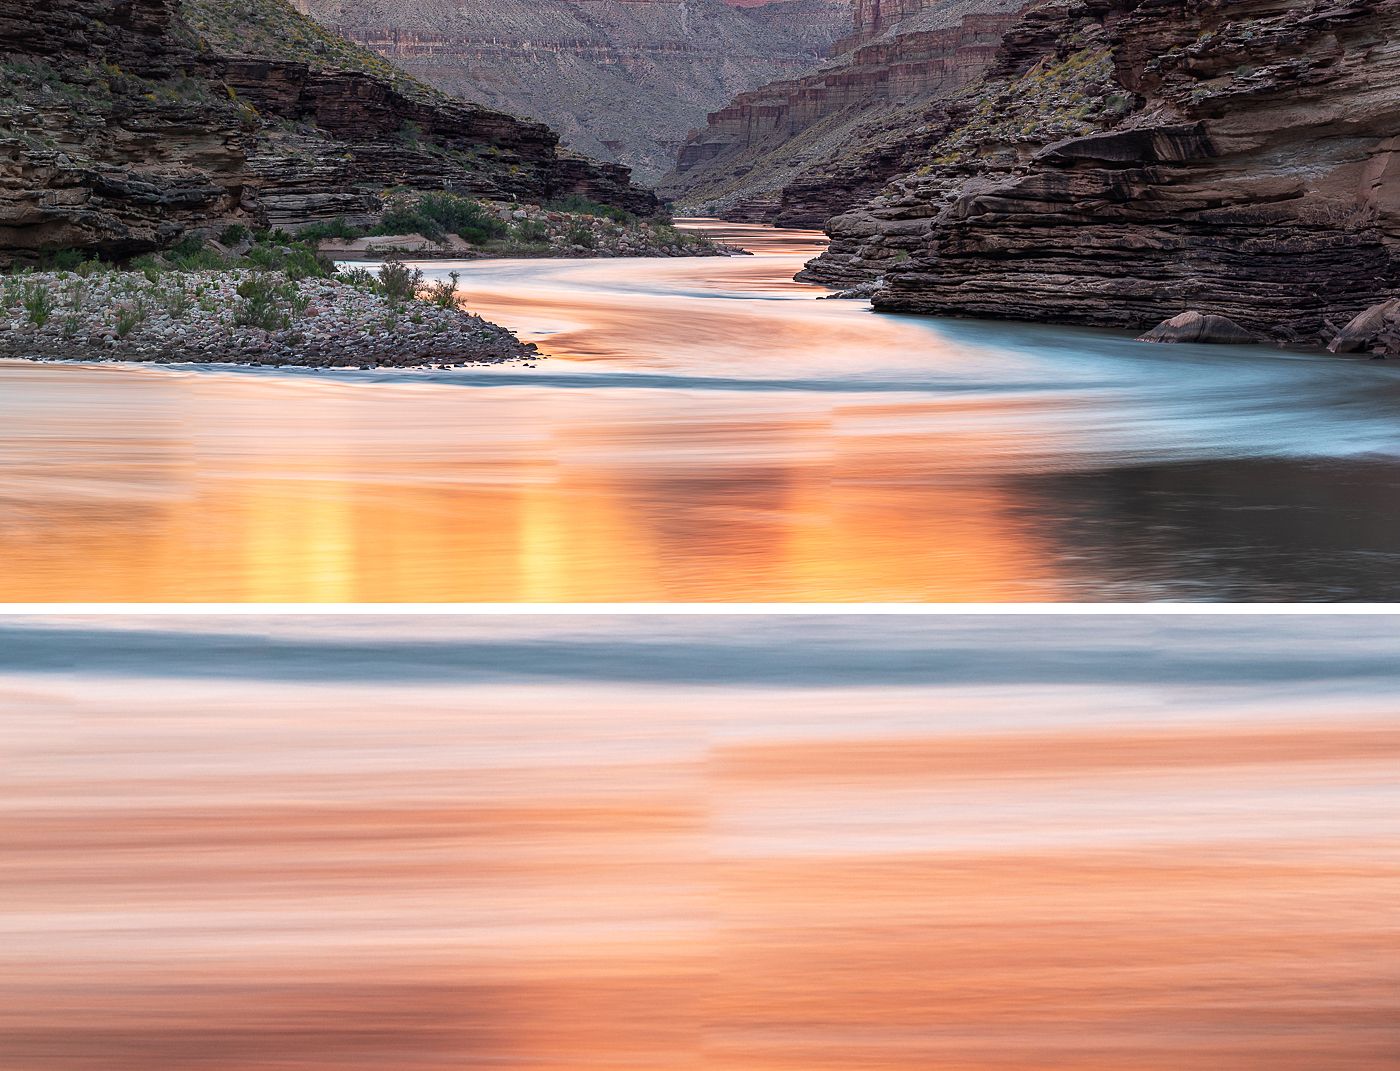
Issues from Stitching/HDR
Stitching and blending frames is a great way to expand the capability of your camera by creating higher resolution files or a photo with a greater dynamic range. The drawback is sometimes Lightroom can struggle to seamlessly blend photos together. Whenever I stitch panoramas or create HDR exposure blends, the first thing I do is scan the image for mistakes. While Lightroom generally does a good job at putting images together, at times elements don’t line up or aren’t blended correctly. Often Lightroom just needs another try at blending or sometimes doing it manually in Photoshop is required. Take time to scan for artifacts. The last thing you want to do is spend a lot of time editing the photo or worse, printing it, only to see later that part of the image didn’t line up correctly.
Stitching and blending frames is a great way to expand the capability of your camera by creating higher resolution files or a photo with a greater dynamic range. The drawback is sometimes Lightroom can struggle to seamlessly blend photos together. Whenever I stitch panoramas or create HDR exposure blends, the first thing I do is scan the image for mistakes. While Lightroom generally does a good job at putting images together, at times elements don’t line up or aren’t blended correctly. Often Lightroom just needs another try at blending or sometimes doing it manually in Photoshop is required. Take time to scan for artifacts. The last thing you want to do is spend a lot of time editing the photo or worse, printing it, only to see later that part of the image didn’t line up correctly.
Cloning Artifacts
If your camera sensor looks anything like mine, chances are good that there are a lot of dust spots from changing lenses in less-than-ideal conditions. This means that on photos with big, clear spaces (such as a blue sky) I will likely have to go in with the spot tool and remove dust spots.
Lightroom’s spot removal tool does a great job of getting rid of unwanted dust bunnies by selecting the problem area and sampling new pixels to cover it up with. Even though it works most of the time, this tool isn’t always perfect. Sometimes the cover-up doesn’t quite match tones or it samples pixels from a textured area into a non-textured part of the photo. It is important to go back and double-check that you didn’t cause more problems than you solved.
Don’t Leave Evidence of Your Work
My strategy with editing photos in Lightroom (or Photoshop) is to never leave evidence of the adjustments I have made. That is not because I am deceitful with my edits, or that I am trying to keep some sort of proprietary secret. I just don’t want people to focus on my editing process when they view my work. I want them to see the subject, to understand the story, to feel an emotion, and to place themselves in the scene. I never want my viewer to notice and focus on a sloppy mask edge, a missed dust spot, or some minor Chromatic Aberration. The best way to accomplish this is to develop good habits and strong attention to detail. Eliminating these easy to overlook faux pas will keep your viewers’ minds on what you want to say with your art.

We offer world-class travel photography
experiences around the world.
Each tour is bundled with lodging, meals, and transportation between workshops included, allowing you to focus on photography instead of the stress of traveling.
experiences around the world.
Each tour is bundled with lodging, meals, and transportation between workshops included, allowing you to focus on photography instead of the stress of traveling.
Get Our Trip Catalog
Receive a trip catalog that highlights all of our upcoming photo tours and workshops.Schedule a Trip Consultation
Meet with a photo experience coordinator, and experience a personal touch to your booking experience.Trip Calendar
View our trip calendar and filter upcoming departures by interest or seasonality.Webinars
Our regularly hosted webinars provide photography instruction from our own guides on a wide range of topics.Education Portal
Explore our library of articles that cover everything from common questions, to in-depth guides on how to achieve that perfect shot.BACKCOUNTRY JOURNEYS
"Backcountry Journeys offers guests the unique opportunity to explore our natural world from behind their own lens. We run a selection of hand-crafted Photo Tours, Workshops & Safaris connecting passionate people to exceptional experiences. Locations worldwide.
- Russ Nordstrand, Backcountry Journeys Founder & Director
- Russ Nordstrand, Backcountry Journeys Founder & Director
TRIP CATALOG
Download our Trip Catalog for detailed information on our many destinations for photography tours, workshops, and safaris.
All Images & Content are property of Backcountry Photography Tours, Workshops & Safaris LLCs - Copyright 2025
BACKCOUNTRY JOURNEYS
"Backcountry Journeys offers guests the unique opportunity to explore our natural world from behind their own lens. We run a selection of hand-crafted Photo Tours, Workshops & Safaris connecting passionate people to exceptional experiences. Locations worldwide.
All Images & Content are property of Backcountry Journeys Photography Tours, Workshops & Safaris LLC - Copyright 2025
TRIP CATALOG
Download our Trip Catalog for detailed information on our many destinations for photography tours, workshops, and safaris.