Awarded 2025 Travelers' Choice

About Backcountry Journeys
Why Choose Backcountry Journeys
If you're considering a photography trip, hear why Backcountry Journeys delivers the best experience in the industry.Frequently Asked Questions
If you're new to photography trips, or new to BCJ, you can find our common travel questions here.Fitness Levels
Our trips vary on physical intensity, and by reviewing our fitness levels, you can find out which trips may be more challenging, or aligned more closely with your comfort level.Meet The Crew
We've built an amazing team of experienced guides, and dedicated office staff that elevate your travel experience. Get to know their backgrounds, and hear their stories.Loyalty Program
We reward our frequent photo adventurers with exclusive discounts on amazing photography trips.Contact Us
If you need to get in touch with our office staff, or have additional business inquiries, you can find our information here.Refer a Friend
Know someone perfect for one of our tours? Recommend them through this quick form.Stay Up To Date On All Things
Backcountry Journeys
Backcountry Journeys
Our Photography Community
Our Webinars
Our regularly hosted webinars provide photography instruction from our own guides on a wide range of topics.Our Education Portal
Explore our library of articles that cover everything from common questions, to in-depth guides on how to achieve that perfect shot.Community Testimonials
We're proud to foster an amazing group of photo travelers, and here you can find their stories from their past adventures.Resources For Photographers
About Our Company
Resources For Photographers
About Our Company
Gear Review: Move-Shoot-Move Tracker – A Great Addition for Astrophotography
Published March 31, 2021
I recently was able to test out a new product that I was really excited to get my hands on – the Move-Shoot-Move (MSM) 2-1 Star Tracker.
For a little background, star trackers have become very popular within the last 5 years, and for good reason. They give photographers the ability to capture low noise exposures of the night sky with incredible detail.
A big challenge of astrophotography is the lack of light. This forces the use of high ISOs (ISO 1600-6400+). The more that ISO creeps up, the more noise an image will have. Compare an ISO 100 exposure to that of an ISO 6400 exposure and the difference is literally night and day. The ISO 6400 will have much more noise.
A simple solution might be just taking longer exposures – multiple minutes long. Well, that’s not an option due to the Earth’s rotation. Any shutter speed longer than 20-30 seconds (depending on the lens and camera) will result in ‘streaked’ stars that are not sharp.
Now, this is where a tracker comes into play. Trackers operate on algorithms that help sync a camera up with the rotation of the Earth. Thus, using a tracker enables photographers to take an exposure that is multiple minutes long. The long exposure allows for lower ISOs to be used as well.
So, the end result is a low noise image with incredible detail and sharp stars. The MSM is not the only tracker on the market, but it is the first I’ve used, and it has some features that separate it from the rest. Let’s get into my findings.
Overview
The MSM 2-1 Star Tracker is designed to track the rotation of the Earth, allowing for long exposures of the night sky.
The tracker comes in many available purchase packages – ranging from just the tracker to bundles including the tracker, a scope, a ball head, and more. There are actually 12 bundles available.
I recommend the ‘Basic Kit B’, which retails for $279, but often is on sale for $218 at the time of writing.
The ‘Basic Kit B’ is the kit I tested out and it includes:
For a little background, star trackers have become very popular within the last 5 years, and for good reason. They give photographers the ability to capture low noise exposures of the night sky with incredible detail.
A big challenge of astrophotography is the lack of light. This forces the use of high ISOs (ISO 1600-6400+). The more that ISO creeps up, the more noise an image will have. Compare an ISO 100 exposure to that of an ISO 6400 exposure and the difference is literally night and day. The ISO 6400 will have much more noise.
A simple solution might be just taking longer exposures – multiple minutes long. Well, that’s not an option due to the Earth’s rotation. Any shutter speed longer than 20-30 seconds (depending on the lens and camera) will result in ‘streaked’ stars that are not sharp.
Now, this is where a tracker comes into play. Trackers operate on algorithms that help sync a camera up with the rotation of the Earth. Thus, using a tracker enables photographers to take an exposure that is multiple minutes long. The long exposure allows for lower ISOs to be used as well.
So, the end result is a low noise image with incredible detail and sharp stars. The MSM is not the only tracker on the market, but it is the first I’ve used, and it has some features that separate it from the rest. Let’s get into my findings.
Overview
The MSM 2-1 Star Tracker is designed to track the rotation of the Earth, allowing for long exposures of the night sky.
The tracker comes in many available purchase packages – ranging from just the tracker to bundles including the tracker, a scope, a ball head, and more. There are actually 12 bundles available.
I recommend the ‘Basic Kit B’, which retails for $279, but often is on sale for $218 at the time of writing.
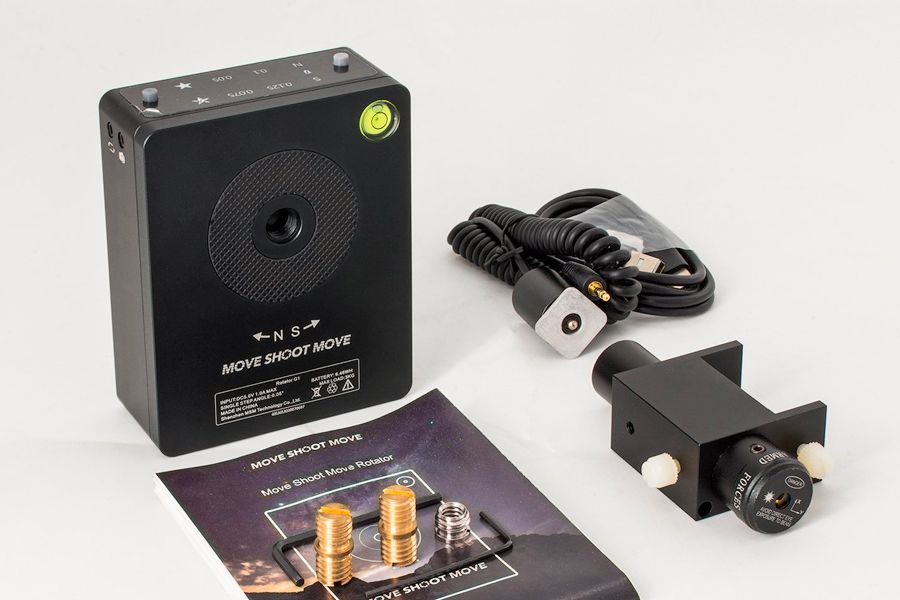
The ‘Basic Kit B’ is the kit I tested out and it includes:
- Rotator
- Laser Pointer
- Laser Bracket
One of the highlights of the tracker, and one of the main reasons I chose this one, is its lightweight. It only weighs 1 lb. (450g) and it is very portable. Other popular trackers, like the iOptron Skyguider Pro, comes in around ~3 lbs.
The MSM max load is 6.6 lbs., which is a downside due to its lighter weight (iOptron can support 11 lbs.). It supported my BH-30 ball head, Nikon Z7, and 14-30mm f/4 no problem. There might be issues with heavier DSLR setups, but I do know photographers using the MSM tracker with their DSLR.
It’s perfect for a mirrorless and wide-angle lens rig.
Setup
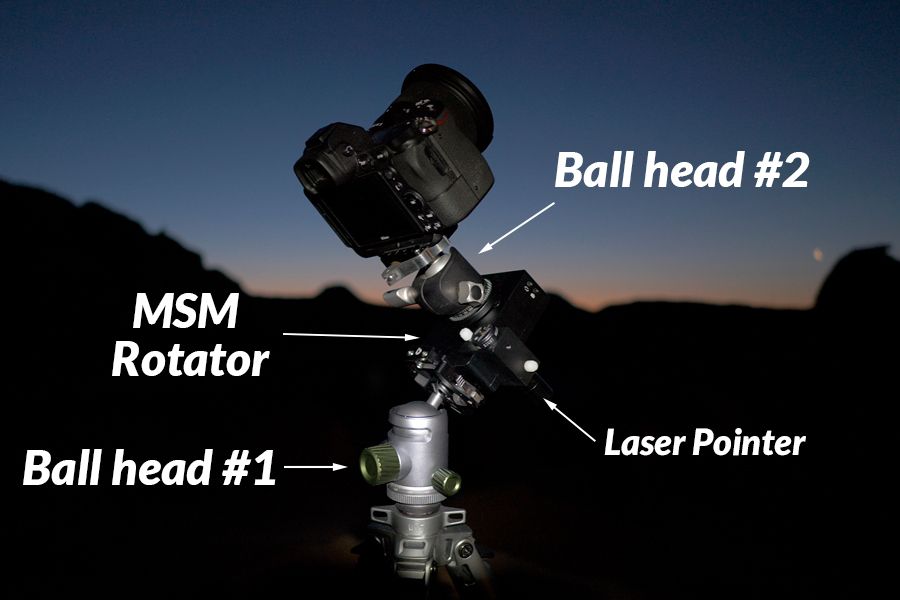
Now, you will need two ball heads to run this tracker. The connection works like this – take a normal tripod and ball head setup, connect the MSM tracker via a mounting plate on the ball head, attach a ball head to the rotator, attach the laser pointer to the rotator, and finally attach a camera.
This is how my setup looked:
The MSM max load is 6.6 lbs., which is a downside due to its lighter weight (iOptron can support 11 lbs.). It supported my BH-30 ball head, Nikon Z7, and 14-30mm f/4 no problem. There might be issues with heavier DSLR setups, but I do know photographers using the MSM tracker with their DSLR.
It’s perfect for a mirrorless and wide-angle lens rig.
Setup
Now, you will need two ball heads to run this tracker. The connection works like this – take a normal tripod and ball head setup, connect the MSM tracker via a mounting plate on the ball head, attach a ball head to the rotator, attach the laser pointer to the rotator, and finally attach a camera.
This is how my setup looked:
How Does it Work?
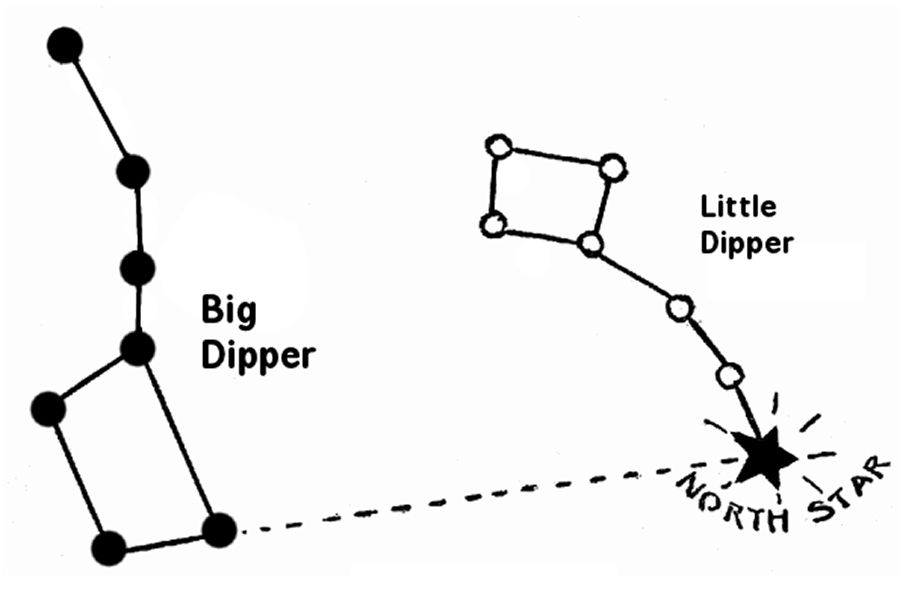
The tracker works via an alignment with the North Star (Polaris). Polaris is located very near the celestial north pole of Earth – meaning that when Earth spins on its axis, it also spins around Polaris, and Polaris is locked in position (although it does move a little).
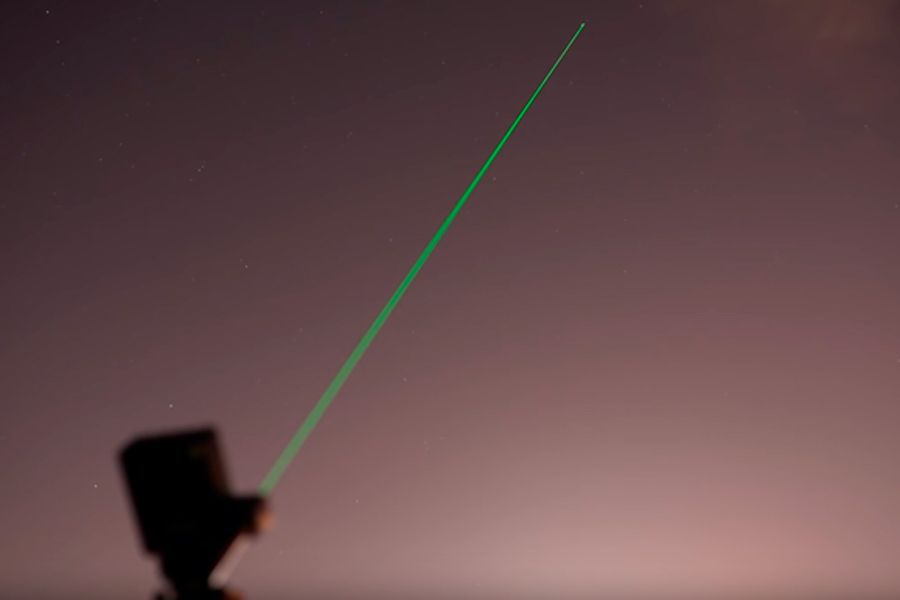
Alignment is required for any tracker and with MSM, it can be achieved using a polar scope or a laser pointer. I highly recommend getting a kit with laser pointer, as it makes setup/alignment so easy.
The tracker works via an alignment with the North Star (Polaris). Polaris is located very near the celestial north pole of Earth – meaning that when Earth spins on its axis, it also spins around Polaris, and Polaris is locked in position (although it does move a little).
Alignment is required for any tracker and with MSM, it can be achieved using a polar scope or a laser pointer. I highly recommend getting a kit with laser pointer, as it makes setup/alignment so easy.
If you’ve never observed Polaris or noted its position, it is the primary star within the ‘Little Dipper’. It can always be found by tracing a line from the ‘Big Dipper’, as in the diagram below.
The PhotoPills app for Android and iPhone is so useful for photographers – and one of its uses is a ‘Night AR’ mode that not only helps find the orientation of the Milky Way, but also helps identify the position of Polaris.
It’s a great feature to help you get the hang of locating Polaris.
You will need to turn on the laser point and adjust ball head #1 so that the laser is pointing right at Polaris. This takes a little bit of maneuvering, but it is so much easier and faster than using a polar scope.
Be careful with the laser pointer, it is very strong. You should toggle it on only to align with Polaris.
Results
Overall, I was very happy with the MSM Star Tracker. I found it easy to set up with a little research and I found performance to be great.
There is a definite advantage to tracking the Milky Way versus shooting at exposures with high ISOs. My tracked shots seemed to have more stars, were more vivid, and of course, had less noise.
I need to stress the importance of alignment and making sure the rotator is securely attached to the ball head though. I did ‘tracked’ shots where something was a bit off, and the stars were definitely a little streaked…not bad, but definitely not great.
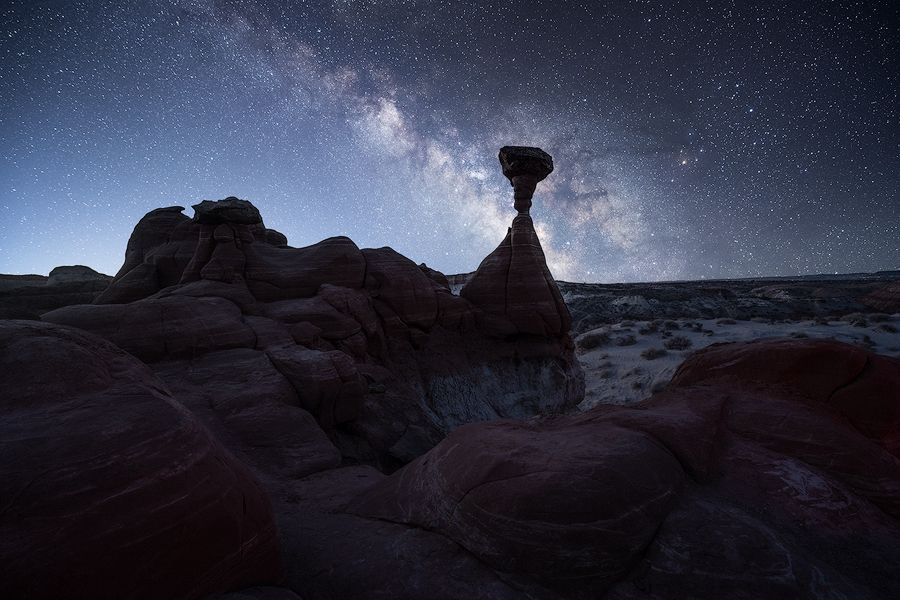
For the majority of my usage though, the tracker worked great. I found these to be the ideal settings for wide-angle work – 4 minutes, ISO 800, f/2.8 (or f/4 depending on the lens).
Below is an example that I shot a few weeks ago.
It’s a great feature to help you get the hang of locating Polaris.
You will need to turn on the laser point and adjust ball head #1 so that the laser is pointing right at Polaris. This takes a little bit of maneuvering, but it is so much easier and faster than using a polar scope.
Be careful with the laser pointer, it is very strong. You should toggle it on only to align with Polaris.
Results
Overall, I was very happy with the MSM Star Tracker. I found it easy to set up with a little research and I found performance to be great.
There is a definite advantage to tracking the Milky Way versus shooting at exposures with high ISOs. My tracked shots seemed to have more stars, were more vivid, and of course, had less noise.
I need to stress the importance of alignment and making sure the rotator is securely attached to the ball head though. I did ‘tracked’ shots where something was a bit off, and the stars were definitely a little streaked…not bad, but definitely not great.
For the majority of my usage though, the tracker worked great. I found these to be the ideal settings for wide-angle work – 4 minutes, ISO 800, f/2.8 (or f/4 depending on the lens).
Below is an example that I shot a few weeks ago.
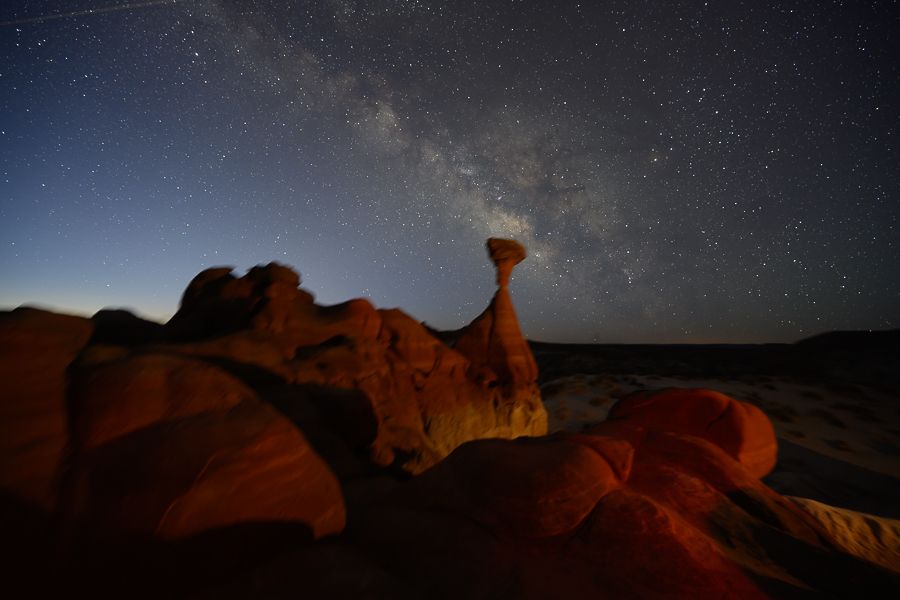
And when you compare this side-by-side with an ISO 6400 exposure, you’ll notice the difference right away.
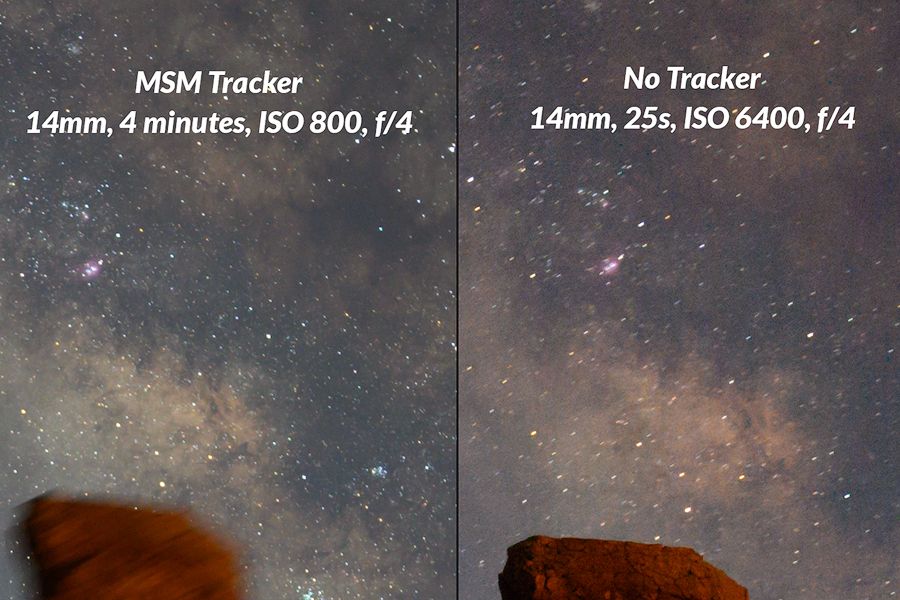
One thing you’ll notice is the foreground is blurred. That’s a caveat of using a tracker. You need to blend the tracked shot with another exposure for the foreground. Because the tracker is following the Milky Way, the camera is moving and that’s why the foreground is blurred.
So, you need the prowess in Photoshop to be able to blend.
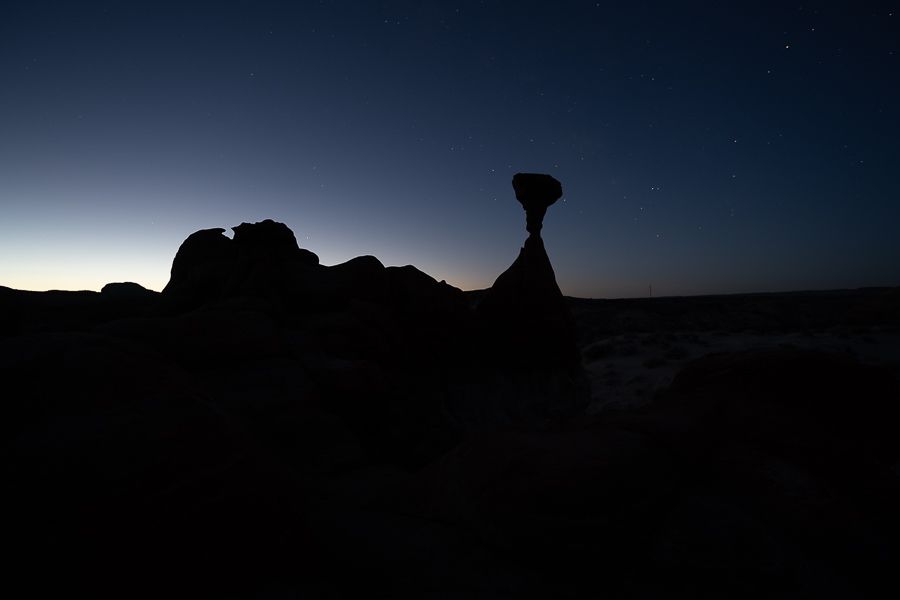
My preferred method, and the method of many astrophotographers, is to use a blue hour exposure. Blue hour is the period after sunset or before sunrise. It’s the period right after/before true darkness.
During blue hour, there is enough light on the landscape to take a low ISO exposure, but still, have it look very similar to an exposure taken in the middle of the night. With a little bit of postwork (darkening and desaturation), you can get even closer.
So, I always used the tracker with the intent to blend. Below is the blur hour exposure I took at 25 seconds, f/4, ISO 200. And below that is the final blended image.
So, you need the prowess in Photoshop to be able to blend.
My preferred method, and the method of many astrophotographers, is to use a blue hour exposure. Blue hour is the period after sunset or before sunrise. It’s the period right after/before true darkness.
During blue hour, there is enough light on the landscape to take a low ISO exposure, but still, have it look very similar to an exposure taken in the middle of the night. With a little bit of postwork (darkening and desaturation), you can get even closer.
So, I always used the tracker with the intent to blend. Below is the blur hour exposure I took at 25 seconds, f/4, ISO 200. And below that is the final blended image.
I was able to really bring out the shadows and brighten the exposure with the blue hour exposure, and then I did some tweaks to get the color and brightness looking similar between the tracked Milky Way and blue hour exposure.
Closing Thoughts
Overall, I am very happy with the MSM star tracker and I will continue to use it during my night photography outings. It’s super portable and gets the job done. I’d be wary of using this setup with a heavier DSLR and larger lenses, but I don’t have much experience with that. For me, it works great for my mirrorless setup.
I found alignment and taking test shots to ensure proper alignment was crucial towards getting sharp exposures at 3-4 minutes.
The ideal settings to use for a wide-angle lens are 4 minutes, ISO 800, f/2.8 (or maximum aperture).
The tracker can also be used for moving time-lapses. I did not test out this mode, but there are various modes and tracking speeds on the rotator that work great for time-lapses.
I should note that MSM is a Chinese-based company and that results in a small language barrier with some of their materials, like manuals and how-tos. I did find some of the information hard to follow. With that said, they have a great resource database on their website of people using and explaining their products. I found that very helpful. They have also gone to great lengths to improve their tracker and multiple iterations have been released since their first model.
If anyone has questions with setup or use, I’d be more than happy to help. Really, after an outing, you get accustomed to the setup and use and it’s pretty straightforward.
Overall, I’d recommend this tracker as a great option for astrophotographers looking to produce the best quality night images.

We offer world-class travel photography
experiences around the world.
Each tour is bundled with lodging, meals, and transportation between workshops included, allowing you to focus on photography instead of the stress of traveling.
experiences around the world.
Each tour is bundled with lodging, meals, and transportation between workshops included, allowing you to focus on photography instead of the stress of traveling.
Get Our Trip Catalog
Receive a trip catalog that highlights all of our upcoming photo tours and workshops.Schedule a Trip Consultation
Meet with a photo experience coordinator, and experience a personal touch to your booking experience.Landscape Guide
Receive a FREE Landscape Cheat Sheet Written By a Pro Photographer.Webinars
Our regularly hosted webinars provide photography instruction from our own guides on a wide range of topics.Education Portal
Explore our library of articles that cover everything from common questions, to in-depth guides on how to achieve that perfect shot.
Backcountry Journeys
Connecting Passionate People To
Exceptional Experiences.
Exceptional Experiences.
Business Hours:
Mon-Fri, 8AM-4PM MT
928-478-1521
adventure@backcountryjourneys.com
Mon-Fri, 8AM-4PM MT
928-478-1521
adventure@backcountryjourneys.com
arrow_drop_down_circle
Divider Text
All Images & Content Are Property Of Backcountry Journeys Photography Tours, Workshops & Safaris LLC - Copyright 2026
About Us
Receive a Digital Trip Catalog
Find an upcoming photography tour with our interactive catalog.