Mon - Fri: 8 am - 4 pm MT

About Backcountry Journeys
Why Choose Backcountry Journeys
If you're considering a photography trip, hear why Backcountry Journeys delivers the best experience in the industry.Frequently Asked Questions
If you're new to photography trips, or new to BCJ, you can find our common travel questions here.Fitness Levels
Our trips vary on physical intensity, and by reviewing our fitness levels, you can find out which trips may be more challenging, or aligned more closely with your comfort level.Meet The Crew
We've built an amazing team of experienced guides, and dedicated office staff that elevate your travel experience. Get to know their backgrounds, and hear their stories.Loyalty Program
We reward our frequent photo adventurers with exclusive discounts on amazing photography trips.Contact Us
If you need to get in touch with our office staff, or have additional business inquiries, you can find our information here.Refer a Friend
Know someone perfect for one of our tours? Recommend them through this quick form.Stay Up To Date On All Things
Backcountry Journeys
Backcountry Journeys
Our Photography Community
Our Webinars
Our regularly hosted webinars provide photography instruction from our own guides on a wide range of topics.Our Education Portal
Explore our library of articles that cover everything from common questions, to in-depth guides on how to achieve that perfect shot.Community Testimonials
We're proud to foster an amazing group of photo travelers, and here you can find their stories from their past adventures.Resources For Photographers
About Our Company
Resources For Photographers
About Our Company
Ten Lightroom CC Tips for Nature Photographers
Published August 18, 2020
Lightroom CC is one of Backcountry Journeys photographers’ favorite tools for organizing and processing photos. It’s a do-it-all app that’s intuitive and feature-rich. Our instructional video course on Lightroom CC is also one of our most popular. It’s the only course on Lightroom CC that you’ll ever need.
There are a lot of things that Lightroom does exceptionally well when it comes to photography. We cover all those things in-depth in our video course. In this article, I want to point out some highlights and cool features that I use to organize/process my photos on a daily basis.
The following are ten Lightroom CC tips geared towards nature photography:

Auto-Advance for Sorting Photos
Every photographer needs to cull and sort their photos. One of the best features of Lightroom CC is the fact that you can organize, sort, and filter photos. Depending on how many images you’re working with, it can be a time-consuming process.
Lightroom CC makes the process fast and efficient, but there are some things you need to know first. In the Library module, press Caps Lock to turn on Auto-Advance. Auto-Advance will switch to the next photo in the sequence after a rating qualifier is applied.
Here are shortcuts for the rating systems:
- P to flag an image as a pick
- X to reject an image
- U to remove a flag from an image, or to skip the current image
- Number keys 1-5 to add the respective number of stars
- Number keys 6-9 to add a color label
Improve Composition with “Crop Overlays”
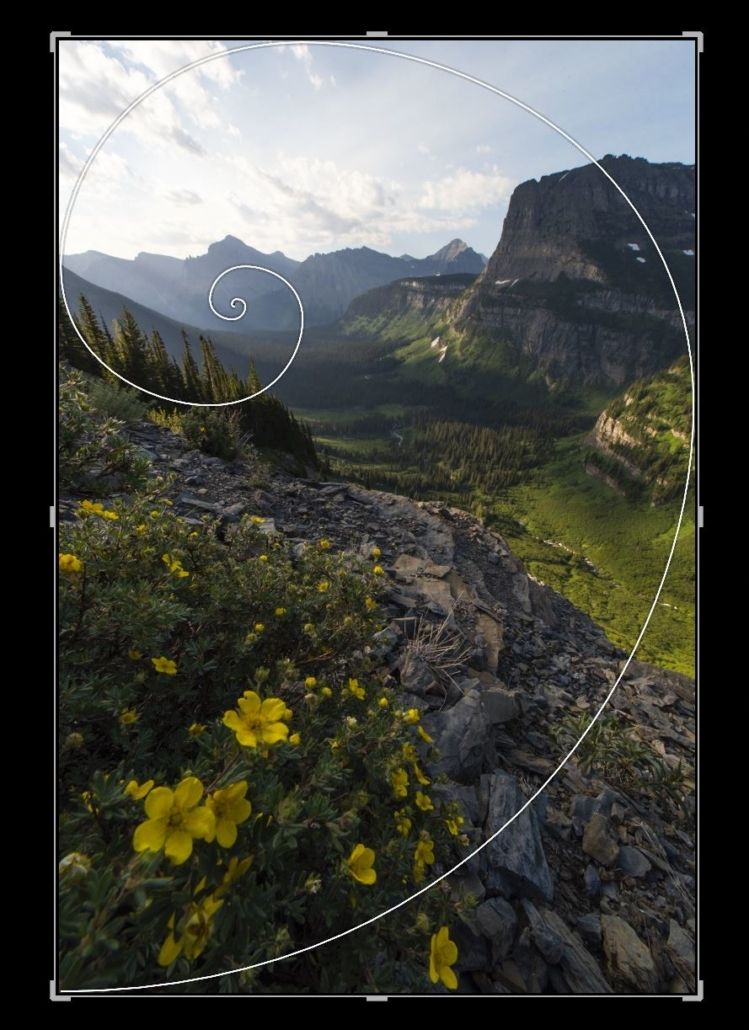
This is one that I have mentioned before in articles and webinars, but it’s super useful for dialing in your composition. The Crop Tool is set to a ‘Rule of Thirds’ overlay by default, but there are seven other overlays that can be toggled. Many of which help you fine-tune your composition via cropping. The eight overlay options include things like ‘Diagonals’ and a few overlays based on the golden ratio. All overlays will help with cropping, depending on the image and your composition. An easy way to toggle through the overlays is to activate the Crop Tool and simply use the key ‘O’ as a shortcut.
This is one that I have mentioned before in articles and webinars, but it’s super useful for dialing in your composition. The Crop Tool is set to a ‘Rule of Thirds’ overlay by default, but there are seven other overlays that can be toggled. Many of which help you fine-tune your composition via cropping. The eight overlay options include things like ‘Diagonals’ and a few overlays based on the golden ratio. All overlays will help with cropping, depending on the image and your composition. An easy way to toggle through the overlays is to activate the Crop Tool and simply use the key ‘O’ as a shortcut.
Range Masking for Selective Control
Until recently, Lightroom wasn’t known for its selective abilities. Those tasks were better suited for Photoshop. Photoshop still has a considerable upper hand on Lightroom when it comes to selective adjustments, but Lightroom has come a long way.
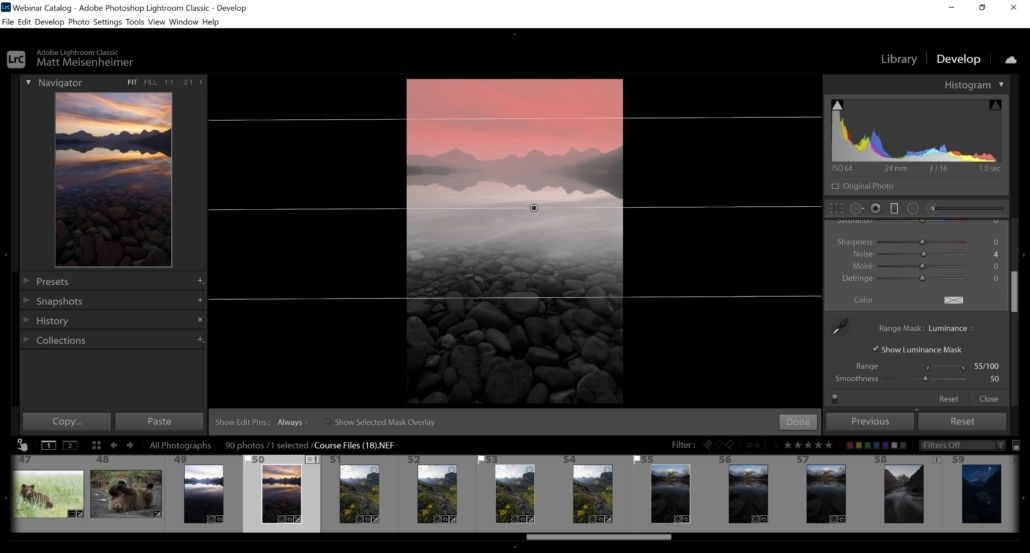
Much of that is due to the ‘Range Mask’ feature available for selective tools. Range masking has three options that can limit selective adjustments – Color, Luminosity, and Depth. The most useful for DSLR and mirrorless users are Color and Luminosity. Both are able to refine an adjustment to a specific color or tonal range. For instance, say I place a Graduated Filter over the sky and add +40 points of Temperature. The adjustment will affect the entire sky. However, if I turn on the ‘Range Mask’ option and select ‘Luminosity’, I can restrict that warmth adjustment to just the highlights in the sky. Conversely, I could choose ‘Color’ and limit the adjustment to only the orange/magenta areas of the sky.
It’s an incredible feature that you should certainly try. Read more here about Range Masks.
Until recently, Lightroom wasn’t known for its selective abilities. Those tasks were better suited for Photoshop. Photoshop still has a considerable upper hand on Lightroom when it comes to selective adjustments, but Lightroom has come a long way.
Much of that is due to the ‘Range Mask’ feature available for selective tools. Range masking has three options that can limit selective adjustments – Color, Luminosity, and Depth. The most useful for DSLR and mirrorless users are Color and Luminosity. Both are able to refine an adjustment to a specific color or tonal range. For instance, say I place a Graduated Filter over the sky and add +40 points of Temperature. The adjustment will affect the entire sky. However, if I turn on the ‘Range Mask’ option and select ‘Luminosity’, I can restrict that warmth adjustment to just the highlights in the sky. Conversely, I could choose ‘Color’ and limit the adjustment to only the orange/magenta areas of the sky.
It’s an incredible feature that you should certainly try. Read more here about Range Masks.
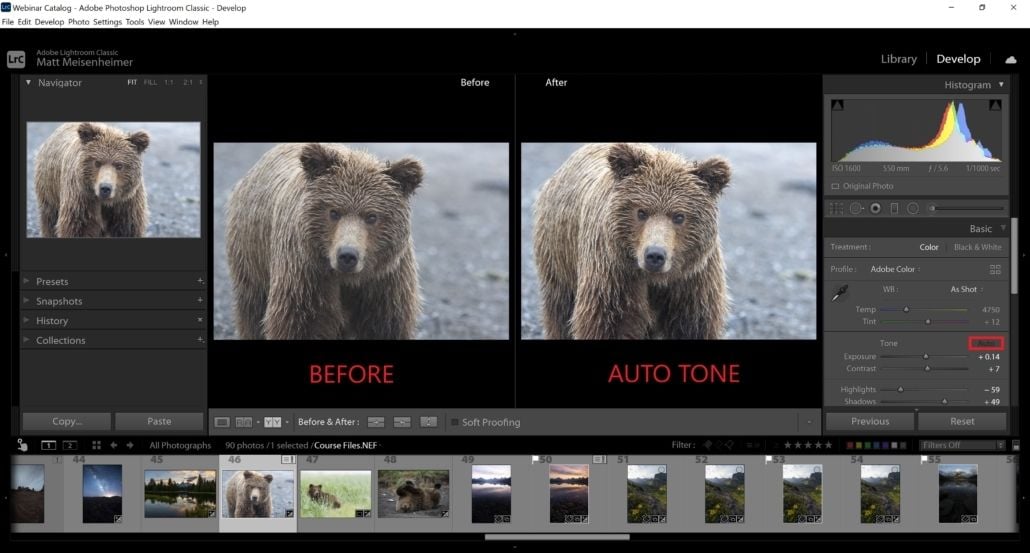
Start with Auto Tone
Knowing where to start can be one of the hardest things about processing. It’s challenging to teach because where you start and end relies on your creative vision and how an image looks to your eye. With that said, using the ‘Auto Tone’ button in the ‘Basic’ panel can offer a good starting point for processing. Clicking the ‘Auto Tone’ button will prompt Lightroom to make automatic adjustments to the image based on the Histogram and image data. Note, these adjustments are only applied across the ‘Basic’ panel sliders.
I enjoy having total control over the adjustments I make, but the nice thing about ‘Auto Tone’ is you can click the button and further fine-tune the adjusted sliders. I recommend trying it out, especially if you’re a beginner, as it will give you a good starting point for your processing.
Use Smart Previews
Smart Previews are another one of those Lightroom features that go under the radar. Smart Previews are compressed, lossy DNG files that measure 2540 pixels on the longest edge. Hence, they are still RAW files and only a fraction of the size of original, high-res photos.
The huge benefit of generating Smart Previews is you do not need access to the original image to make adjustments and even export. Thus, if working on a laptop you can import images to an external drive, but choose to ‘Build Smart Previews’ during import. With Smart Previews generated, you can disconnect your external drive with your original images, but you will still be able to make adjustments and edit the Smart Previews of the original images. When you re-connect the external drive, all adjustments will be synced.
I highly recommend building Smart Previews if you process images using a laptop and find yourself traveling a lot.
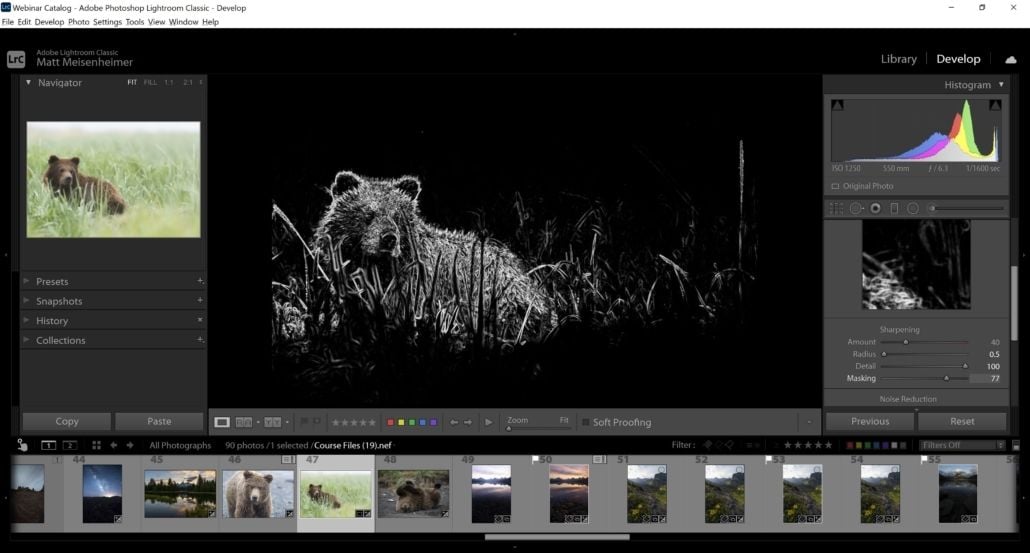
Sharpening ‘Masking’ Slider
The ‘Masking’ slider underneath the Sharpening box in the ‘Detail’ panel is one of the most useful sliders in all of Lightroom. Sharpening is a critical post-processing step, but one that requires some finesse. Our goal during sharpening is to increase sharpness and detail, but most often we only want to sharpen specific areas. The ‘Masking’ slider allows for selective sharpening. It uses algorithms to identify high contrast edges and areas of detail, and as you move the slider to the right, it restricts the sharpening adjustments you’ve made (Amount, Radius, Detail).
I recommend using the Alt/Option (PC/MAC) key with the ‘Masking’ slider. Hold the key down while you move the slider and you’ll see a black and white overlay. Think of the overlay like this; black conceals the sharpening adjustment while white reveals it. Your goal should be a white overlay on only high detail areas of the scene. The white overlay areas will receive the sharpening adjustment.
Here’s an example: I’m sharpening an image of a bear. The photo was taken at f/2.8 so the bear is in focus, but the background is blurred. I don’t want to sharpen the blurred, low detail background, but I do want to sharpen the bear. Using the ‘Masking’ slider I can effectively confine the sharpening adjustment to the bear’s face by dragging the slider to the right while holding Alt/Option (see the example photo at the top).
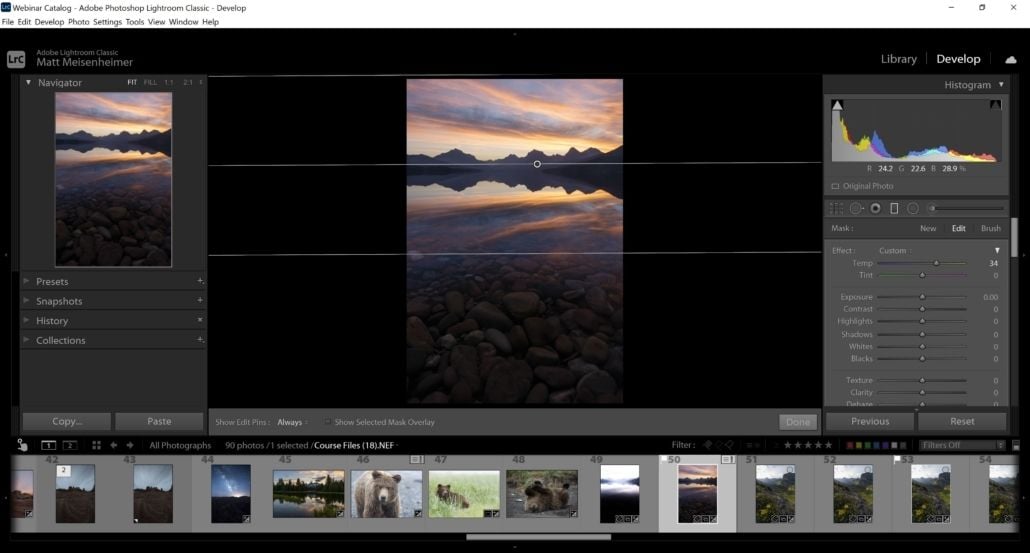
Graduated Filter for Skies
I love using the selective tools in the Lightroom tool strip, especially the Graduated Filter. The Graduated Filter is fantastic for targeting ‘halved’ sections of an image. For instance, think of a landscape image as having a sky portion and a landscape portion. The Graduated Filter can easily target either the sky or the landscape.
I use the Graduated Filter for processing skies all the time. There are many situations where while processing a sunrise/sunset sky with nice light, I want the sky to be warmer and have more magenta. I can easily drag a Graduated Filter over the sky and make those adjustments. I can also darken, lighten, add contrast, and much more.
Pro Tip: Use Range Masks within your Graduate Filters for the utmost control over where an adjustment is applied.
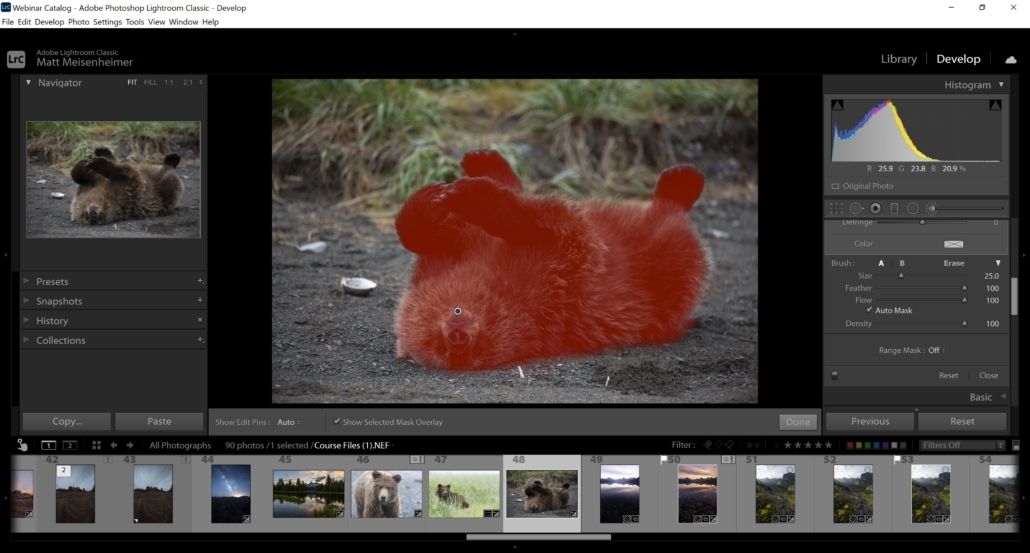
Check ‘Auto Mask’ for Brush Tool
Try checking Auto Mask next time you attempt to use the Brush Tool to make a tricky selection. In the example above, I checked Auto Mask and carefully painted around the bear. You can see the impressive job Lightroom does with isolating the bear from the background. No, with the bear selected, I can change whatever adjustment sliders I want and only the bear will be affected.
Auto Mask can be used for the Brush Tool and the Eraser Brush Tool, which really helps define and isolate areas of an image. I find it works great for wildlife images and landscape images where you want to highlight a foreground or midground element. Auto Mask used to not be very effective, but updates have brought improved algorithms and it works great now, in my opinion.
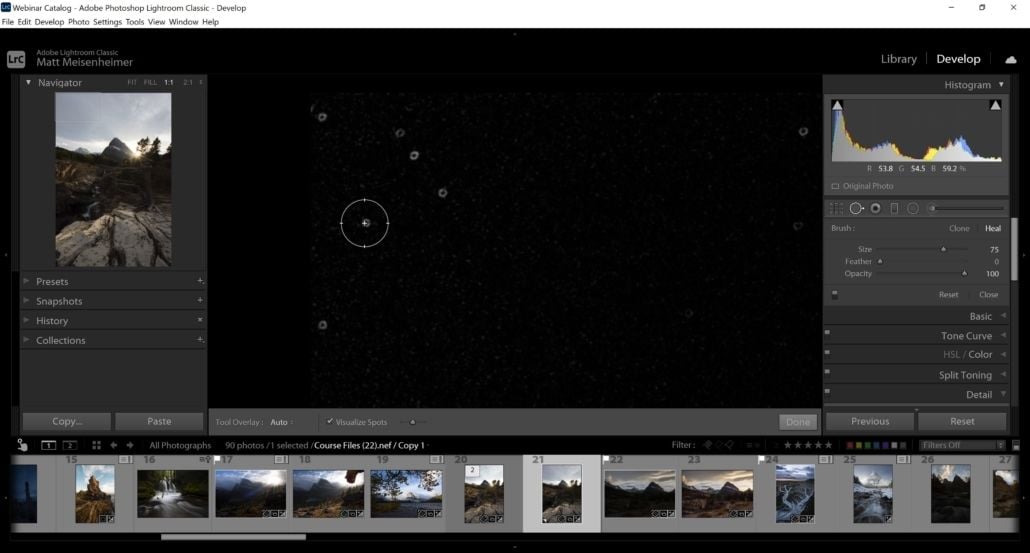
Visualize Spots
Dust spots on the sensor, we all have them and have dealt with them. Sometimes there are just a few and other times they litter the entirety of an image.
Thankfully, Lightroom has an easy and effective way to deal with these pesky spots. The Spot Removal Tool set to ‘Heal’ is a great option for removing spots. But, there’s an additional overlay hidden in the toolbar that helps with this process even more.
Check ‘Visualize Spots’ on the toolbar and move the slider to the right, to the point where you can easily identify spots against the black background. See the above photo for an example.
At that point, I change the size of the Spot Removal Brush to just larger than the dust spots and click away. With the brush set to ‘Heal’, ‘Feather’ to 0, and ‘Opacity’ to 100, the tool removes spots seamlessly.
Pro Tip: Use the Navigator in the top left corner to zoom in 1:1 and pan around an image while using the Spot Removal Tool.
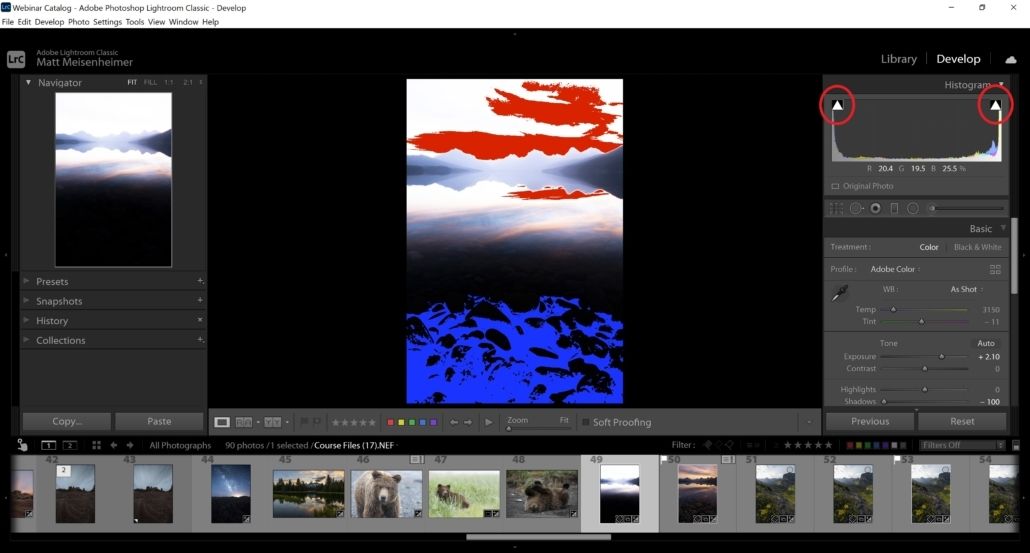
Identify Clipping
Clipping can potentially ruin an image. It refers to pixels that are ‘blown out’, meaning pixels that are either 100% white or 100% black and have no other data. While shooting in the field, we use the Histogram to ensure that no highlight or shadow areas are blown out. While processing, it is also possible to blow out/clip pixels.
For instance, moving the ‘Exposure’ slider to the right or left might cause clipping in certain areas of an image. You can use the Histogram in Lightroom to determine if there is clipping, but really you’re going by your eye when processing, and your eye isn’t always the most accurate.
There is an awesome feature in Lightroom that’s linked with the Histogram and allows you to toggle on/off and overlay that identifies clipping in the scene. Just click the two arrows at the top of the Histogram to turn the clipping overlay on/off. Red areas designate highlights that are clipped/blown out and blue areas designate shadow areas that are clipped/blown out.

We offer world-class travel photography
experiences around the world.
Each tour is bundled with lodging, meals, and transportation between workshops included, allowing you to focus on photography instead of the stress of traveling.
experiences around the world.
Each tour is bundled with lodging, meals, and transportation between workshops included, allowing you to focus on photography instead of the stress of traveling.
Get Our Trip Catalog
Receive a trip catalog that highlights all of our upcoming photo tours and workshops.Schedule a Trip Consultation
Meet with a photo experience coordinator, and experience a personal touch to your booking experience.Landscape Guide
Receive a FREE Landscape Cheat Sheet Written By a Pro Photographer.Webinars
Our regularly hosted webinars provide photography instruction from our own guides on a wide range of topics.Education Portal
Explore our library of articles that cover everything from common questions, to in-depth guides on how to achieve that perfect shot.
Backcountry Journeys
Connecting Passionate People To
Exceptional Experiences.
Exceptional Experiences.
Business Hours:
Mon-Fri, 8AM-4PM MT
928-478-1521
adventure@backcountryjourneys.com
Mon-Fri, 8AM-4PM MT
928-478-1521
adventure@backcountryjourneys.com
arrow_drop_down_circle
Divider Text
All Images & Content Are Property Of Backcountry Journeys Photography Tours, Workshops & Safaris LLC - Copyright 2026
About Us
Receive a Digital Trip Catalog
Find an upcoming photography tour with our interactive catalog.