2024 Travelers' Choice

About Backcountry Journeys
Why Choose Backcountry Journeys
If you're considering a photography tour, hear why Backcountry Journeys delivers the best experience in the industry.Frequently Asked Questions
If you're new to photography tours, or new to BCJ, you can find our common travel questions here.Fitness Levels
Our trips vary on physical intensity, and by reviewing our fitness levels, you can find out which trips may be more challenging, or aligned more closely with your comfort level.Meet The Crew
We've built an amazing team of experienced guides, and dedicated office staff that elevate your travel experience. Get to know their backgrounds, and hear their stories.Gift Certificates
Give the gift of photo adventure! We offer gift certificates that can be applied to any of our upcoming tours.Loyalty Program
We reward our frequent photo adventurers with exclusive discounts on amazing photography tours.Contact Us
If you need to get in touch with our office staff, or have additional business inquiries, you can find our information here.Stay Up To Date On All Things
Backcountry Journeys
Backcountry Journeys
Our Photography Community
Our Webinars
Our regularly hosted webinars provide photography instruction from our own guides on a wide range of topics.Our Education Portal
Explore our library of articles that cover everything from common questions, to in-depth guides on how to achieve that perfect shot.Community Testimonials
We're proud to foster an amazing group of photo travelers, and here you can find their stories from their past adventures.Resources For Photographers
About Our Company
Resources For Photographers
About Our Company
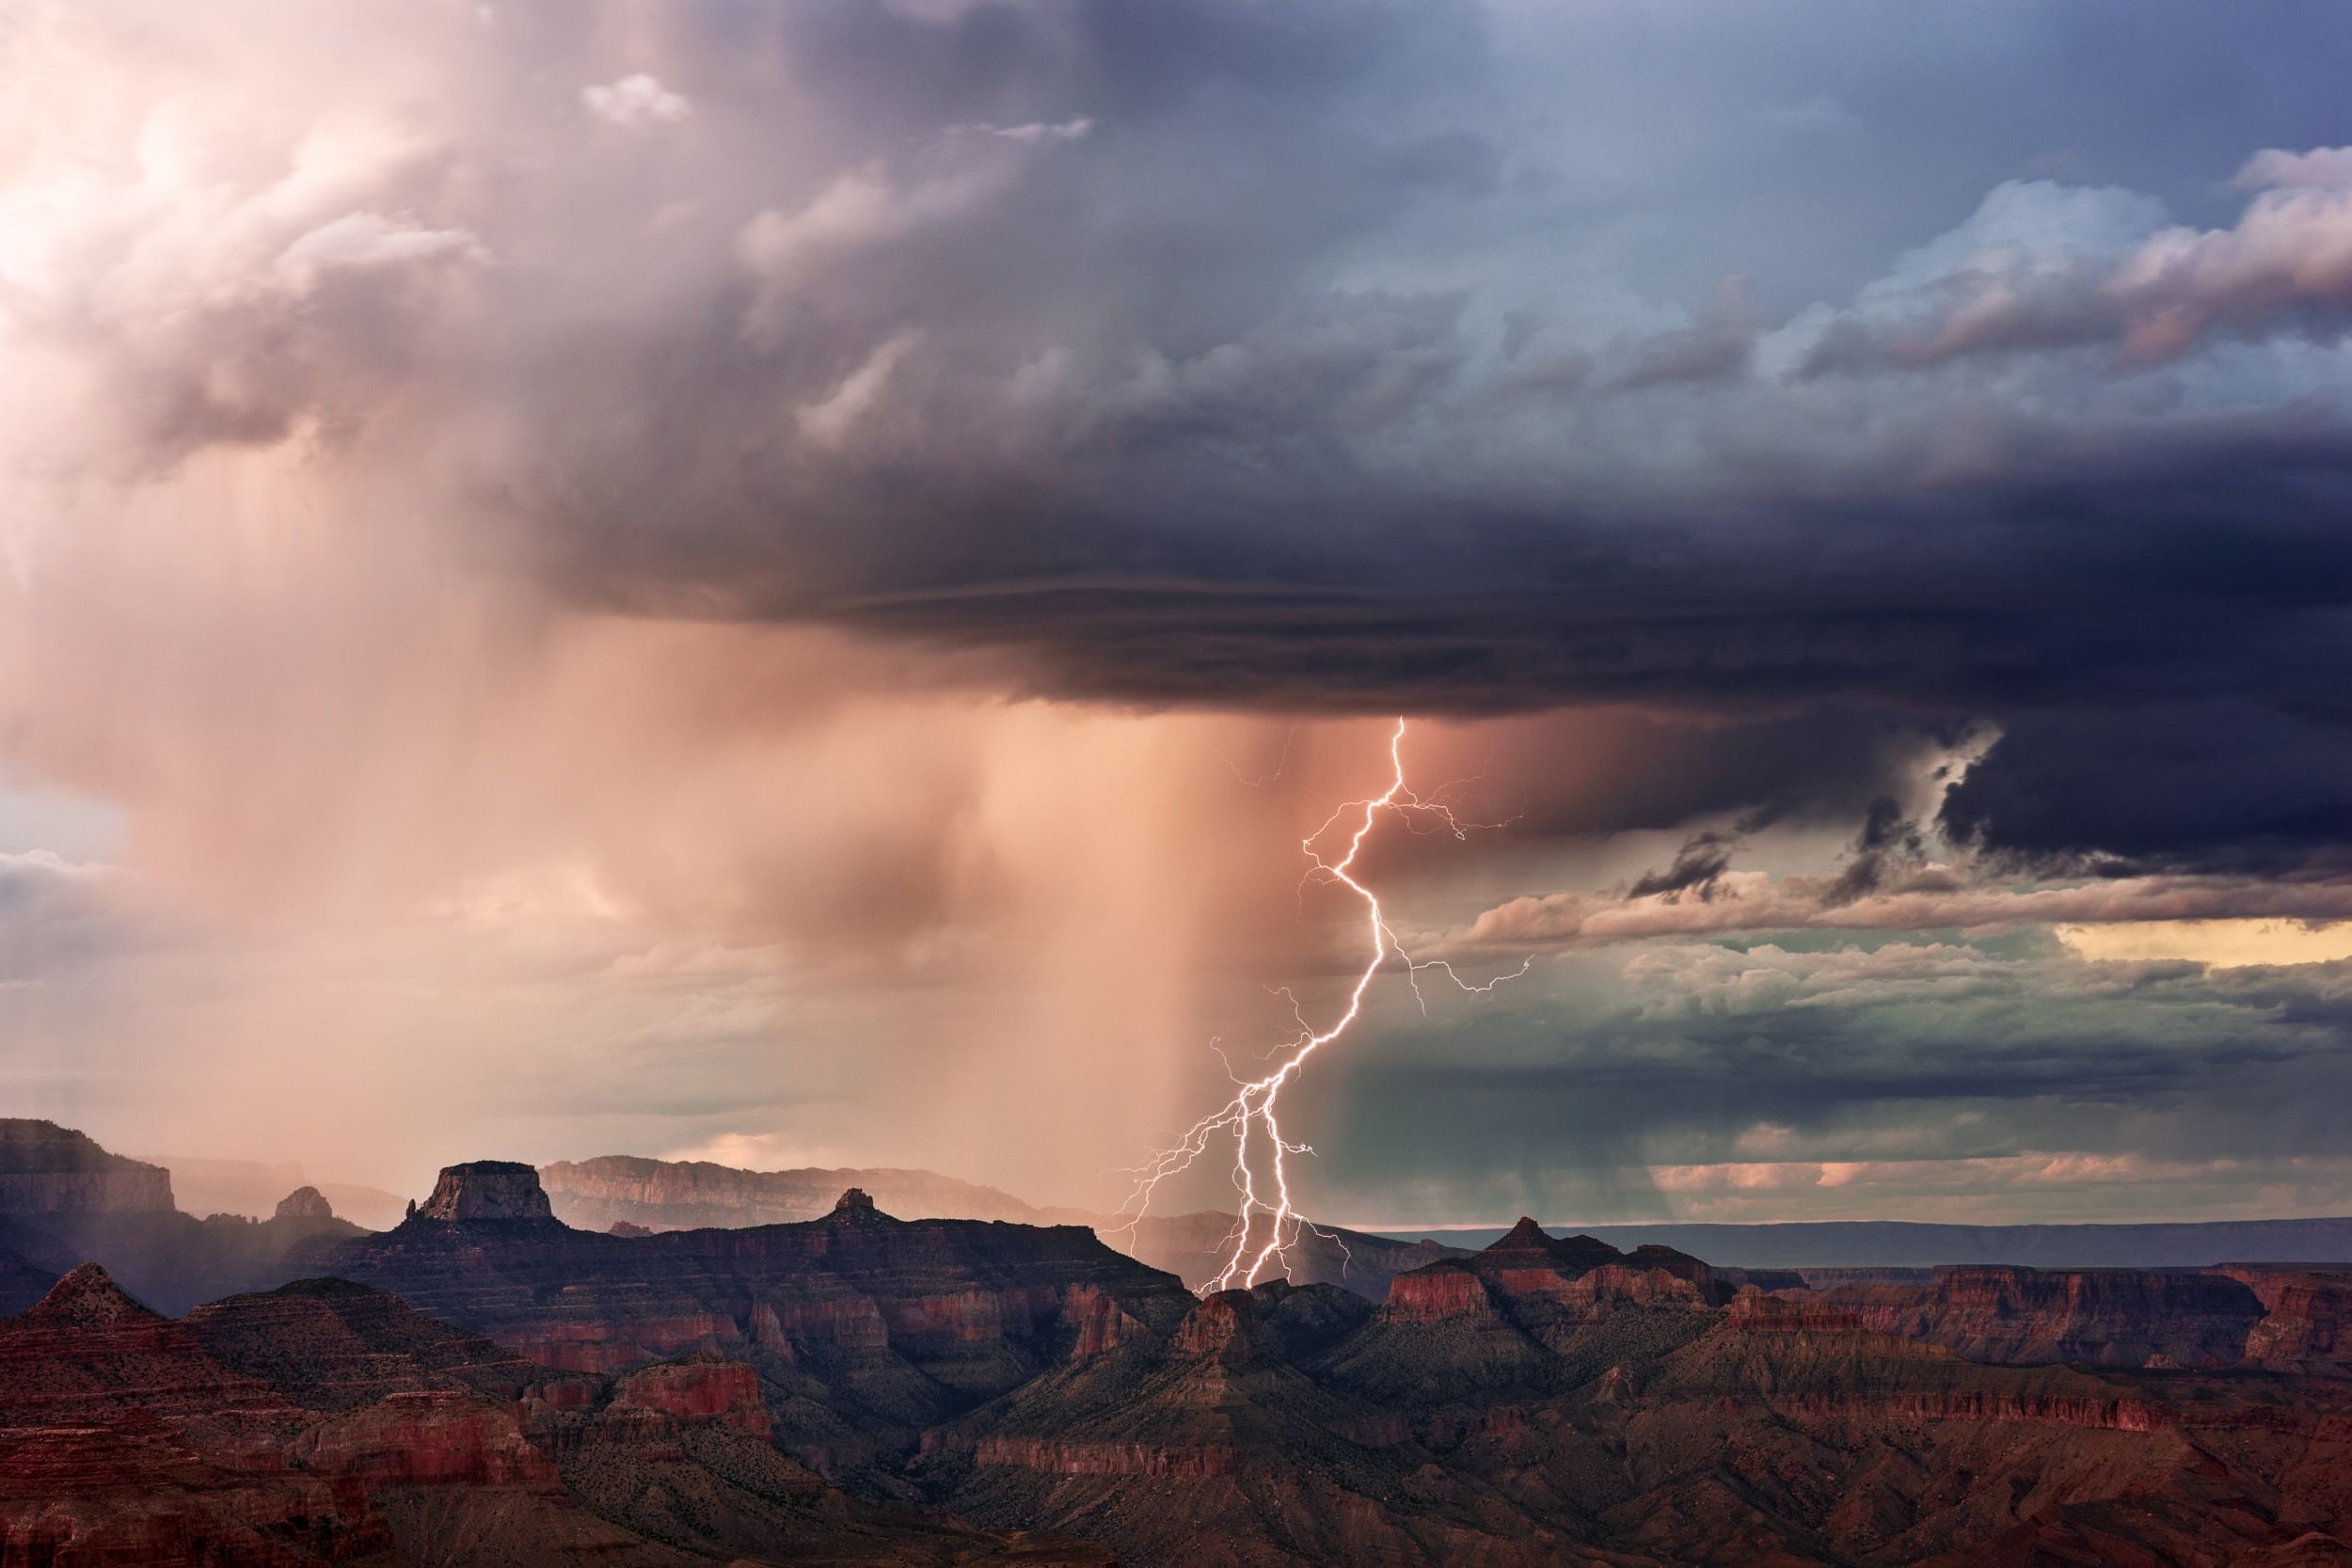
The Monsoon and Photographing Lightning

Published July 20, 2019
Today marks the beginning of Backcountry Journeys’ inaugural Southwest Monsoon: Grand Canyon Country photo tour.
Our hope for the week is that we are able to see and photograph some of the most striking features out here in Northern Arizona that, over the years, have come to define the southwestern United States.
The Mittens, and Merrick Butte. That spot where Forrest Gump got tired of running. Antelope Canyon. Horseshoe Bend. Lake Powell. And, of course, The Grand Canyon (from its North Rim).
Our mission is to travel to these iconic locations during the region’s monsoon season in an attempt to create compositions that include these famous subjects with colorful clouds, sheets of rain, and a lightning-filled backdrop, as storms hit the region daily.
For the first time in ‘forever,’ the Monsoon in the northern Arizona region is late. Unbelievably, our forecast for the week is for hot and mostly sunny skies. Anyone familiar with July in the desert southwest knows that monsoon storms are a thing you can normally count on. Every day. At least somewhere in the region.
While the forecast does not appear to be in our favor, we will still take high hopes into the week. That being said, the conditions are still there, and the time is still right for a storm or two to pop up, even if not projected to do so. You know how weather is! Storms are precicted for later in the week near Flagstaff, which is located across the Grand Canyon from where we’ll be at the time. If those stomrs shift towards the South Rim of the Canyon, it’ll be EXACTLY what we want. Fingers crossed!
Regardless of weather, the locations we’ll be visiting and the company of this group of friends and photographers will be enough to create a lasting memory and remarkably wonderful images.
I’m jealous of myself, a bit, for being lucky enough to go along for the ride!
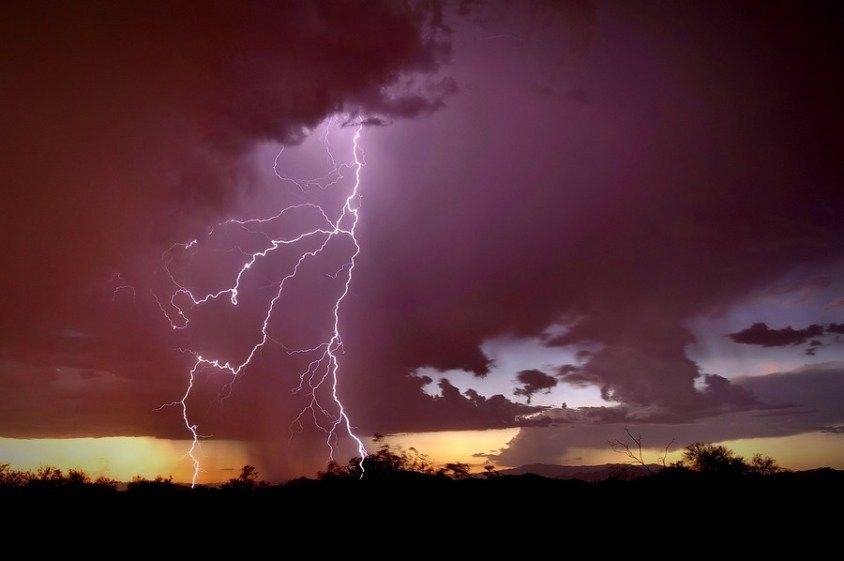
In a previous post we discussed shooting lightning safely. Its time to complete that conversation with a quick introduction on how to photograph lightning.
Here we go:
Quick things to consider first
You must stay safe – Shoot ahead of storms, not inside of them.
You must use a sturdy tripod – Sturdier the better to combat (likely) wind
DSLR or Mirrorless Camera – You need to be able to shoot longer exposures
Focus manually – Look for a distant light and focus on it.
Shoot in Manual – You need to control these settings
Shoot in RAW – Allows for better post-processing
Remote Trigger – Eliminate any kind of vibration from pressing the shutter button.
Rain Covers – Goes without saying, no?
Location
We’ve mentioned it before, and we’ll do it again. Safety comes first with this style of photography so your location to the storm is crucial! Secondly, with regard to location, your best images are going to come if you shoot lightning that is away from the heaviest rainfall, as it will soften things. If you are between six and 10 miles from the storm you’ll be a. Safer, and b. Within a good range to get nice sized bolts with good color.
Conceptualize your shot
Choose your lens based on your image concept. Perhaps the lighting might even dictate what you choose. Are you looking to create a landscape image with cloud-to-ground lighting from a storm as a backdrop? Are you shooting up into the sky, capturing cloud-to-cloud bolts up in the sky? If you are looking to create a landscape image, utilize a wide or mid-range lens such as a 24-70mm. If you are capturing the sky only (think clouds just flashing in the sky, not cloud-to-ground strikes), you can zoom in tighter and therefore can choose something longer range like a 70-200mm.
Settings
Once you are in manual mode, you can control the following settings: Use Evaluative Metering and lock the White Balance in on Auto (If you are shooting in RAW you adjust WB in Post). Set your shutter to BULB, and aperture to f/5.6, ISO to 400. Again, focus manually.
Close the shutter as soon as lighting strikes. Then, take a look at your images to then make the necessary changes to your settings based on the outcome. For instance, if the lighting is bright and results in your image being overexposed, reduce your ISO a bit. If the reverse is the result, bump up the ISO a bit.
Remember that when shooting lighting during the day, or early during sunset, you’ll need to expose for the landscape, as well. To do this, select shutter priority mode and set that shutter speed to 1/15 or ¼ of a second and the ISO at 100. Take some shots and take a look at the outcome. Adjust shutter speed until your exposure is good. Slower shutter speed will allow you better chance to capture the lightning so try using a polarizing or neutral density filter to allow you to slow the exposure a few stops allowing for a slower shutter.
You’ll likely achieve a sharper image with shorter shutter speed, so you’ll want to do what you can to achieve that. And that is where a Lightning Bug can be quite handy! The lightning trigger causes the shutter to open just when lightning strikes. Just don’t forget to still get your camera settings and white balance correct. If you utilize a lightning trigger, whichever brand, make sure to read the instructions in advance of going out into the field so you don’t miss a strike!

We offer world-class travel photography
experiences around the world.
Each tour is bundled with lodging, meals, and transportation between workshops included, allowing you to focus on photography instead of the stress of traveling.
experiences around the world.
Each tour is bundled with lodging, meals, and transportation between workshops included, allowing you to focus on photography instead of the stress of traveling.
Get Our Trip Catalog
Receive a trip catalog that highlights all of our upcoming photo tours and workshops.Schedule a Trip Consultation
Meet with a photo experience coordinator, and experience a personal touch to your booking experience.Trip Calendar
View our trip calendar and filter upcoming departures by interest or seasonality.Webinars
Our regularly hosted webinars provide photography instruction from our own guides on a wide range of topics.Education Portal
Explore our library of articles that cover everything from common questions, to in-depth guides on how to achieve that perfect shot.BACKCOUNTRY JOURNEYS
"Backcountry Journeys offers guests the unique opportunity to explore our natural world from behind their own lens. We run a selection of hand-crafted Photo Tours, Workshops & Safaris connecting passionate people to exceptional experiences. Locations worldwide.
- Russ Nordstrand, Backcountry Journeys Founder & Director
- Russ Nordstrand, Backcountry Journeys Founder & Director
TRIP CATALOG
Download our Trip Catalog for detailed information on our many destinations for photography tours, workshops, and safaris.
All Images & Content are property of Backcountry Photography Tours, Workshops & Safaris LLCs - Copyright 2025
BACKCOUNTRY JOURNEYS
"Backcountry Journeys offers guests the unique opportunity to explore our natural world from behind their own lens. We run a selection of hand-crafted Photo Tours, Workshops & Safaris connecting passionate people to exceptional experiences. Locations worldwide.
All Images & Content are property of Backcountry Journeys Photography Tours, Workshops & Safaris LLC - Copyright 2025
TRIP CATALOG
Download our Trip Catalog for detailed information on our many destinations for photography tours, workshops, and safaris.