2024 Travelers' Choice

About Backcountry Journeys
Why Choose Backcountry Journeys
If you're considering a photography tour, hear why Backcountry Journeys delivers the best experience in the industry.Frequently Asked Questions
If you're new to photography tours, or new to BCJ, you can find our common travel questions here.Fitness Levels
Our trips vary on physical intensity, and by reviewing our fitness levels, you can find out which trips may be more challenging, or aligned more closely with your comfort level.Meet The Crew
We've built an amazing team of experienced guides, and dedicated office staff that elevate your travel experience. Get to know their backgrounds, and hear their stories.Travel Desk
You can review our various payment, and travel policies here, along with resources regarding international travel.Gift Certificates
Give the gift of photo adventure! We offer gift certificates that can be applied to any of our upcoming tours.Loyalty Program
We reward our frequent photo adventurers with exclusive discounts on amazing photography tours.Contact Us
If you need to get in touch with our office staff, or have additional business inquiries, you can find our information here.Stay Up To Date On All Things
Backcountry Journeys
Backcountry Journeys
Our Photography Community
Our Webinars
Our regularly hosted webinars provide photography instruction from our own guides on a wide range of topics.Our Education Portal
Explore our library of articles that cover everything from common questions, to in-depth guides on how to achieve that perfect shot.Community Testimonials
We're proud to foster an amazing group of photo travelers, and here you can find their stories from their past adventures.Resources For Photographers
About Our Company
Resources For Photographers
About Our Company
Understanding Autofocus

Published March 20, 2019
There are countless different variables that go into taking a photo and ensuring the desired outcome. Among them, sharpness is perhaps the most critical. By ensuring proper shutter speed and aperture the photographer can try to capture the moment sharply, but without a properly functioning autofocus, getting a crisp shot quickly is all but impossible.
Before we dive into the function of your camera’s autofocus, be sure you’ve taken a look at the previous articles regarding shutter speed and aperture to ensure you’re making the most of your camera’s settings to maximize your autofocus’ abilities. Once you’ve done that, continue reading and maybe we can provide some clarity (ha!) to what it is your autofocus is doing.
What is Autofocus?
Autofocus is an integrated system that combines a mechanical and optical system integrated into your camera system to quickly ensure proper focus under a wide variety of shooting conditions. The current autofocus systems on modern DLSR and mirrorless cameras, unlike most other functions of your camera, utilize components from both the lens and the camera body when shooting that work together to provide the photographer with a clear subject. By utilizing your camera’s autofocus and its corresponding settings, you can ensure quick and accurate focus on a variety of subjects, whether moving or not. In short, autofocus is what allows the photographer to take tack sharp photos of a flying bird’s wings as easily as a crisp ridgeline in a mountainous landscape.
How Does Autofocus Work?
Disclaimer: While I’d love to provide detailed information on every camera on the market, it would simply be too much. So with that in mind, know that there are a few variables within your camera’s autofocus depending on which system and camera body you are using. While we take a look at the broad basics of how autofocus systems work, understand that there may be discrepancies depending on your particular camera. If you have questions about the specifics, start by looking at your camera’s manual to understand which type and style of autofocus you are using, and go from there.
There are two main types of autofocus that are implemented in a wide variety of cameras and lenses, called active and passive autofocus. Back in the 70’s, when designing the first autofocus systems, most cameras used an active autofocus system that works by sending a beam of light or a radio frequency similar to SONAR toward the subject and measuring the distance to that subject and adjusting the focal length accordingly. This system worked great for short range applications such as portraits or macro photography, as well as low light settings, but fell short when shooting larger scenes or subjects that were moving quickly. Most point and shoot cameras and camera phones will still use some sort of active autofocus today.
The more popular of the two autofocus methods used in higher end cameras like DSLR and modern mirrorless bodies is the passive system. The passive system is called that because the camera is not actively sending out a measurement upon which to make autofocus adjustments, and is instead simply assessing the image digitally. This can be, from a microscopic level, less accurate than some active systems, but has widely been considered adequate for the vast majority of professional applications. Within the passive autofocus are two additional styles, contrast detection and phase detection. Both of these styles utilize a sensor within the camera that makes assessments of the image within the frame and manages the focus to fit a computerized algorithm for determining focus.
Contrast detection uses a sensor that is focused on a line of pixels within the frame to determine areas of highly contrasting pixels. This will allow the camera to find places where the individual pixels vary sharply and know that the sharper the difference, the more in focus the image is. As the image blurs, so do the colors within the line of pixels. This single line may be duplicated many times over throughout the frame, giving the photographer a multi-point autofocus system where the camera is looking for multiple areas of contrast to ensure the single sharpest exposure possible. As the sensor in the camera is making these assessments, it is telling the motor within the lens to make adjustments until the image is at its sharpest. This system works well with mirrorless cameras and through the use of “live view” on DLSRs because the camera needs to already have a digital image captured in order to assess pixels. The downside of contrast detection is that it works poorly in low light and can take slightly longer to focus on moving subjects. The benefit, however, is that in highly contrasting scenes, this can ensure a very crisp image.
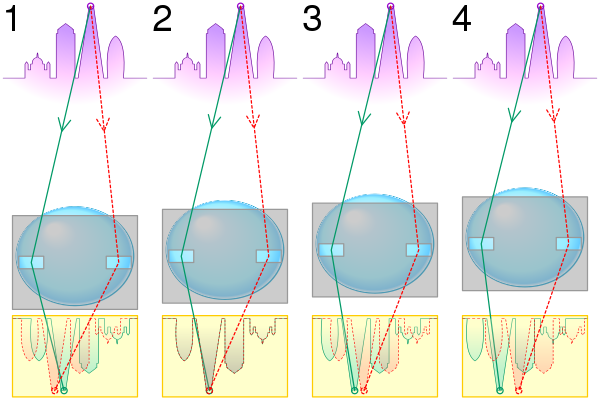
In this diagram, phase detection autofocus is demonstrated with red and green lines, with the focus point at the top of the image. Figure 1 is focused too near, figure 2 is focused correctly, figured 3 is focused too far, and figure 4 is focused much too far. Credit: Wikimedia Commons
Those of us using a DLSR system without the assistance of live view are more likely to autofocus using a phase detection system. A similarly passive system, phase detection actually utilizes a separate sensor from your camera’s digital image processing sensor that will capture light points from two opposite sides of your lens’ aperture, and then adjust the focus until these points are synchronized. Think of it as your camera looking at the image from a left and right “eye” and then adjusting the position of the lens so that both eyes are seeing the same thing at the same focus point. Once these two light points are overlapping and matching, it will then send a signal to the image processor that the image is in focus and to capture the image. As a photographer, you can select individual focus points that your camera will assess these light points from and ensure the image is in focus across multiple aspects of the frame.
Autofocus Modes
Within the camera’s autofocus system are multiple ways that it optimizes focus. These are called autofocus modes or styles. There are three main autofocus modes, single shot, continuous or “servo” and a hybrid setting often labeled as AF-A (Nikon) or AI Focus (Canon). The single shot mode is great for landscapes and portraits, as the camera will allow the photographer to pick a focus point and it will adjust for that point once and take the photo. Nikon and Sony users will see it labeled as AF-S, while Canon folks will want to select “One Shot.” This is a very simple mode. It is a 1:1 ratio, one focus measurement, one photo.
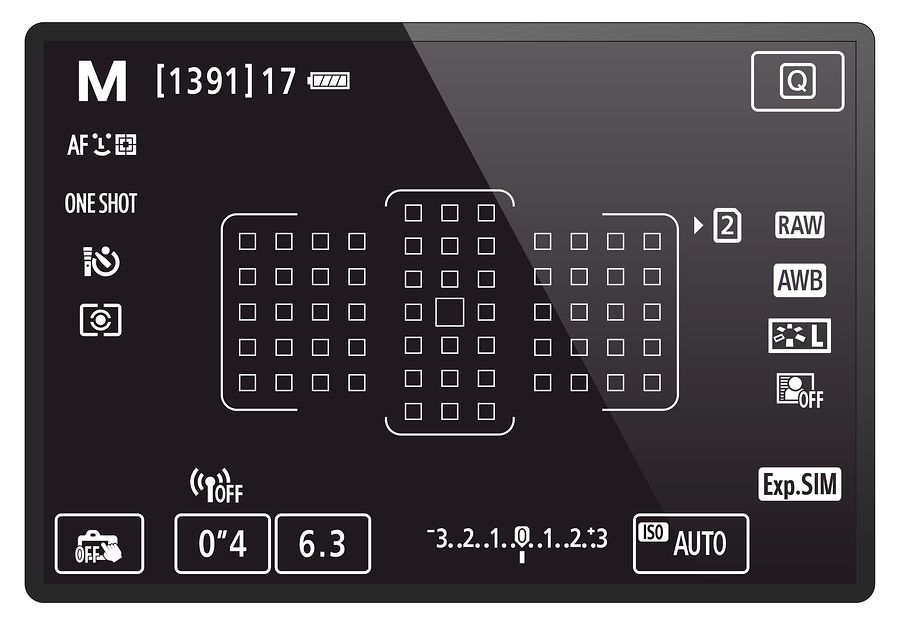
In this screen grab, you can see that the current autofocus setting is set to “One Shot”, and the maximum number of autofocus points are activated for a fairly automated single shot autofocus.
The continuous mode, often labeled as AF-C or AI Servo, will tell your camera that you anticipate your subject to move, and as a result, would like your autofocus system to engage continuously while holding down your shutter (or back button focus for those of you who use this). Using this setting will allow your camera to monitor the subject for movement and continue to make adjustments to the focus as long as the focus button is pressed. Those of you signed up for the upcoming Bald Eagles of Alaska photo tour I’ll be guiding at the end of March will be living in this mode all week. While shooting a landscape scene in continuous mode will not harm your image, some photographers do believe that stationary landscape or portrait imagery is best shot on the one shot mode as your camera will not stray from the focal point specified, and you can ensure a cleaner shot. Personally, I haven’t seen too many differences, but do know that continuous mode will eat up the battery a bit faster than one shot, so if you find yourself shooting an exclusively landscape scene, go ahead and switch to save your battery life a bit.
The third mode, and perhaps most confusing for most of my guests, is the AI Focus or AF-A hybrid mode. This mode utilizes a combination of the single shot and continuous focus modes and will monitor for movement and adjust focus accordingly. If the subject is stationary, the camera will take a single reading and then monitor for movement. Once movement is detected, the continuous mode will kick in and the camera will adjust as the subject moves. So why not use this setting all the time? Well, the hybrid mode is typically the least accurate of the three modes, but will be most helpful when your camera is moving while your subject is also moving as the system continues to watch for movement. By selecting this mode, you can also track moving subjects that were at one point stationary (like a bird taking off from its perch) without having to switch modes.
Autofocus Points
Once you have determined which autofocus mode to use, your next task is to determine the type and number of individual autofocus points to utilize. Each camera is a bit different, with older models having as few as four or five individual autofocus points, and some modern mirrorless options having well over 200! How do you determine which points to use? Why not just have all of them turned on all of the time?
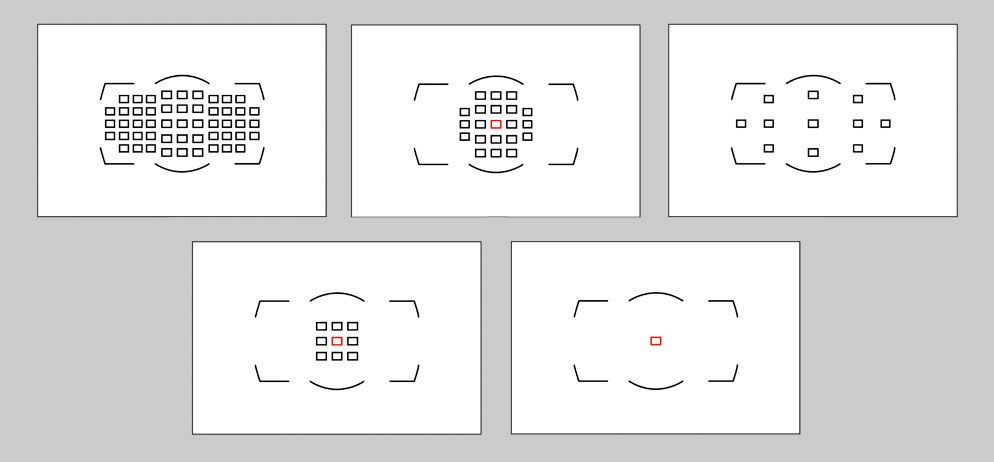
In this diagram from Nikon, we see the wide range of types of autofocus point selection available. The top left shows all focus points available which are used in a fully automated autofocus setting. At the bottom right is a single focus point, great for picking a specific focal point and sticking to it. The remaining three displays are the various dynamic multipoint focus options great for tracking or focusing on a broader subject. Photo Credit: Nikon USA
The number of individual autofocus points that you should be using is greatly dependent upon the type of shooting you’ll be doing. If you’ve read my recent post on understanding composition, you’ll know that there are very different photography styles that depend heavily upon your selected focus point. By using your camera’s autofocus point selection you are able to control where within the frame your camera will focus.
An instance when this is extremely useful are when shooting portraits (whether human or wildlife), when focusing on the eye of the subject is crucial. By shooting in your camera’s continuous or hybrid autofocus mode you can initiate focus on the subject’s eye by selecting a single autofocus point, and then continue to track as your subject moves.
If your subject is moving quickly, however, it may be difficult or impossible to stay trained on the eye, or your subject’s eye may simply be a very small component of the frame. In this case, utilize your camera’s multipoint dynamic autofocus selection system to help track and maintain focus within a set space. This works by initially gaining focus on one central point, and then using a larger number of autofocus points to maintain that focus as the subject (or the camera) moves. This works great when tracking or wanting to anticipate movement from your subject, and, depending on the size of your subject within your frame, you may select larger spaces for your camera to monitor.
If your subject will not be moving, and is going to be spread throughout your entire frame (ie. landscape photos), using your camera’s multipoint selection for autofocus can work well, but I prefer to still use a single point focus. This way I can ensure my autofocus point is exactly where I want my emphasis to be and will be its sharpest as my camera doesn’t try to compensate for other areas within the frame. Typically with landscape photos, I will select a spot roughly ⅓ of the way into my frame. Going back to my recent post on aperture, you’ll know that by setting your aperture for f/11 for landscape shots, your background will be in focus along with your foreground. It’s more important to have a crisp foreground, so I’ll set my focus point on something closer to the front of the frame and go from there.
To get extra precise with this, you can use something called the hyperfocal distance to ensure you will have a tack sharp foreground, as well as a sharp background. Hyperfocal distance is the point at which, based on the chosen aperture and focal length, that your image will be sharp from the chosen focal point all the way to infinity. If your entire image is captured from beyond this distance, there’s no need to concern yourself with it. However, this is crucial when shooting a distinctive foreground subject, as it will be the difference in a fuzzy foreground and a sharp background, or vice versa. There are a wide variety of hyperfocal distance calculators available, both in apps and books and online that will help you to determine the hyperfocal distance of each lens you use. Once you know the ideal hyperfocal distance for the desired image, aim your single autofocus point for that spot, and fire away.
Overall, your camera’s autofocus is a crucial component to ensuring crisp clean images. The reality of shooting nature photography is that we have to operate in a wide variety of conditions and circumstances. By understanding your camera’s autofocus modes and the method by which your camera looks for focus points you are better prepared to adapt to the frequent changes that come from shooting nature scenes. As you utilize the different autofocus modes, find ways to modify your personal shooting style to streamline your process and you’ll be sure to come away happy. And by keeping an eye on your scene and the distance and relative size of your subject within the frame, you’ll be able to track moving subjects well and ensure clean crisp landscape photos with ease. Happy shooting!

We offer world-class travel photography
experiences around the world.
Each tour is bundled with lodging, meals, and transportation between workshops included, allowing you to focus on photography instead of the stress of traveling.
experiences around the world.
Each tour is bundled with lodging, meals, and transportation between workshops included, allowing you to focus on photography instead of the stress of traveling.
Get Our Trip Catalog
Receive a trip catalog that highlights all of our upcoming photo tours and workshops.Schedule a Trip Consultation
Meet with a photo experience coordinator, and experience a personal touch to your booking experience.Trip Calendar
View our trip calendar and filter upcoming departures by interest or seasonality.Webinars
Our regularly hosted webinars provide photography instruction from our own guides on a wide range of topics.Education Portal
Explore our library of articles that cover everything from common questions, to in-depth guides on how to achieve that perfect shot.BACKCOUNTRY JOURNEYS
"Backcountry Journeys offers guests the unique opportunity to explore our natural world from behind their own lens. We run a selection of hand-crafted Photo Tours, Workshops & Safaris connecting passionate people to exceptional experiences. Locations worldwide.
- Russ Nordstrand, Backcountry Journeys Founder & Director
- Russ Nordstrand, Backcountry Journeys Founder & Director
TRIP CATALOG
Download our Trip Catalog for detailed information on our many destinations for photography tours, workshops, and safaris.
All Images & Content are property of Backcountry Photography Tours, Workshops & Safaris LLCs - Copyright 2025
BACKCOUNTRY JOURNEYS
"Backcountry Journeys offers guests the unique opportunity to explore our natural world from behind their own lens. We run a selection of hand-crafted Photo Tours, Workshops & Safaris connecting passionate people to exceptional experiences. Locations worldwide.
All Images & Content are property of Backcountry Journeys Photography Tours, Workshops & Safaris LLC - Copyright 2025
TRIP CATALOG
Download our Trip Catalog for detailed information on our many destinations for photography tours, workshops, and safaris.