Mon - Fri: 8 am - 4 pm MT

About Backcountry Journeys
Why Choose Backcountry Journeys
If you're considering a photography trip, hear why Backcountry Journeys delivers the best experience in the industry.Frequently Asked Questions
If you're new to photography trips, or new to BCJ, you can find our common travel questions here.Fitness Levels
Our trips vary on physical intensity, and by reviewing our fitness levels, you can find out which trips may be more challenging, or aligned more closely with your comfort level.Meet The Crew
We've built an amazing team of experienced guides, and dedicated office staff that elevate your travel experience. Get to know their backgrounds, and hear their stories.Loyalty Program
We reward our frequent photo adventurers with exclusive discounts on amazing photography trips.Contact Us
If you need to get in touch with our office staff, or have additional business inquiries, you can find our information here.Refer a Friend
Know someone perfect for one of our tours? Recommend them through this quick form.Stay Up To Date On All Things
Backcountry Journeys
Backcountry Journeys
Our Photography Community
Our Webinars
Our regularly hosted webinars provide photography instruction from our own guides on a wide range of topics.Our Education Portal
Explore our library of articles that cover everything from common questions, to in-depth guides on how to achieve that perfect shot.Community Testimonials
We're proud to foster an amazing group of photo travelers, and here you can find their stories from their past adventures.Resources For Photographers
About Our Company
Resources For Photographers
About Our Company
10 Powerful Lightroom Tips and Tricks
Published July 13, 2023
Adobe Lightroom is by far one of the most popular, powerful, and widespread photo editing platforms of all time. I’ve been using Lightroom for as long as I can remember, and this impressive application has allowed me to bring my photography to greater heights. Whether I’m editing a star trail composite, wildlife shots, or wide-angle landscape HDR images I almost always turn to Lightroom when I need to bring my RAW files to life.
Lightroom is largely considered the industry standard for photo editing and it’s pretty insane to think of all the features and capabilities housed within. Even though I’ve used Lightroom for years and have mastered all the basics, there’s always something new to be learned. Whether they’ve released new tools and features, or another photographer has shown me something incredible that I never knew existed, Lightroom continues to surprise me and continues to get even better and more capable.
In today’s article, we’re going to take a closer look at the Lightroom platform and specifically cover some of the most powerful, helpful, and impressive features and capabilities within the application. So, without wasting too much time, let’s get right into it! Here are 10 of the most powerful Lightroom tips and tricks that every photographer should know about!
Organize your Images
Right off the bat, let’s discuss some great ways to organize your images before you even start editing them. If you’re anything like me, you likely capture tons of photos while out shooting and one of the longest parts of the editing process is painstakingly going through all your images and deciding which ones you even want to edit in the first place. This used to drive me crazy until I developed some good habits.
This is especially true when I’m on longer trips or shooting wildlife or sports subjects and capturing thousands of images before I even upload them to my computer. So, how can one efficiently organize their images before they start editing? Luckily Lightroom has some great features that make this process easy.
The first thing I’ll do is open up all my images in the library and start going through them one by one. I’ll quickly delete any images that are out of focus, blurry, or that I simply don’t like for any given reason. I usually try to delete at least 50-75% of them off the bat. A great way to do this is to flag them as you go through the entire folder. You can press “X” to reject images and or “P” to “pick” images and at the end you can delete all the rejected images at once.
Now that you’ve deleted all your “bad” images, this is where things can get nuanced and complicated. Here are some strategies to further help you organize.
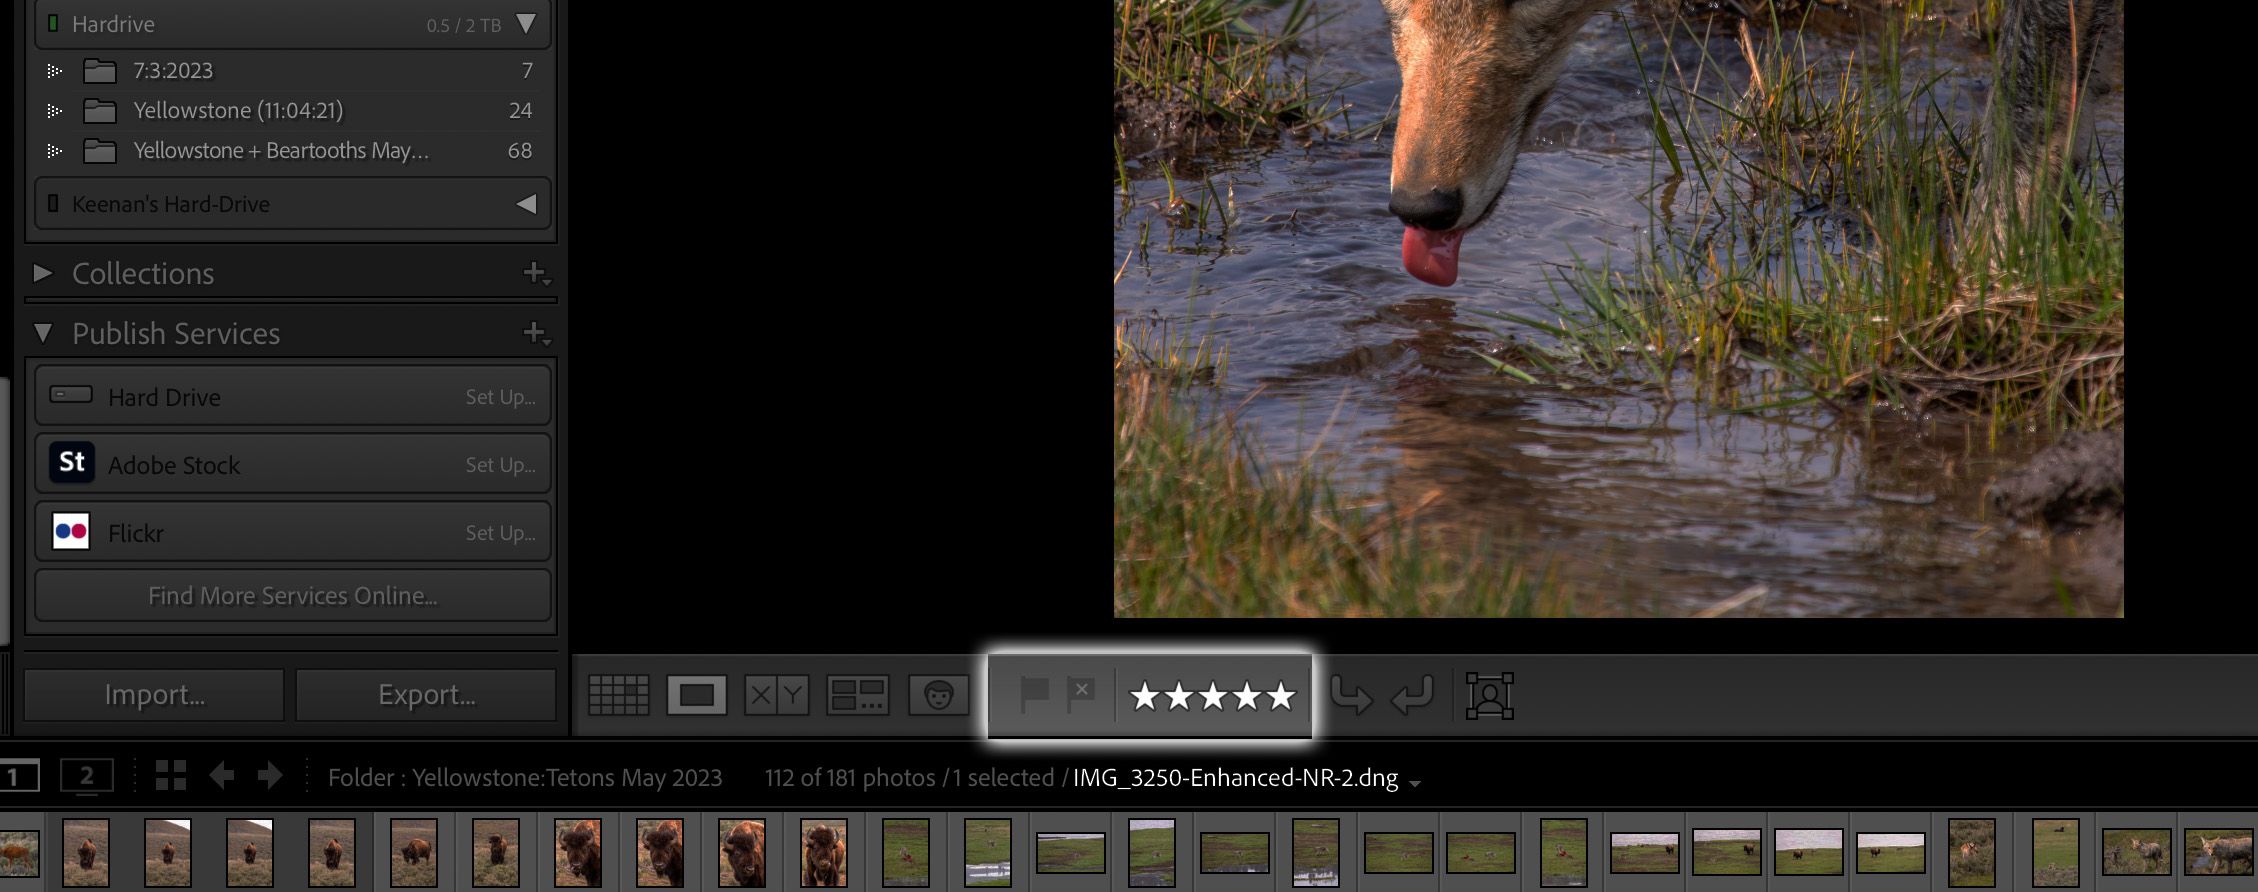
The main thing I use at this point is the star rating tool which allows you to rate your images on a scale from 1-5 stars. You can easily do this by pressing the “1-5” number keys on your keyboard while the image is selected. I rarely use the entire five-point scale as this overcomplicates things in my mind. I give images that I know I will want to edit a 1-star rating. I give images that I like quite a bit and will likely keep a 3-star rating. And I will give my absolute favorite images from a collection a 5-star rating. This system works well for me so that I can quickly organize my images into three different classifications, and I can then filter the entire library, catalog, or folder with these ratings. Feel free to experiment with this and come up with a system that works for you.
You can also change the background color of an image’s thumbnail if you want to divide images within a folder into separate categories. A good example of this would be dividing images from a trip to Yellowstone into either landscape or wildlife photos with a separate color denoting each. To easily change the background color of a thumbnail you can click the “6-9” number keys on your keyboard (each correlating to a different color) while an image is selected.
Now that we’ve gone over some helpful ways to organize your images let’s get into some tips and tricks when it comes to editing.
Make your Image Stand Out
A great option to have at your disposal is the ability to isolate your image from the background. Illustrator is a relatively complex application with lots of windows and information surrounding your image and this information can often be overwhelming and distract from the image you are attempting to edit. Here are a few ways you can isolate your image and allow it to stand out.
To darken the windows and information surrounding an image simply click the “L” key. By pressing the “L” key multiple times you can cycle between a dark background, a completely black background, and the normal view at ease enabling you to view said image with fewer distractions on the screen.
You can also change the background color to suit your needs. Perhaps you will be printing this image and placing it on a white wall or maybe it will be in a magazine with a white paper background. Or maybe you want a pitch-black background instead. Whatever you desire, simply right-click the area surrounding the image and you can choose from several background colors.
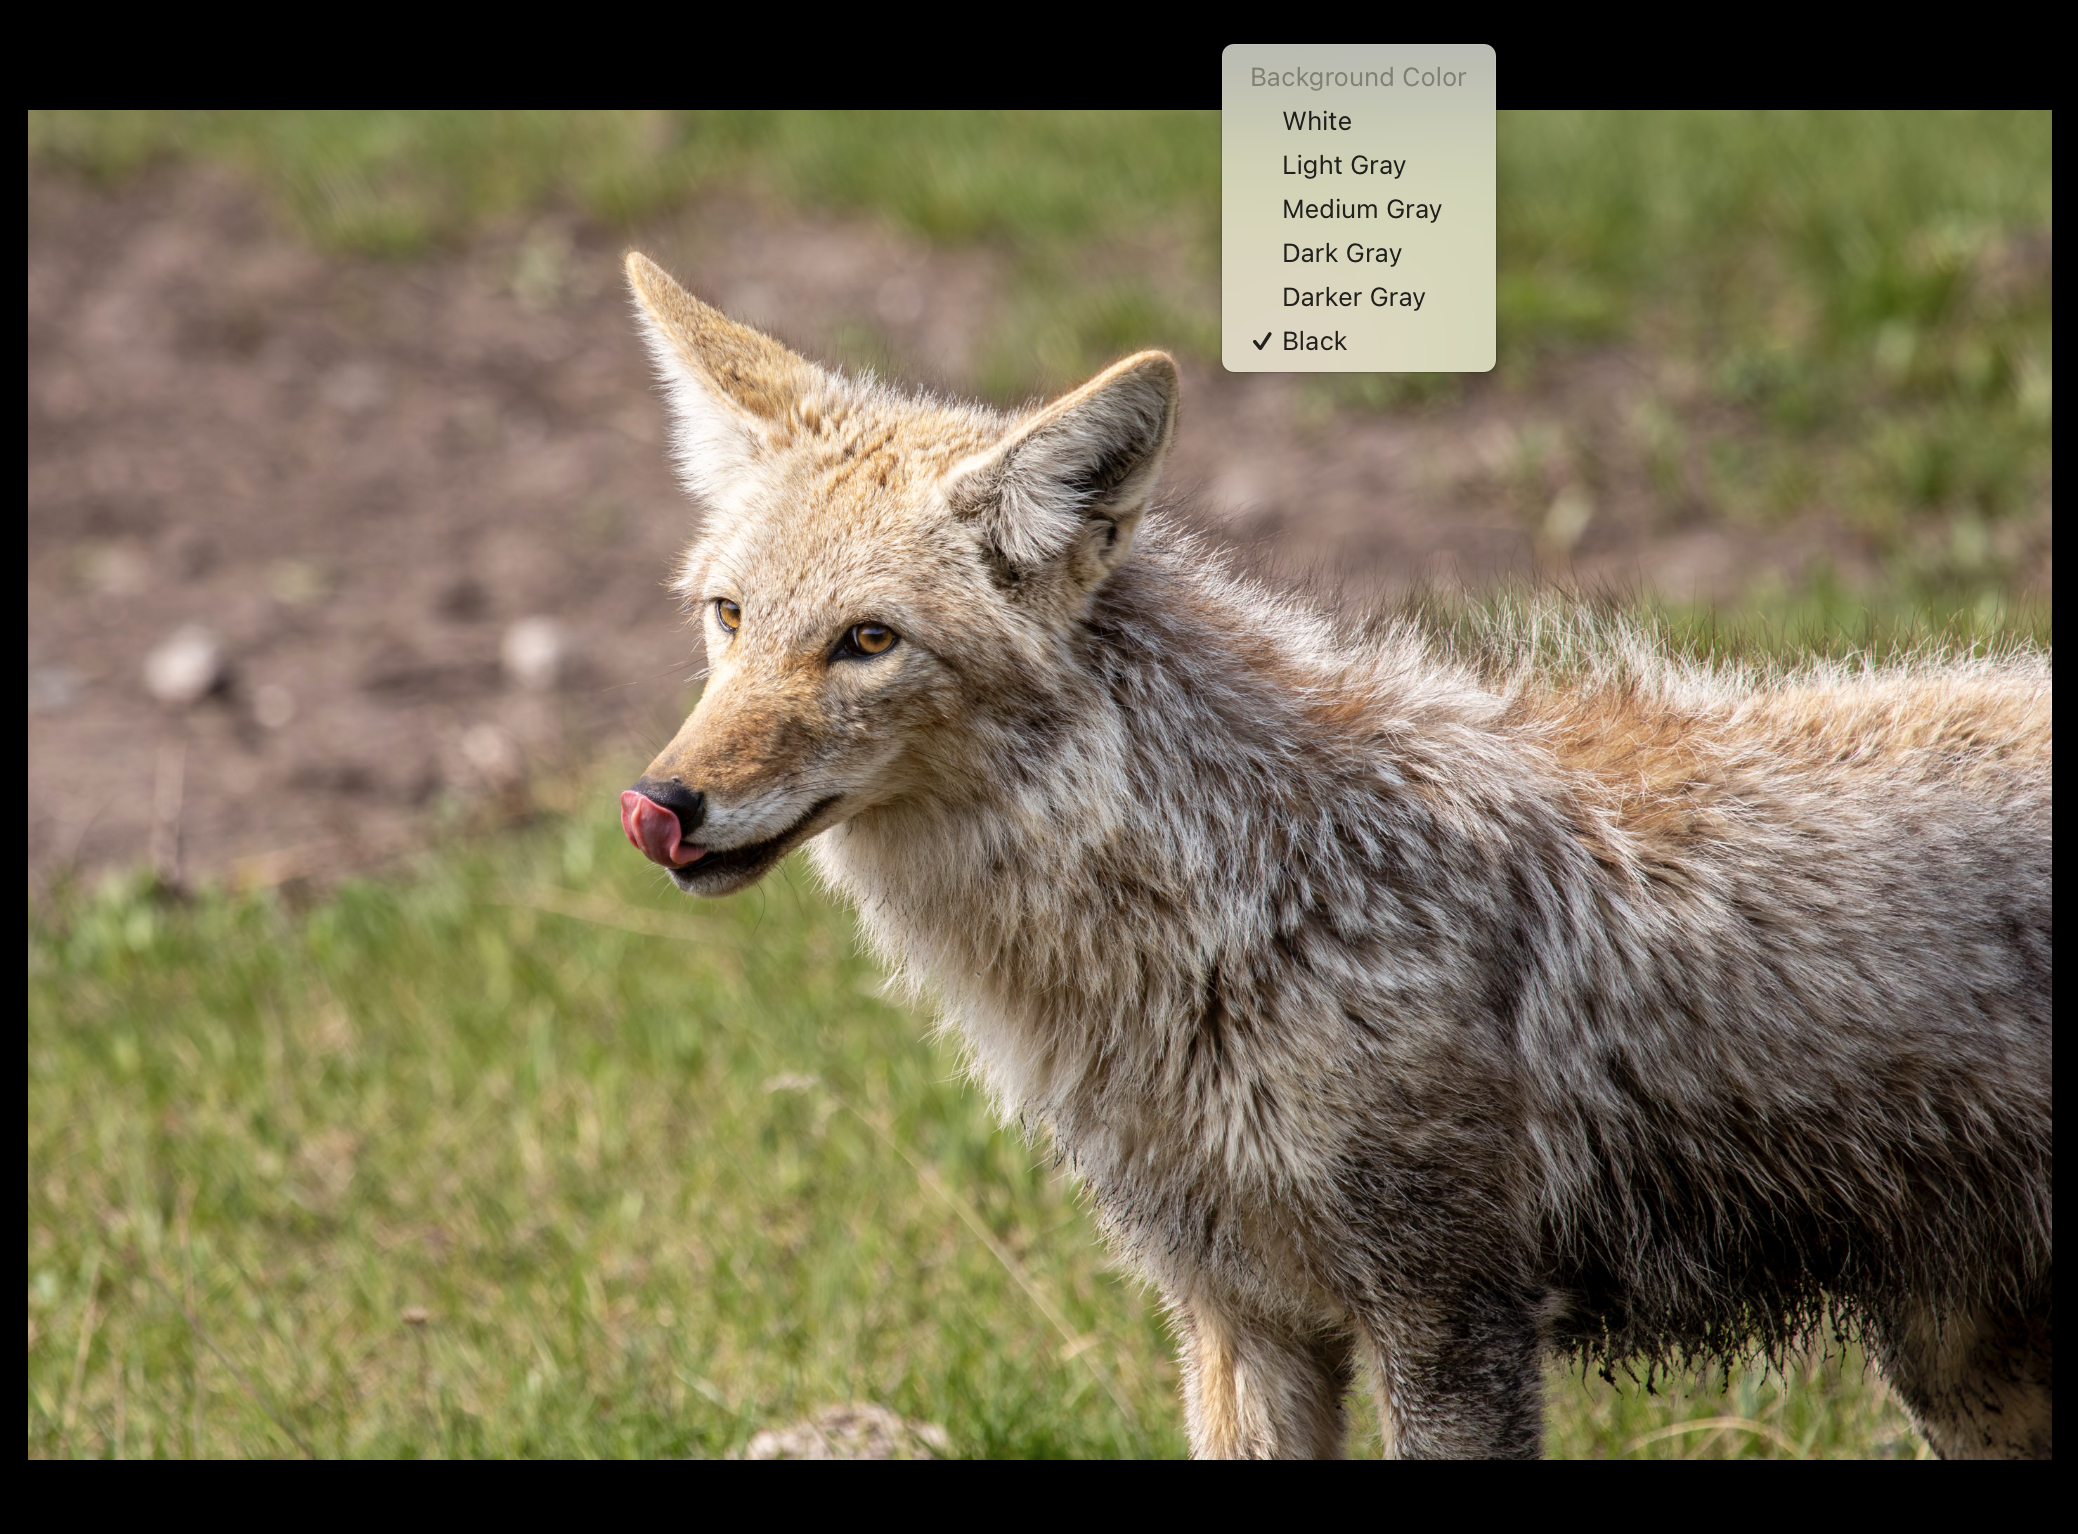
And finally, by pressing the “F” key you can enter Fullscreen mode allowing your image to fill up the entirety of your computer screen or monitor. Simply press the “F” key again to return to the normal view.
I almost always crop images and frequently change aspect ratios to produce something I like better than the original. Another very useful set of tools you can use when cropping an image or changing the overall composition is the composition overlays.
Composition Overlays
I almost always crop images and frequently change aspect ratios to produce something I like better than the original. Another very useful set of tools you can use when cropping an image or changing the overall composition is the composition overlays.
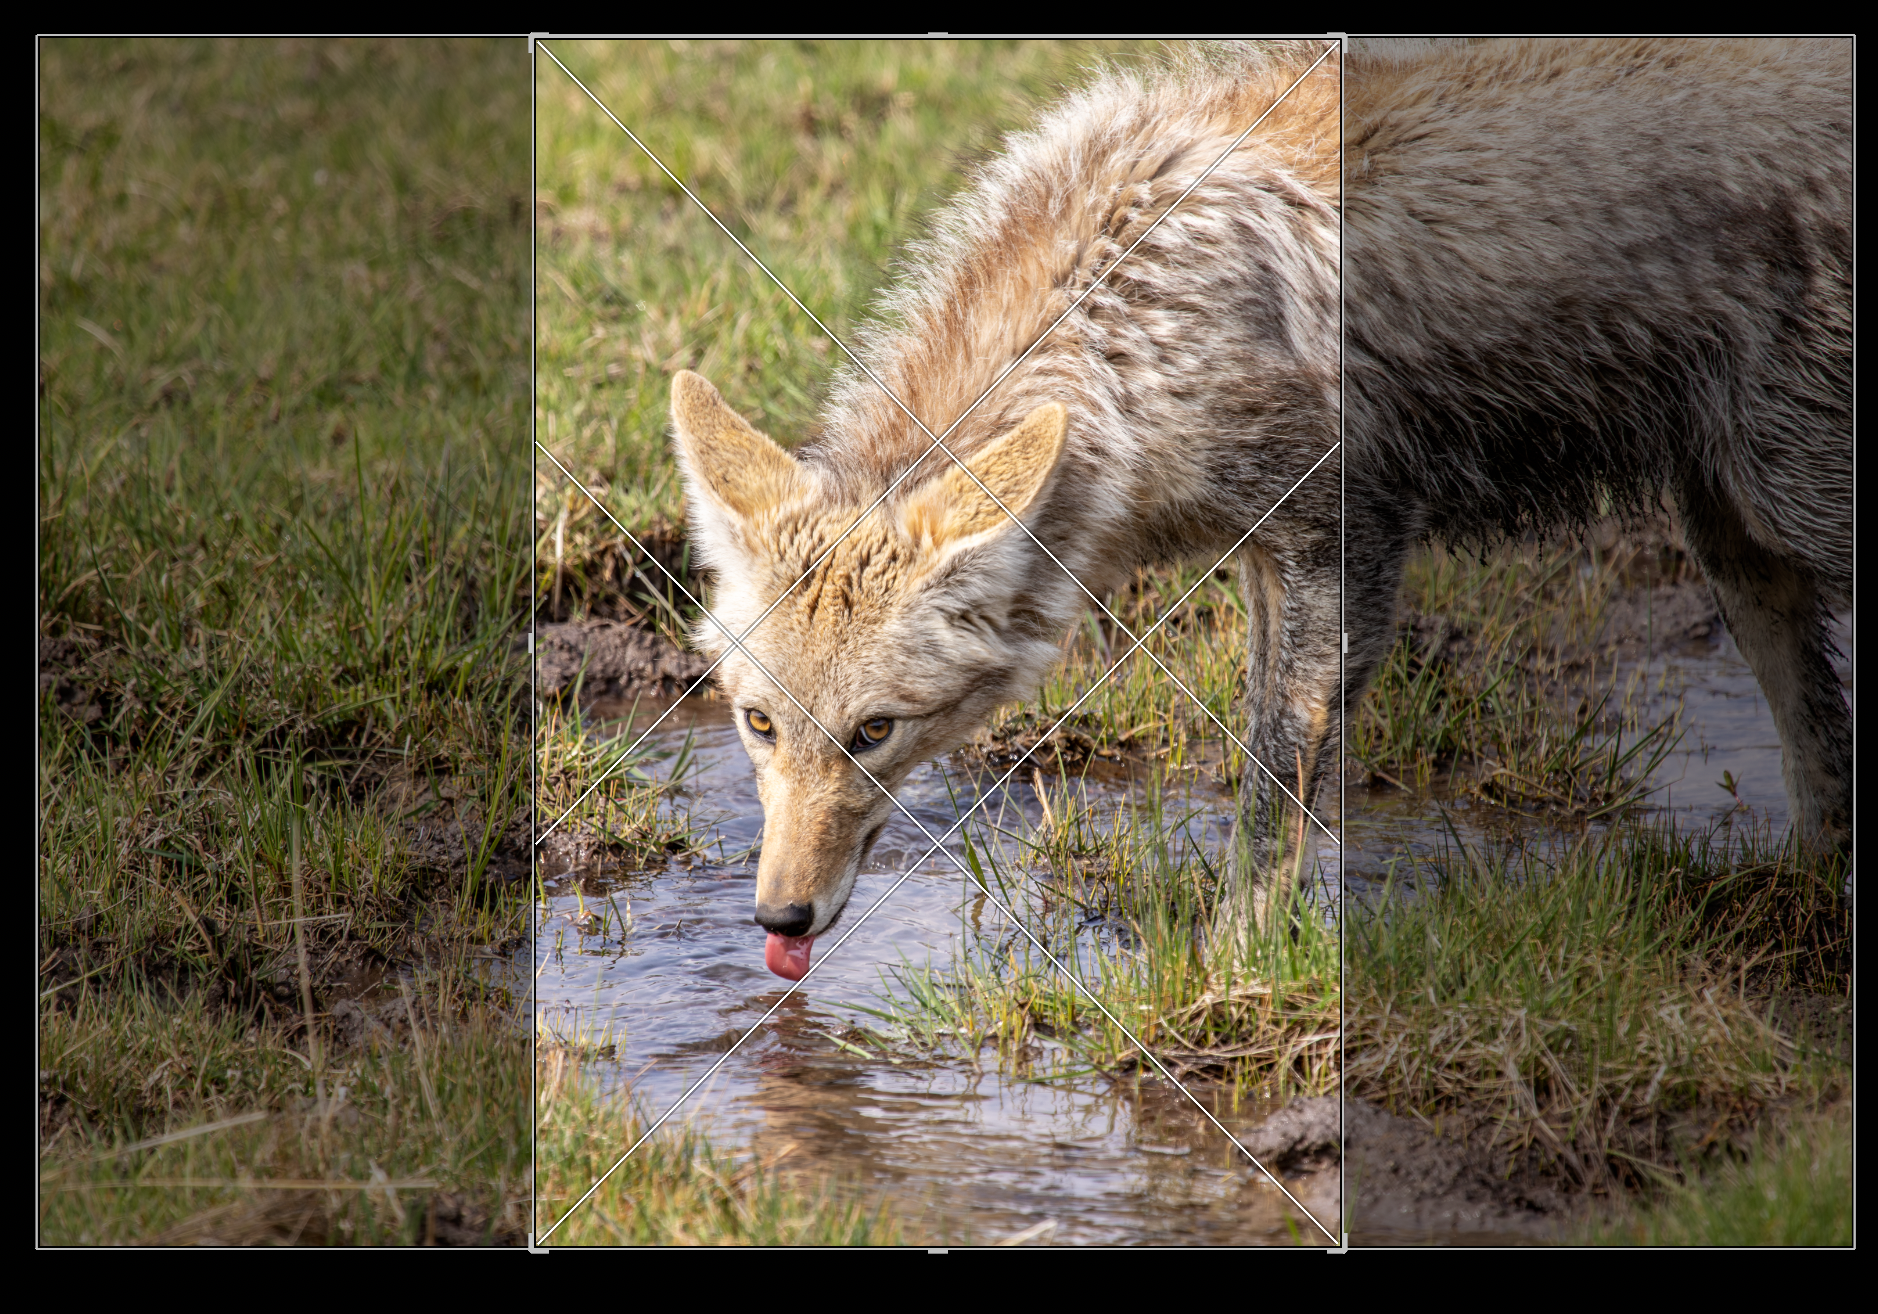
I didn’t know about these for the longest time but I use them quite frequently now. When you have an image selected and go to develop it, you’ll simply click the “Crop Overlay” button below your histogram, or alternatively you can press the “R” key. Once you have selected this tool you can now press the “O” key to start switching between useful overlays. These include anything from the basic rule of thirds overlay to other, less common options with diagonal lines and even spirals. These are useful when thinking about how someone will view your image and where their eyes will naturally be directed.
You Can Always Start with Auto Tone
Many times, when I’m in the early stages of editing an image, It can be difficult for me to know how to start manipulating settings off the bat. Should I go brighter or darker? Warmer or colder? How should I adjust highlights and shadows? These are all very valid questions and ultimately you must decide how you want your image to appear. That being said, if you’re initially having trouble you can always have Lightroom automatically set some adjustments for you. This is a great way to establish an initial starting point and then take full creative control from there.
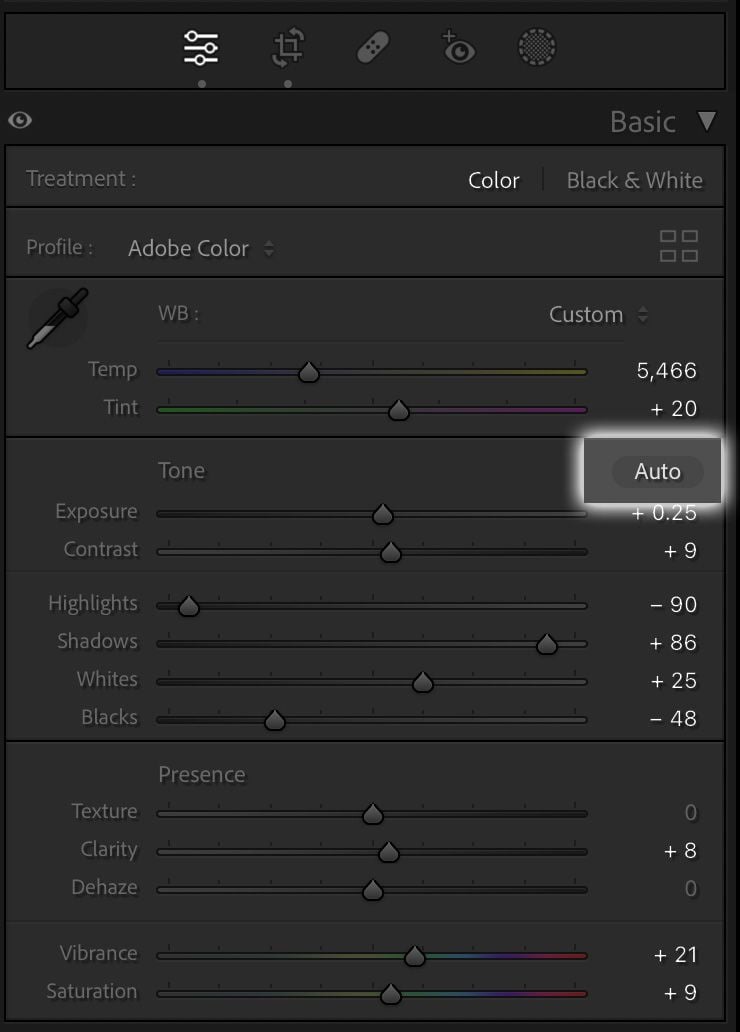
A great place to start is with the Basic Corrections panel to the right of your image. This is where you will change all the basic settings such as temperature, exposure, contrast, saturation, etc. Towards the top of this panel right above the exposure slider is a small dark grey button titled “Auto”. Simply click this and Lightroom will do its best to automatically set all the sliders in this panel to what the software thinks is best. I use this all the time if I’m not sure where to start or want a quick edit right off the bat that I can then tweak further.
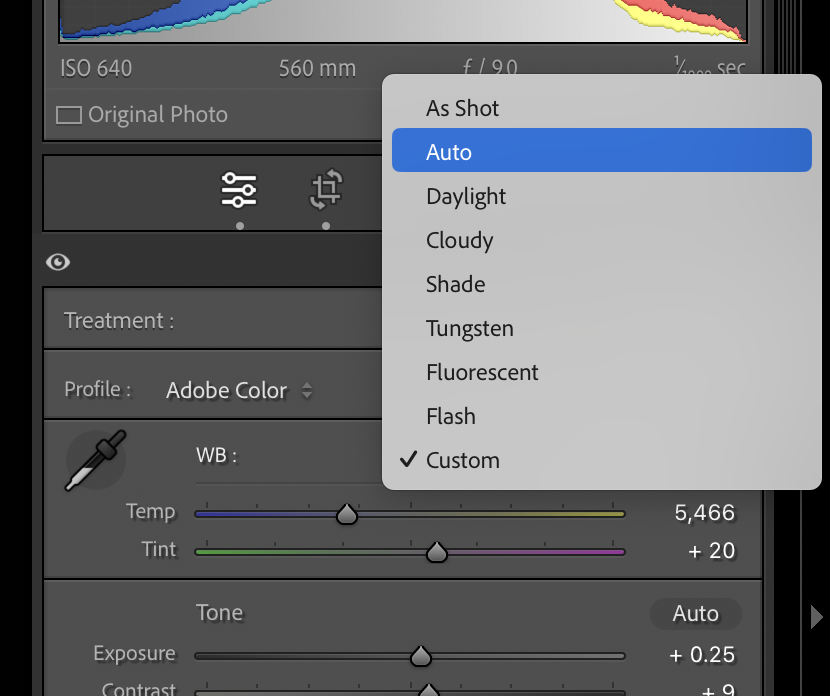
In addition to the Auto Tone button, you can also automatically set the white balance. To do this locate your white balance or WB slider at the very top of the Basic Corrections panel and click the drop-down menu above the slider. Select “Auto” and Lightroom will choose a white balance that it thinks is ideal for the image.
Create Virtual Copies
Another great little trick you can use while editing images in Lightroom is to create virtual copies. This is especially helpful if you want to edit an image in multiple ways or styles to get a sense of what you like best. I use this all the time if I want to edit a single image both in color and in black and white for instance or if I want to try out different compositions.
The other nice thing about a virtual copy is that as the name suggests this is a completely “virtual” version of the image that won’t take up any additional space on your hard drive.
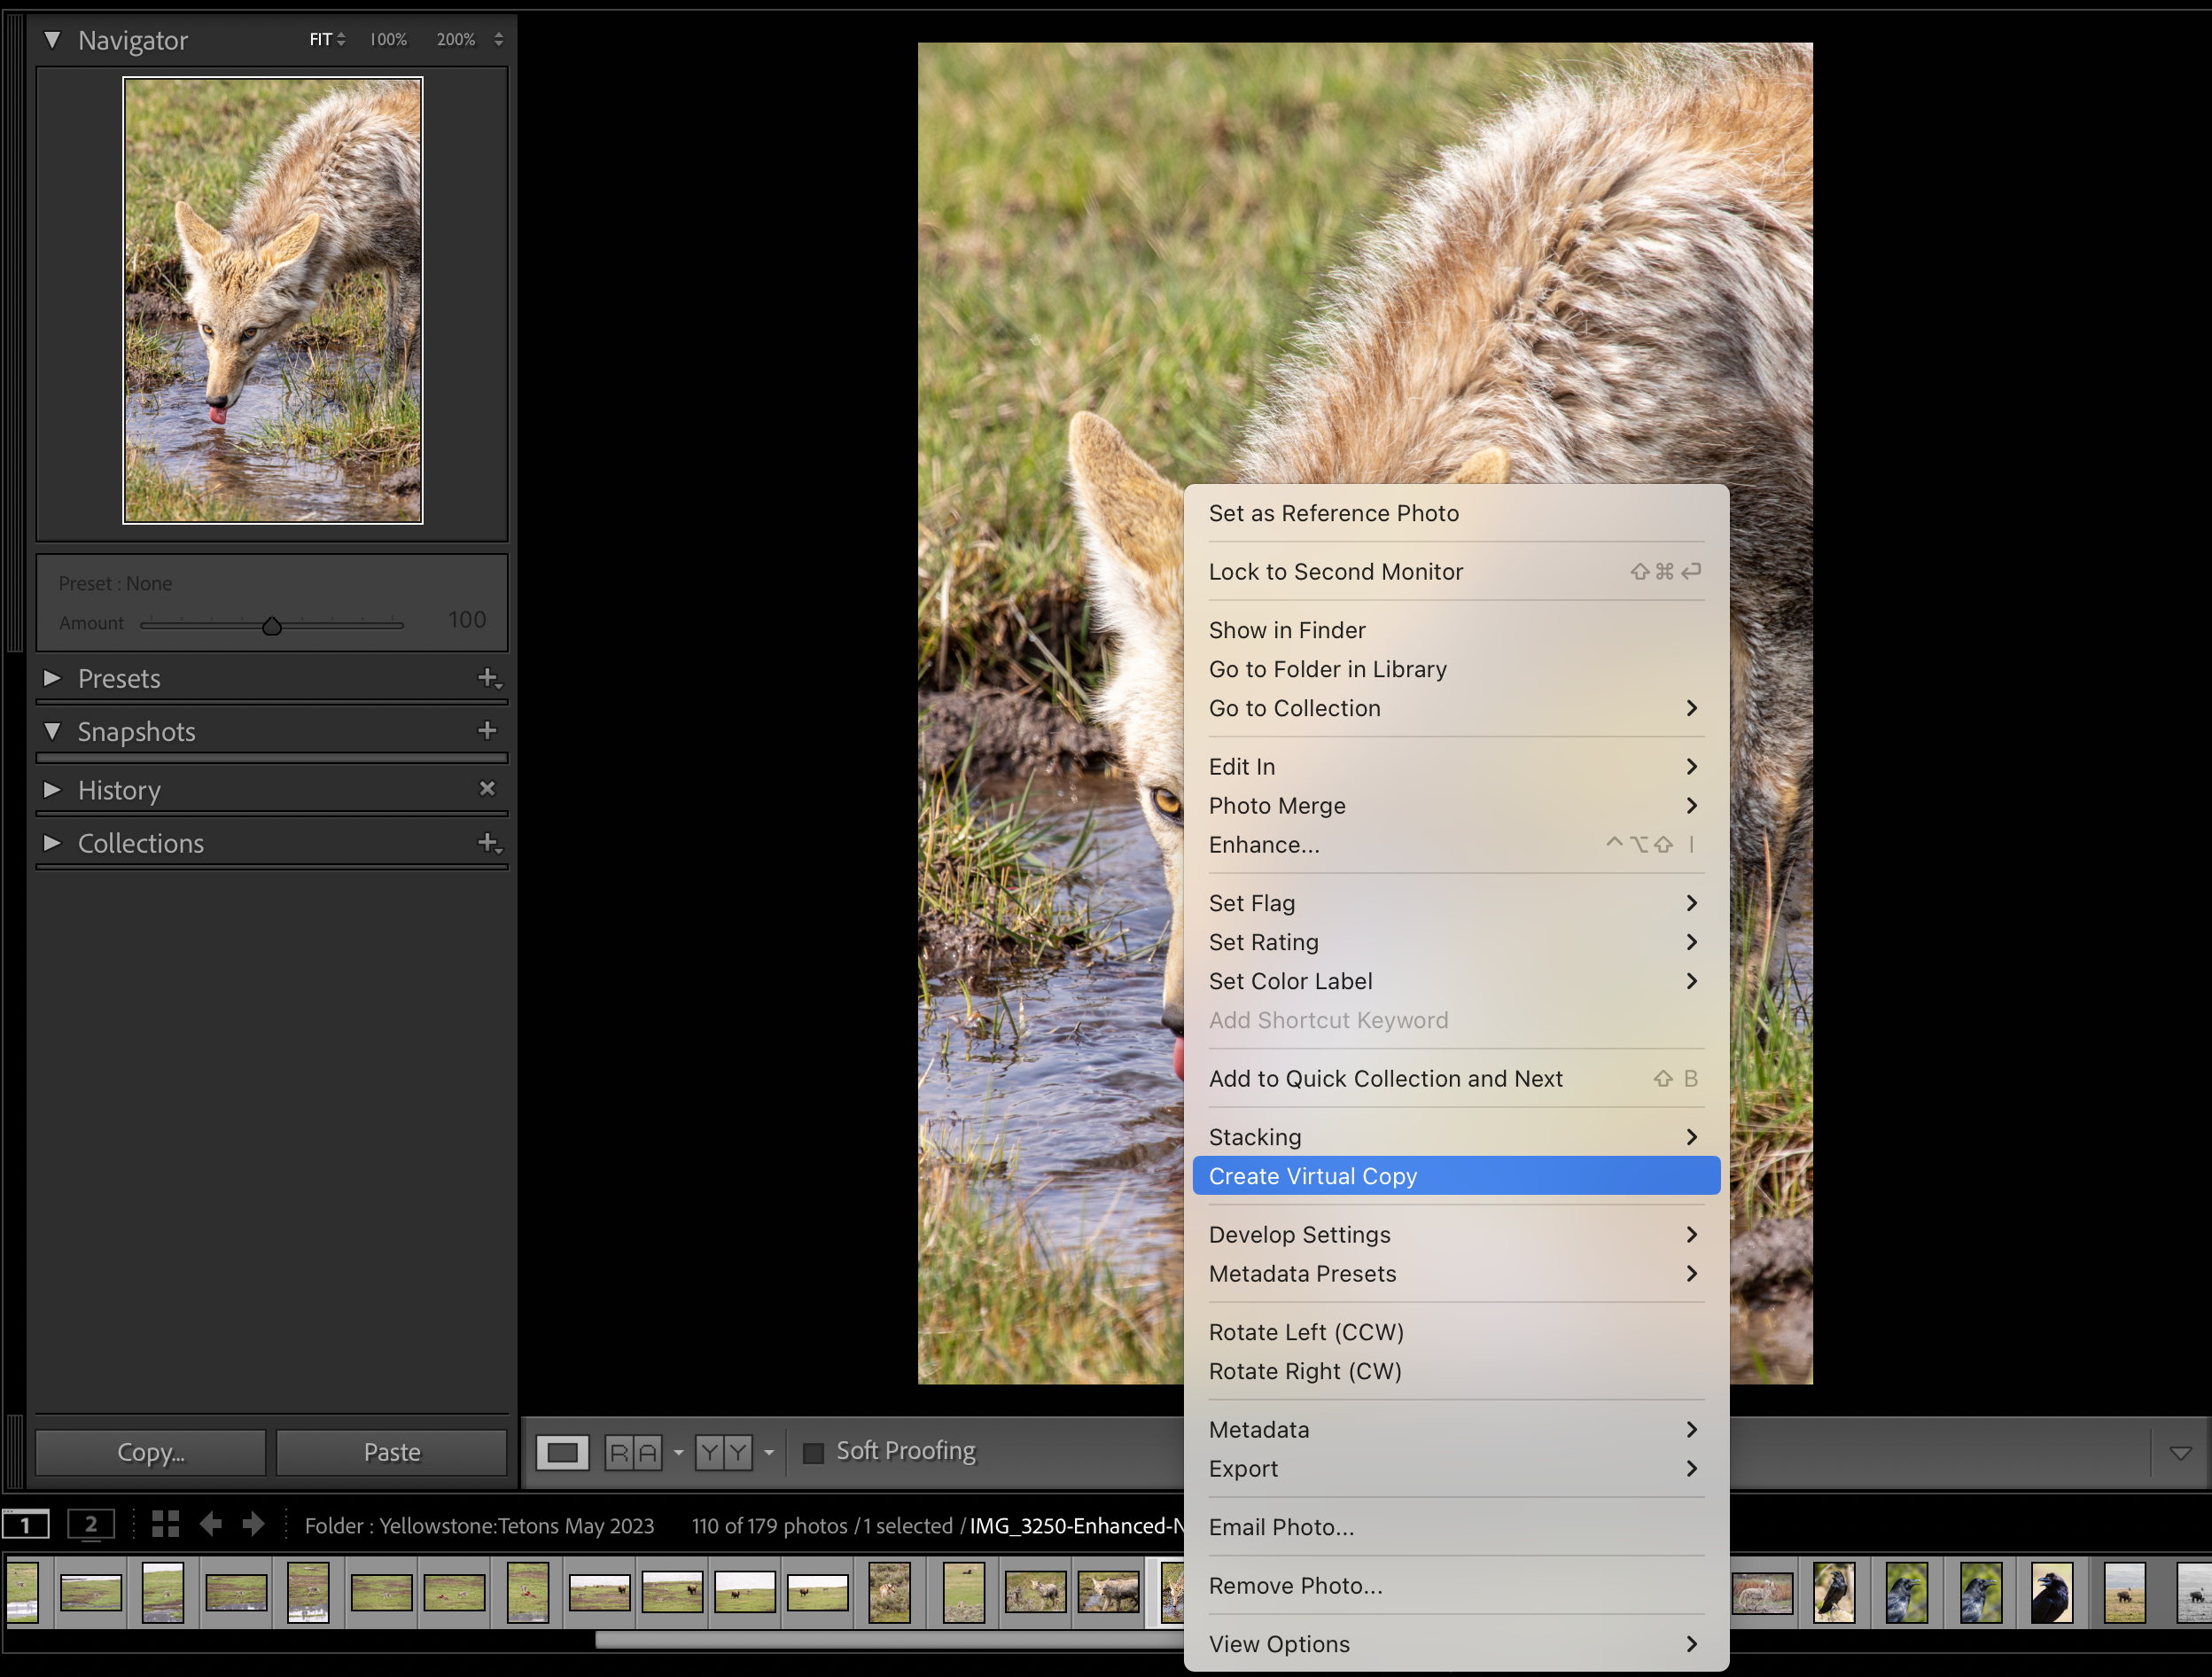
To create a virtual copy simply right-click on the image thumbnail in the bottom of your Lightroom window and select “Create Virtual Copy” This will then create a duplicate version of the image right next to the original and you can now edit them separately.
Copy and Paste Settings
Let’s say you’ve captured tons of images in the same place with similar lighting conditions. For instance, you captured 20 images of the same wildlife subject in the same location and the environmental lighting, and your camera settings didn’t significantly change. When editing, you want to avoid repeating the exact same steps over and over again for each photo wasting time and energy. Lightroom has a very simple and easy way to work around this and I use it all the time.
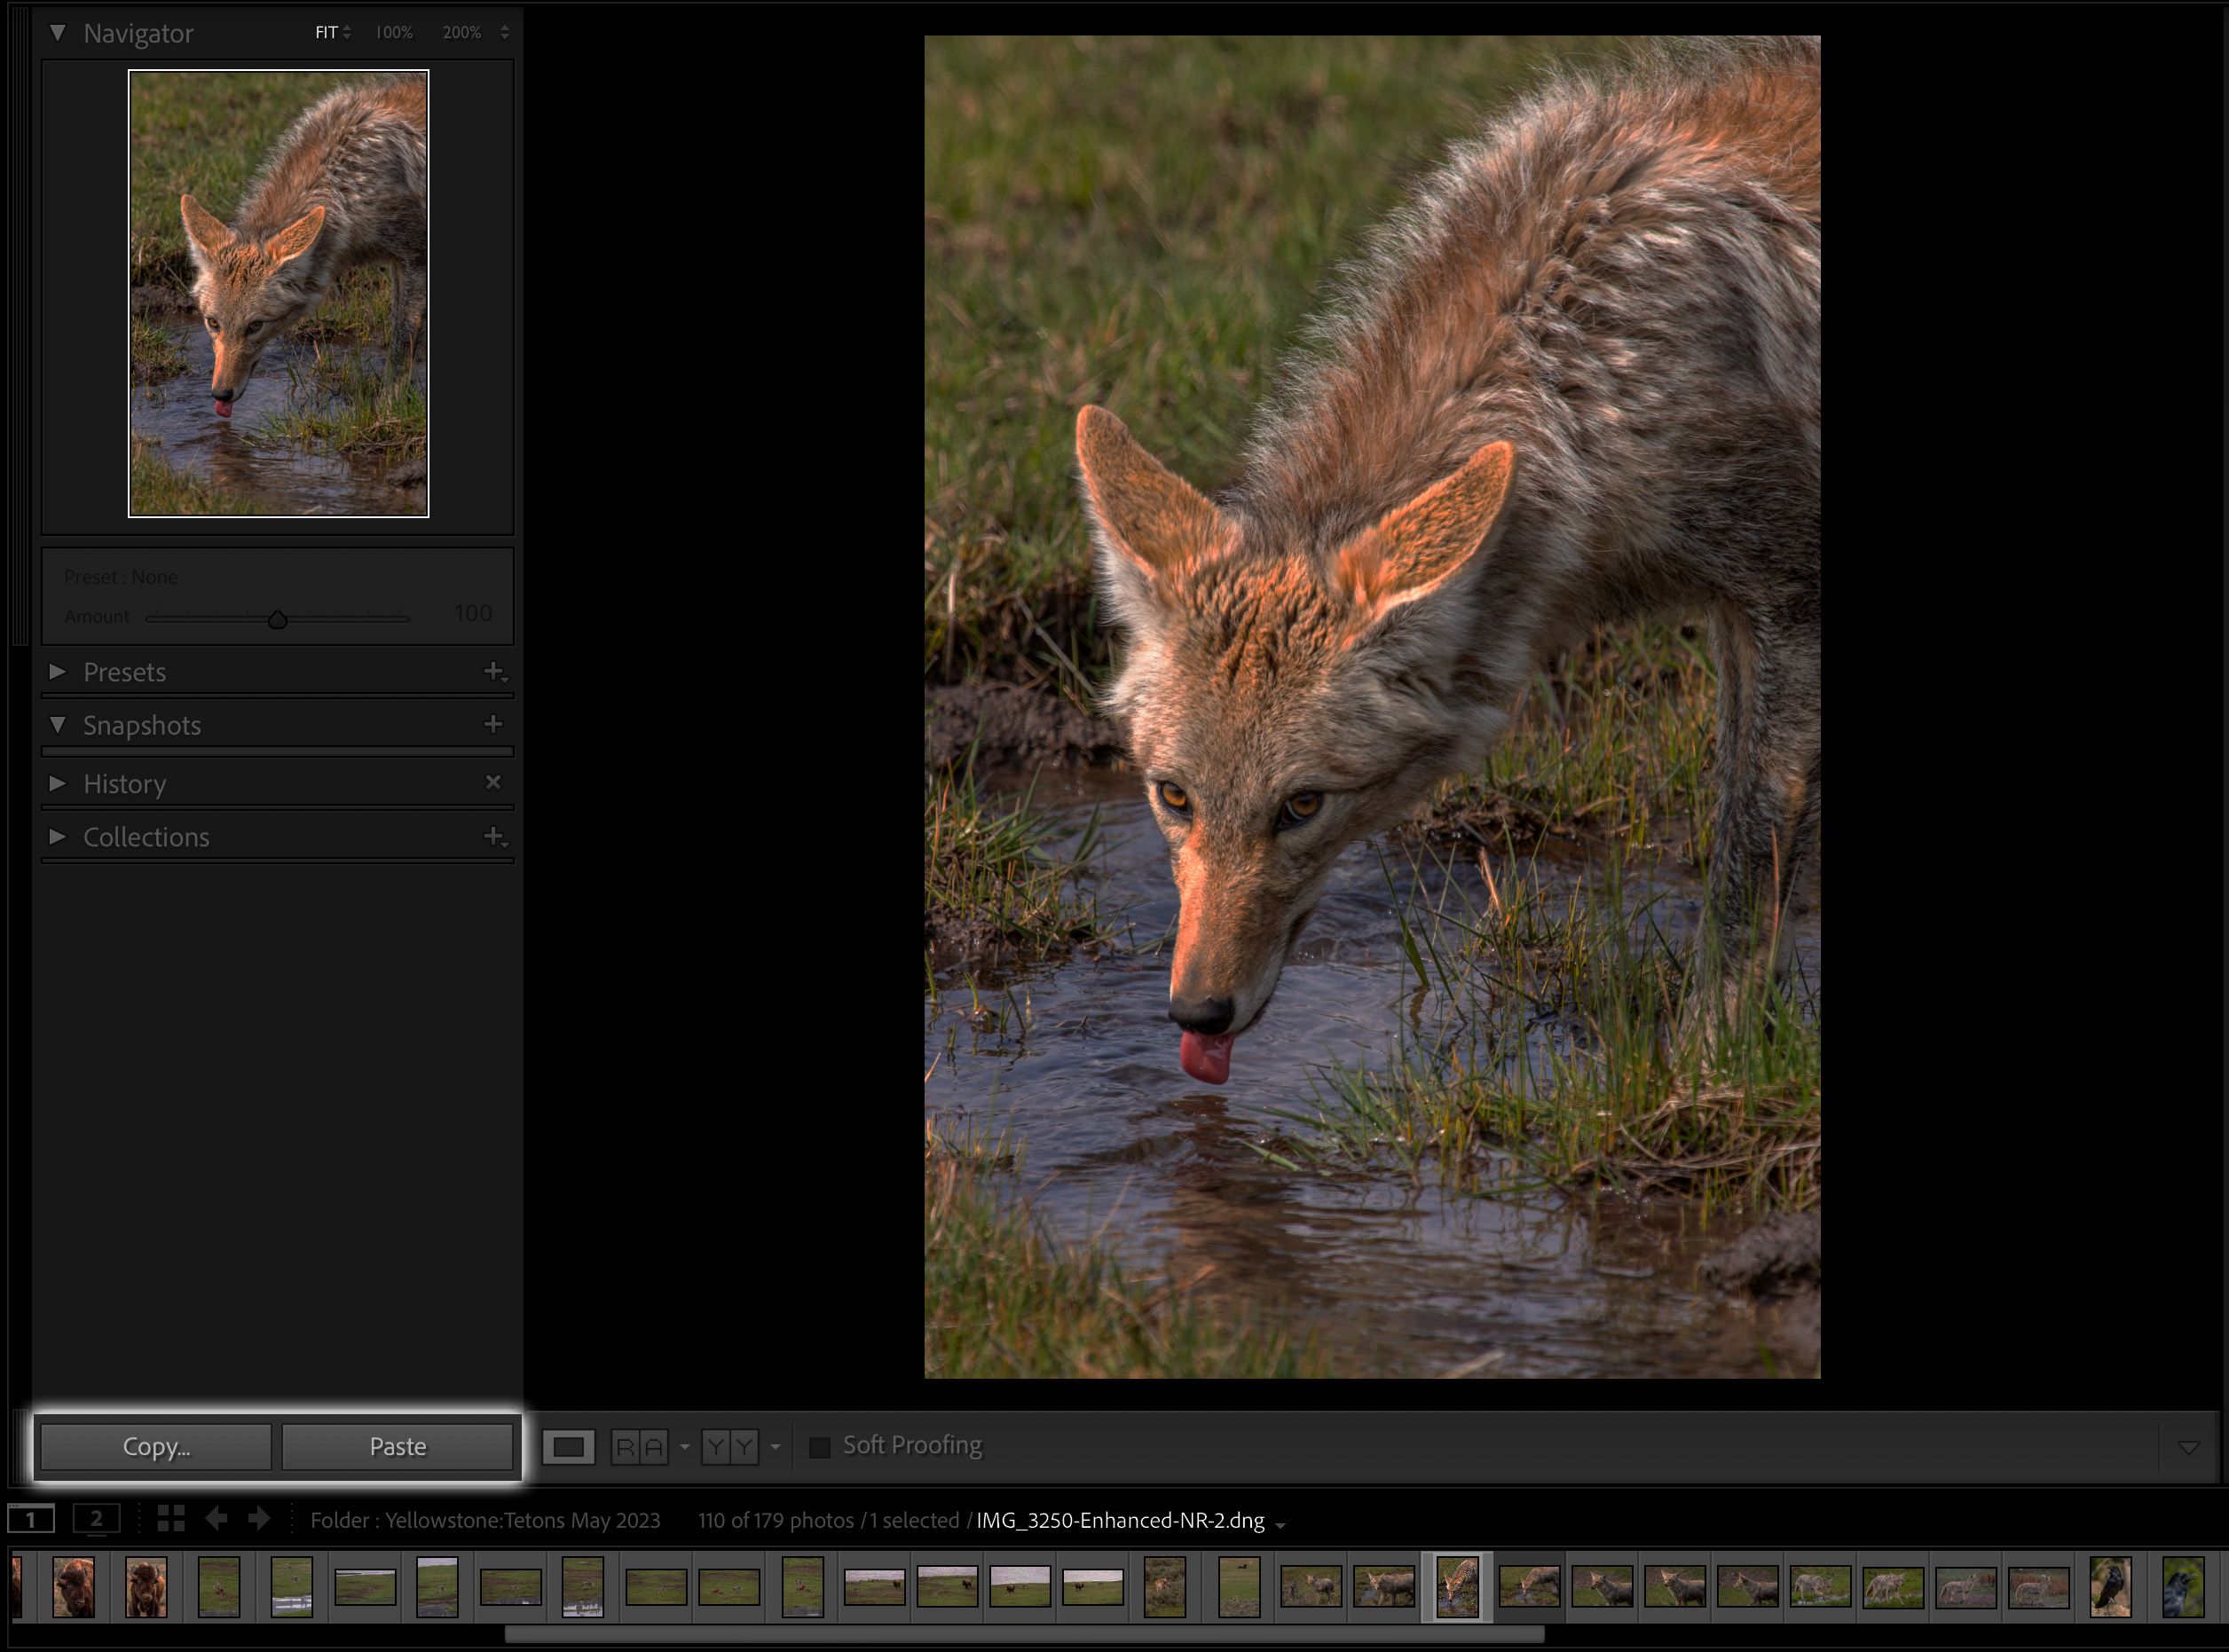
I’m talking of course about good old copy and paste. You’ve used it in plenty of other aspects of your life so why not use it in photo editing as well? To do this you simply have to edit one photo to your desired settings and then, while that image is selected, click the “Copy” button at the bottom left corner of Lightroom. A pop-up window will appear allowing you to select which settings you want to copy. All the basic settings will automatically be preselected and you can choose to add or remove settings if you’d like. Once you’ve done this you can then select other images and simply press the “Paste” button to have all the settings carried over.
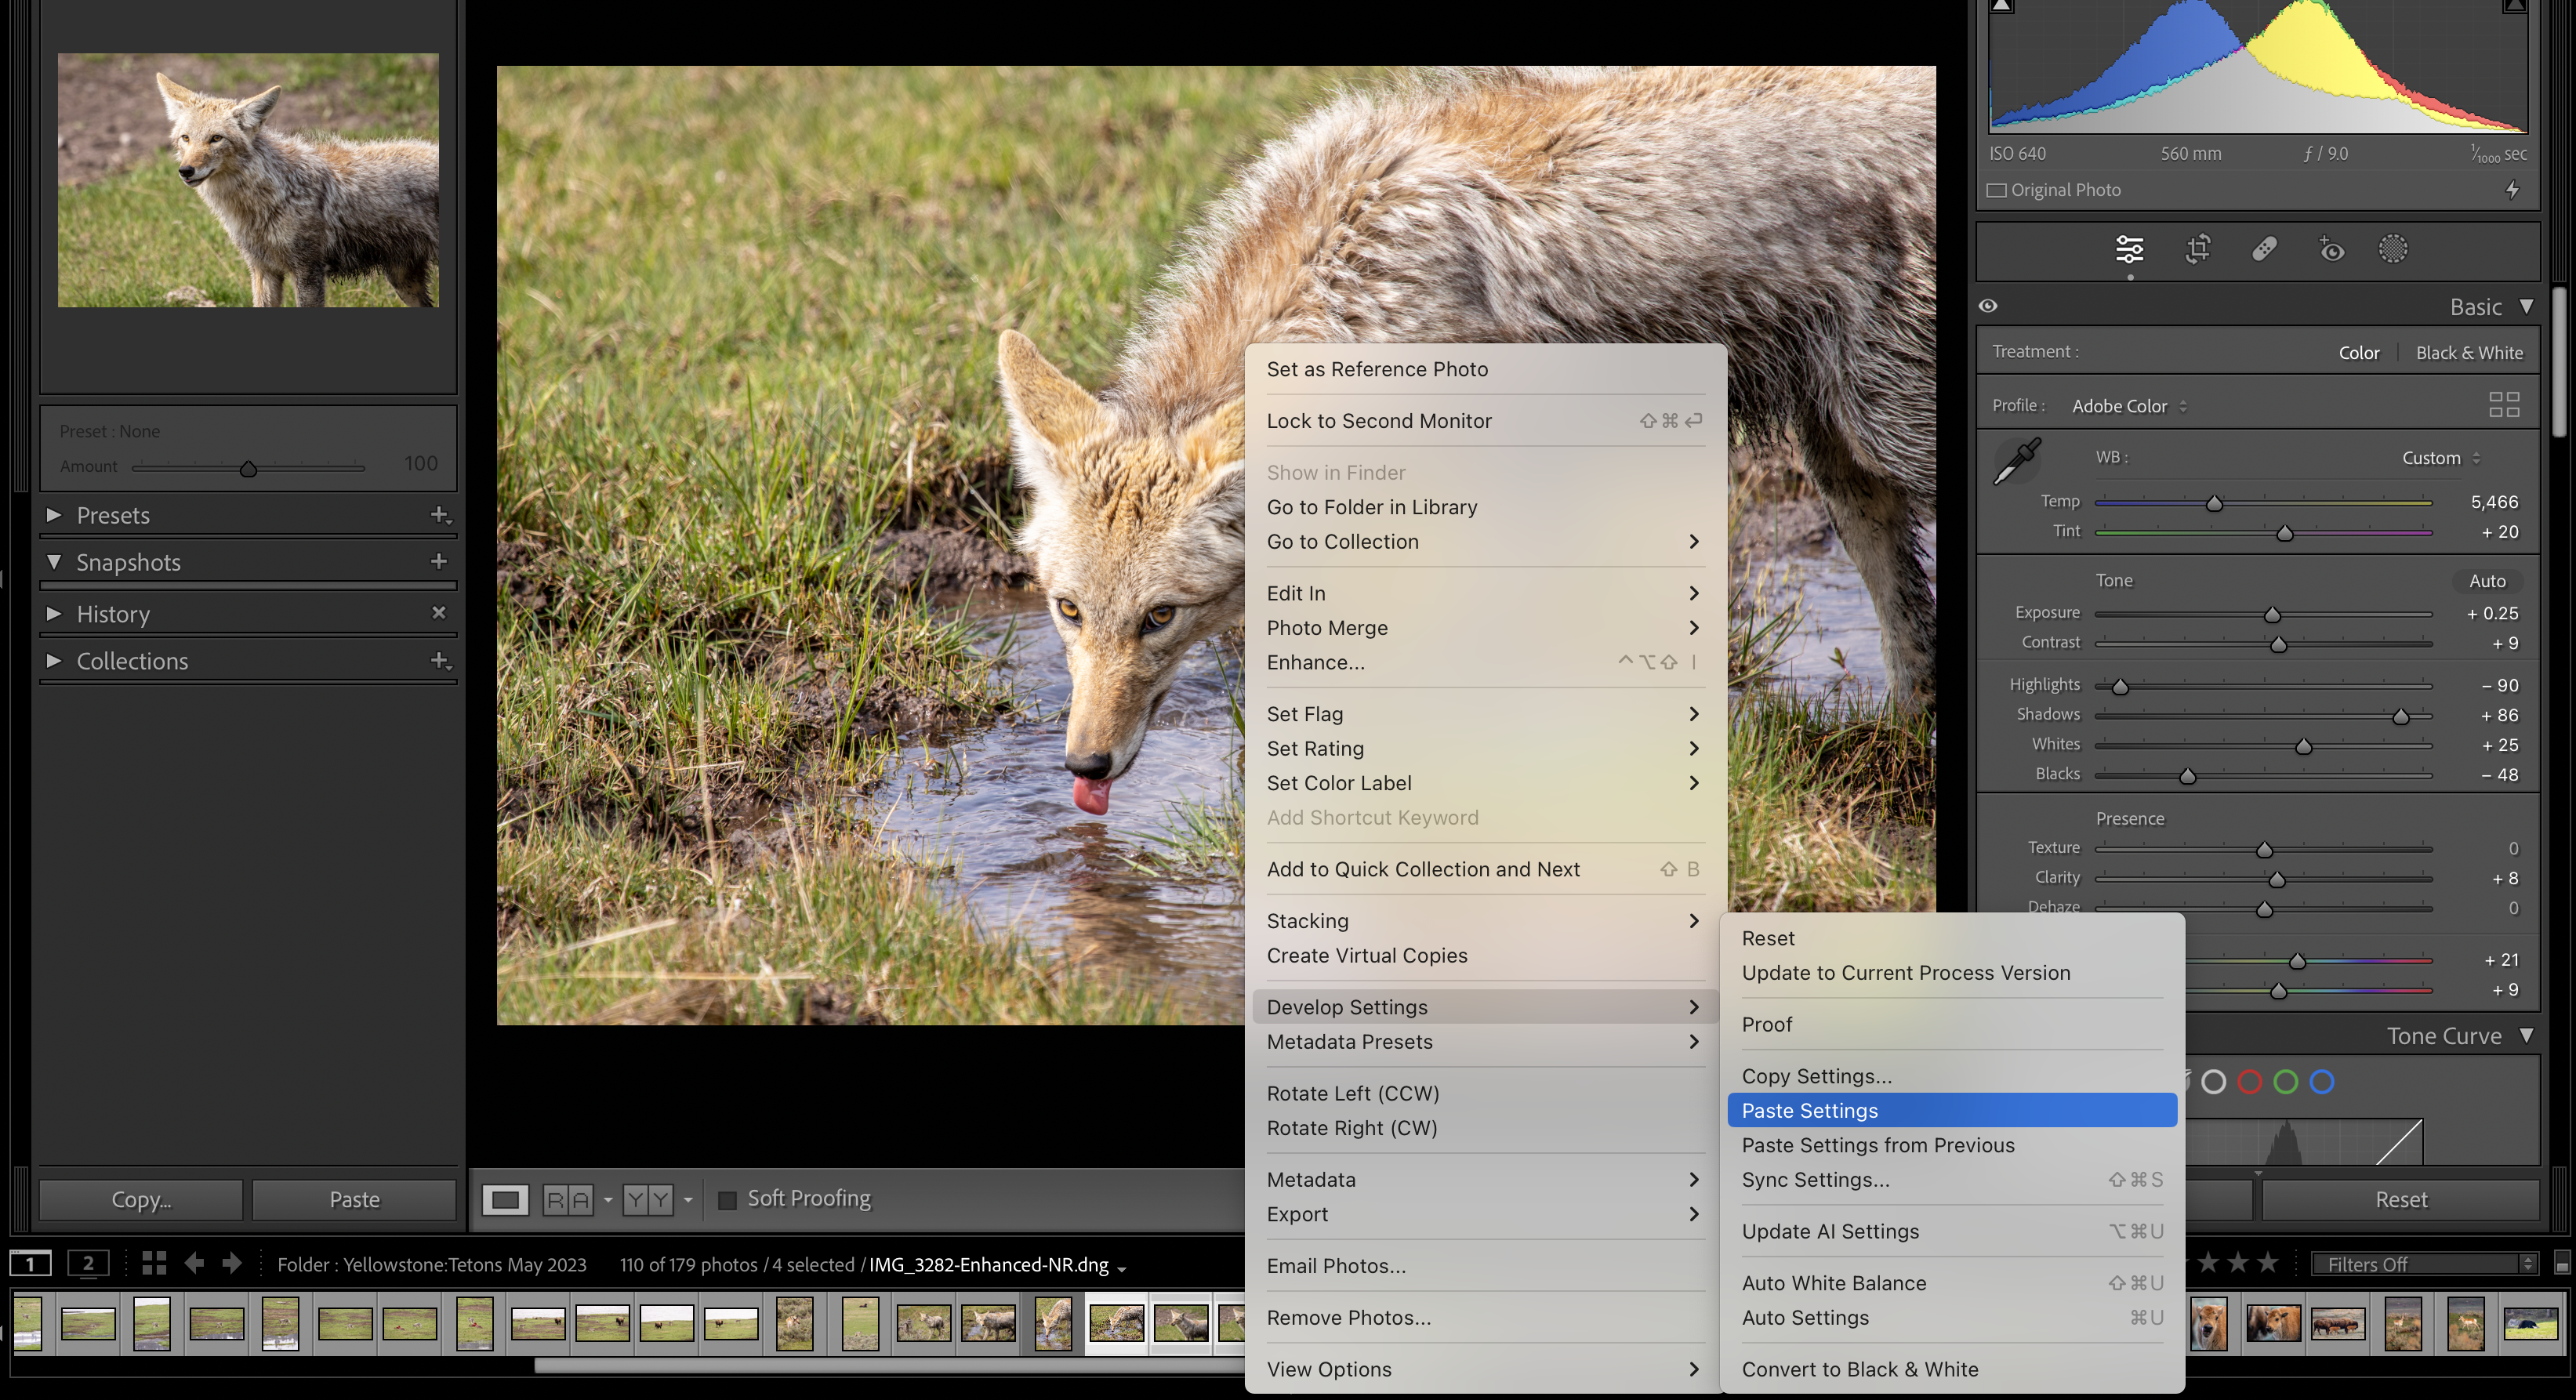
You can also paste settings to multiple images by selecting them and then right-clicking on your selection. You can then select “Develop Settings” and “Paste Settings” to apply an edit to all of the images at once.
Avoid Clipping While Editing
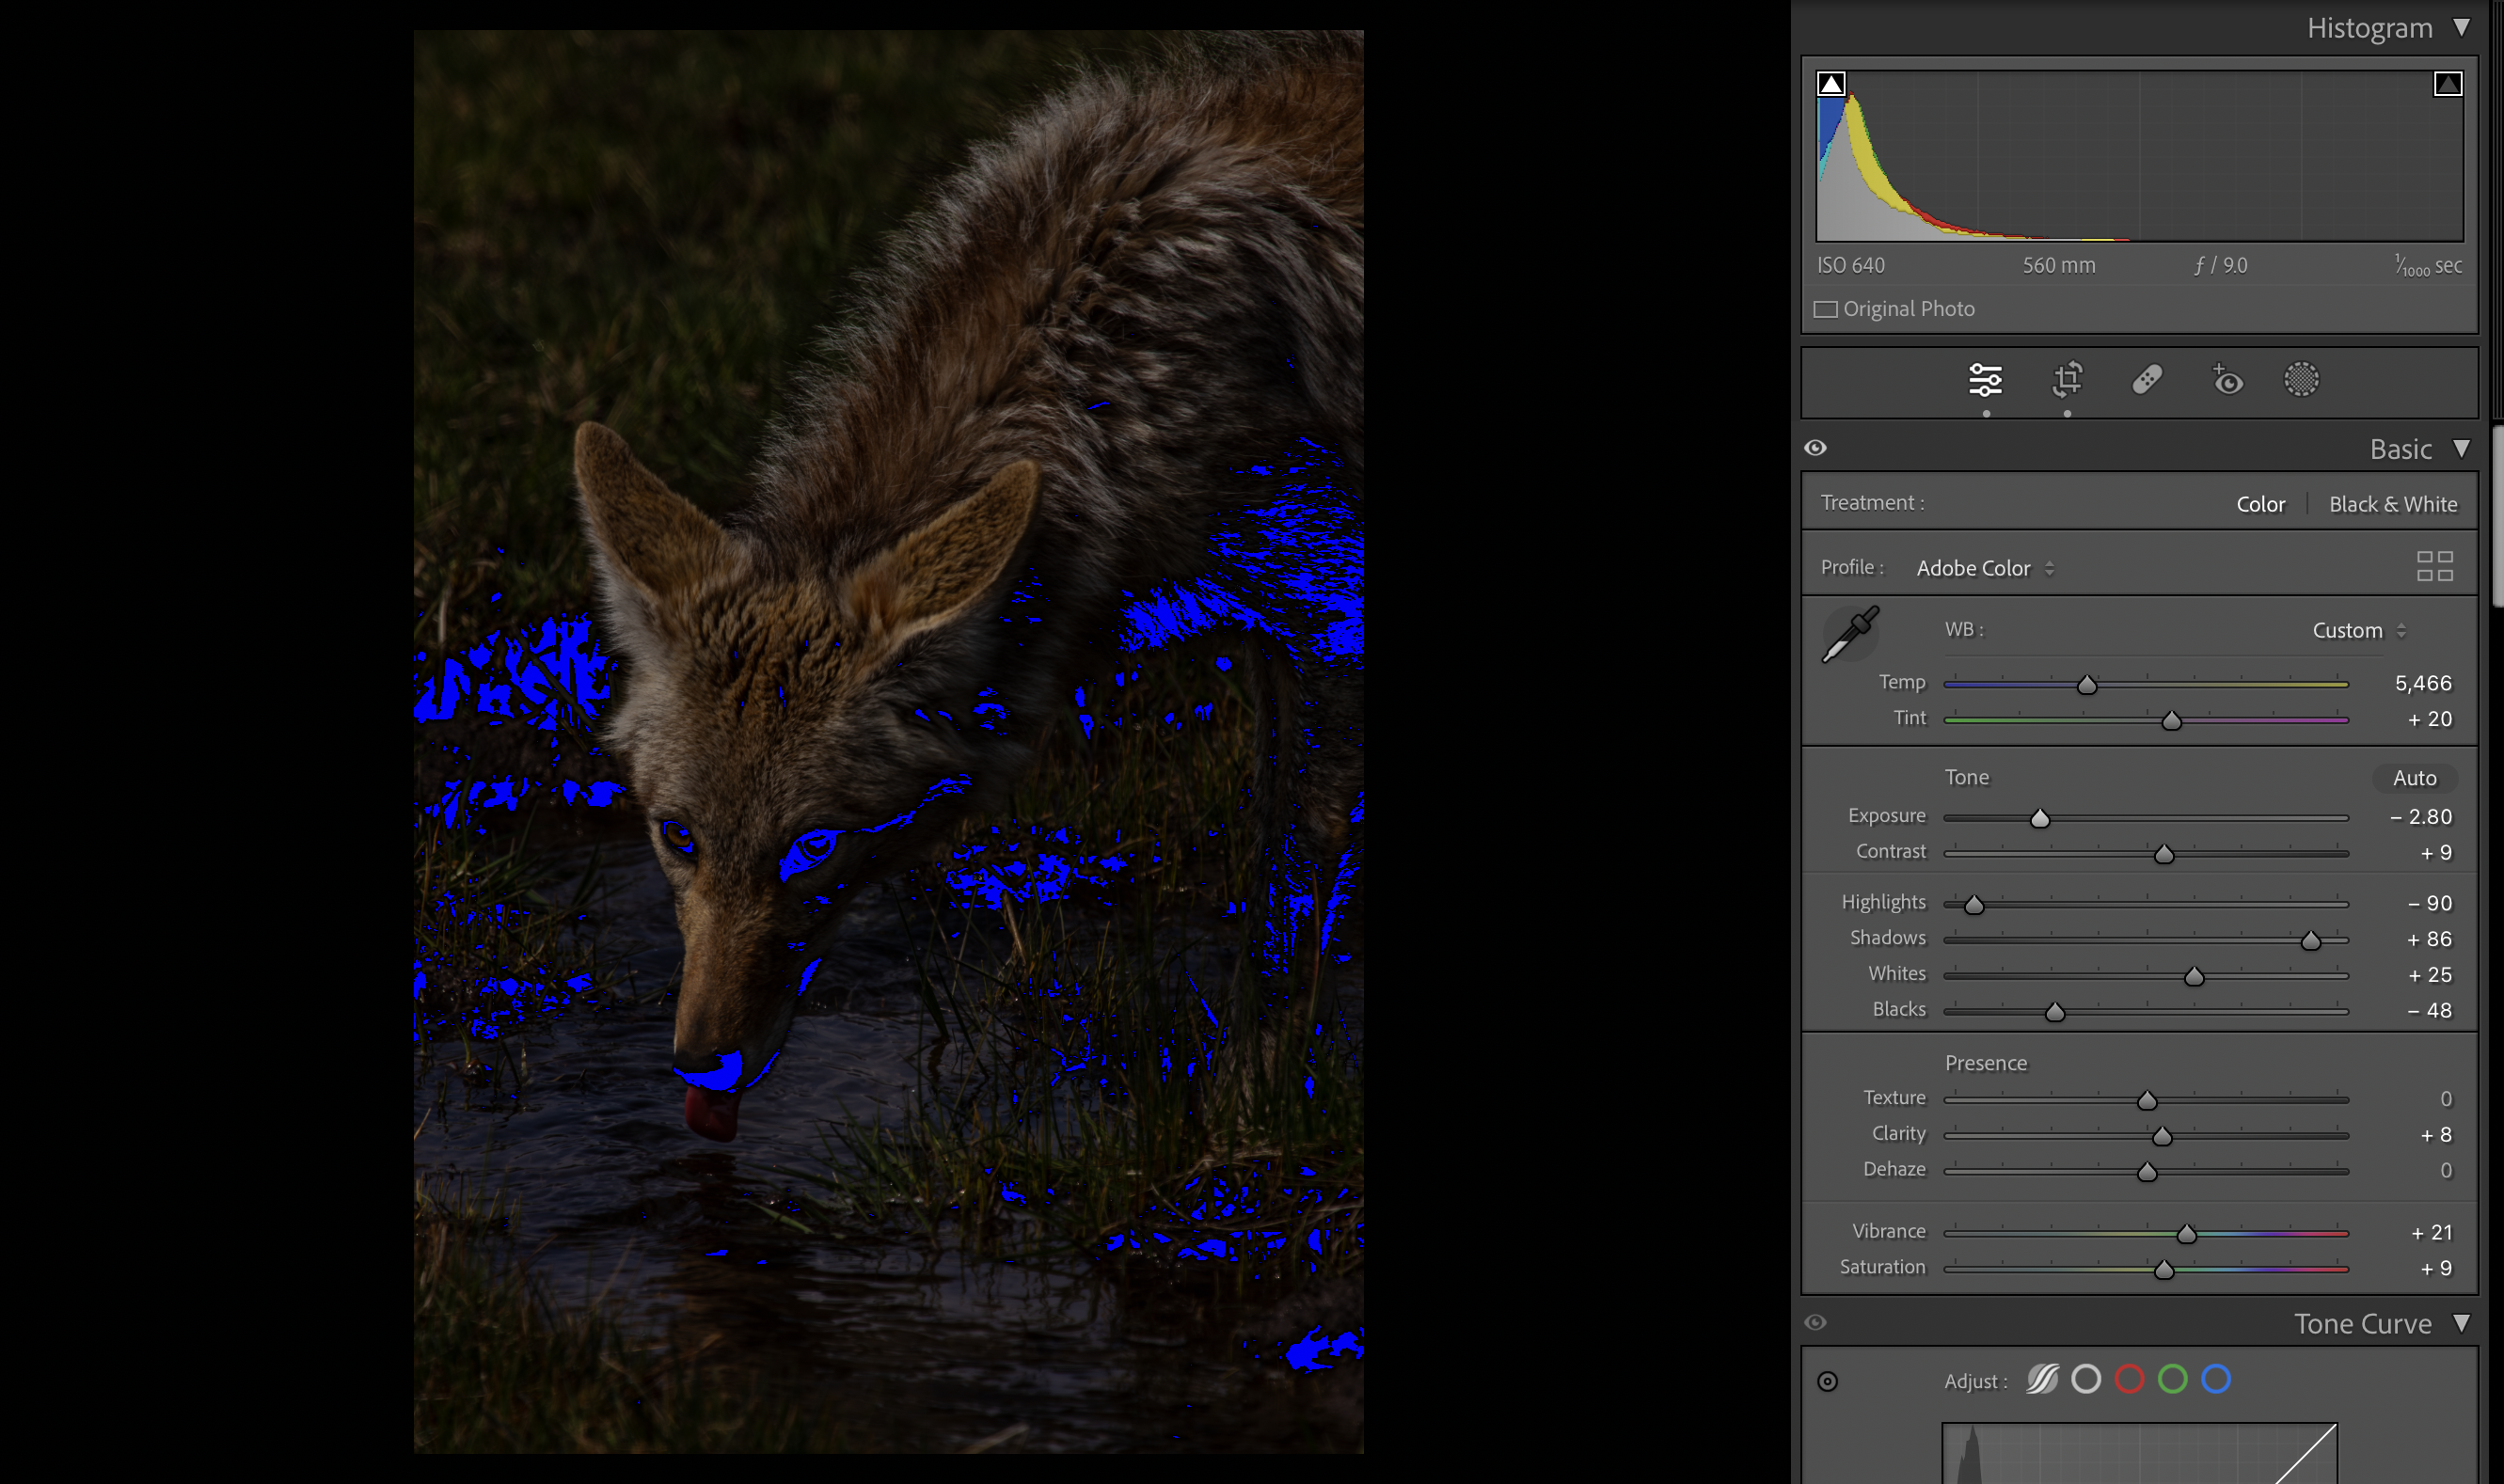
Of course, keeping an eye on your Histogram is very important when capturing photos on your camera, but the histogram is just as important when editing images as well. I always make a habit of looking at my histogram while adjusting any sliders or settings in Lightroom to see how they’re changing the distribution of light and color.
One of the main reasons to monitor your histogram is to make sure you aren’t clipping the highlights and shadows of an image. Clipping is when either the highlights are so bright or the shadows are so dark that you lose information and these parts of the image appear as either pure white or black. I pretty much always try to avoid any significant clipping when possible and Lightroom has a great way to monitor this.
Avoid Clipping While Editing
Of course, keeping an eye on your Histogram is very important when capturing photos on your camera, but the histogram is just as important when editing images as well. I always make a habit of looking at my histogram while adjusting any sliders or settings in Lightroom to see how they’re changing the distribution of light and color.
One of the main reasons to monitor your histogram is to make sure you aren’t clipping the highlights and shadows of an image. Clipping is when either the highlights are so bright or the shadows are so dark that you lose information and these parts of the image appear as either pure white or black. I pretty much always try to avoid any significant clipping when possible and Lightroom has a great way to monitor this.
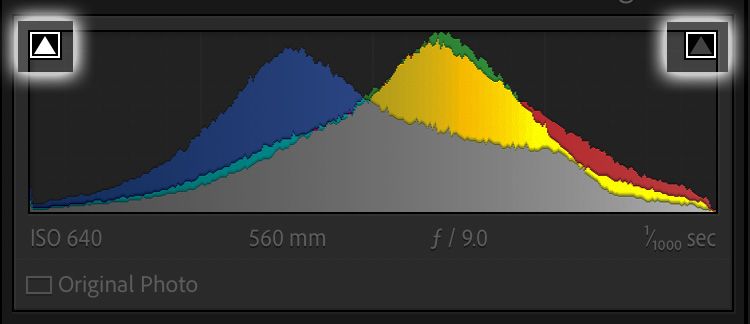
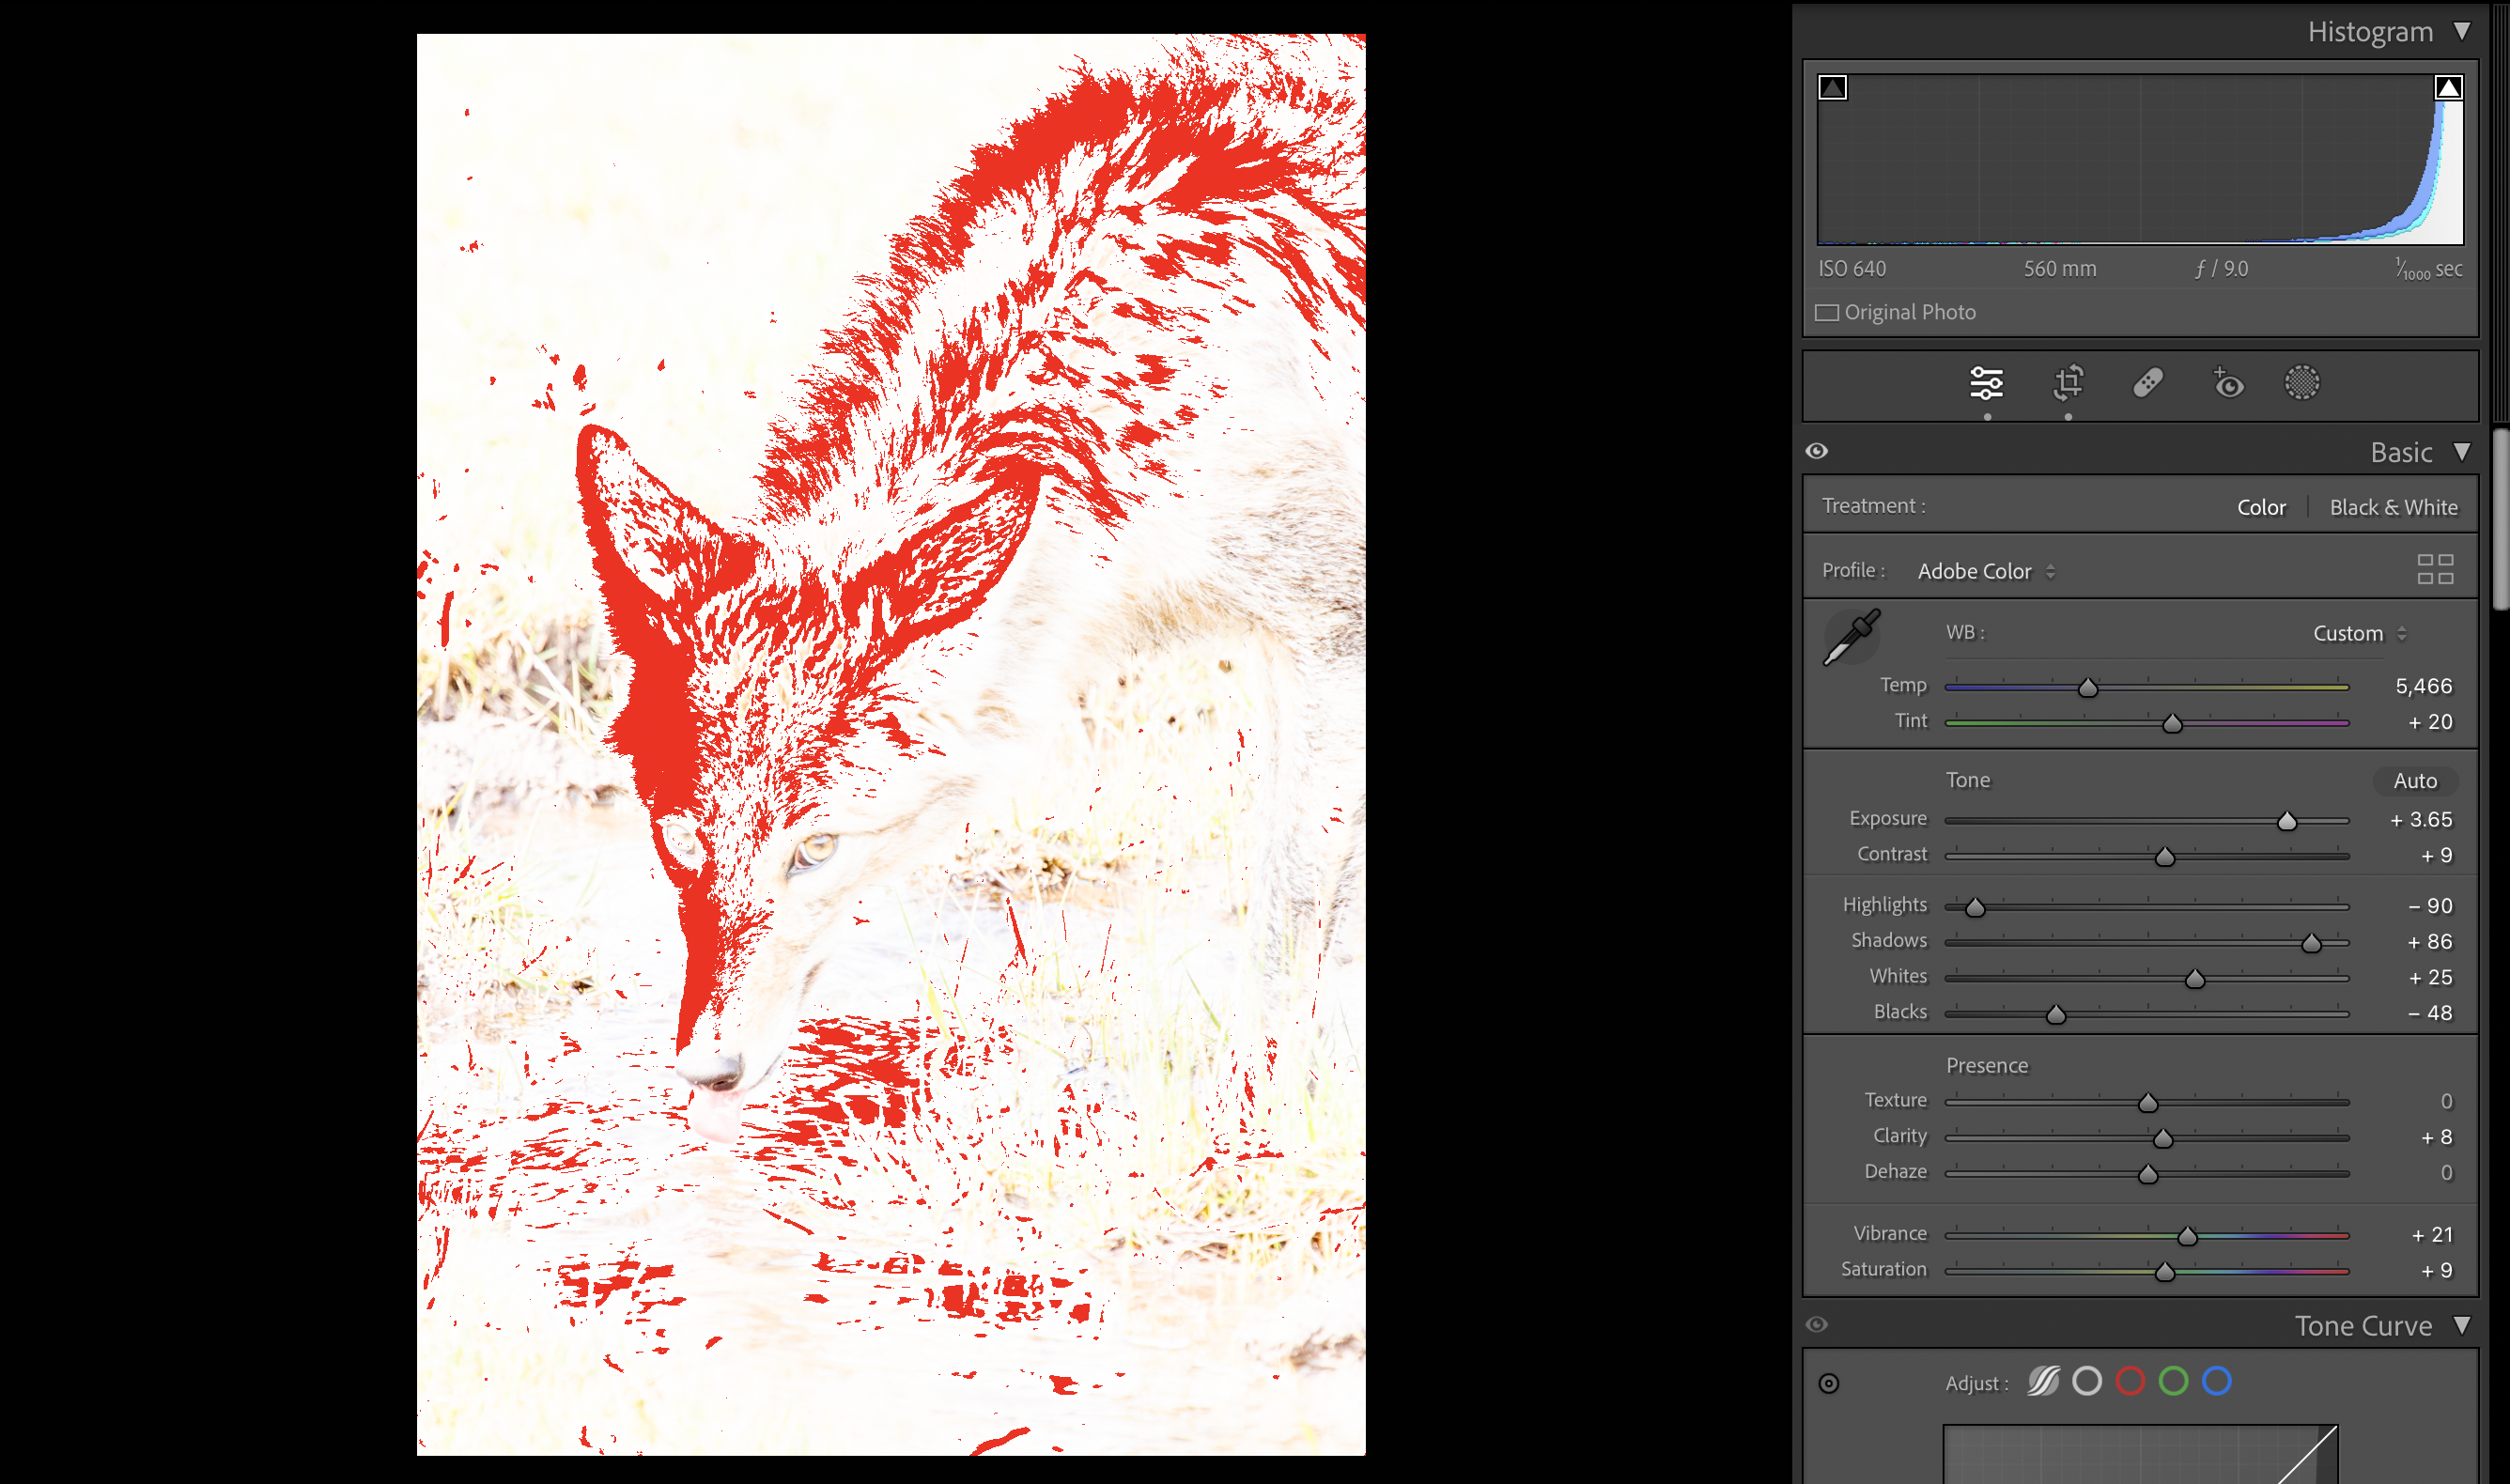
In your histogram, at the top right corner of Lightroom, you’ll see two upward-facing arrows in boxes at both ends of the histogram. The one on the left signifies shadows and the one on the right is for highlights. By clicking these boxes, Lightroom will now represent clipped shadows as blue and clipped highlights as red on the image you’re editing. This is a great way to visually monitor the exposure of your image and adjust it accordingly.
Remove Unwanted Artifacts with the Spot Removal Tool
Whether it’s a speck of dust on your sensor, a water droplet on your lens, or maybe even something that's actually in the picture you’ve captured, we’ve all likely come across artifacts or elements of an image that we wish we could simply remove. With Lightroom, this is possible to an extent by using the Healing tool.
Whether it’s a speck of dust on your sensor, a water droplet on your lens, or maybe even something that's actually in the picture you’ve captured, we’ve all likely come across artifacts or elements of an image that we wish we could simply remove. With Lightroom, this is possible to an extent by using the Healing tool.
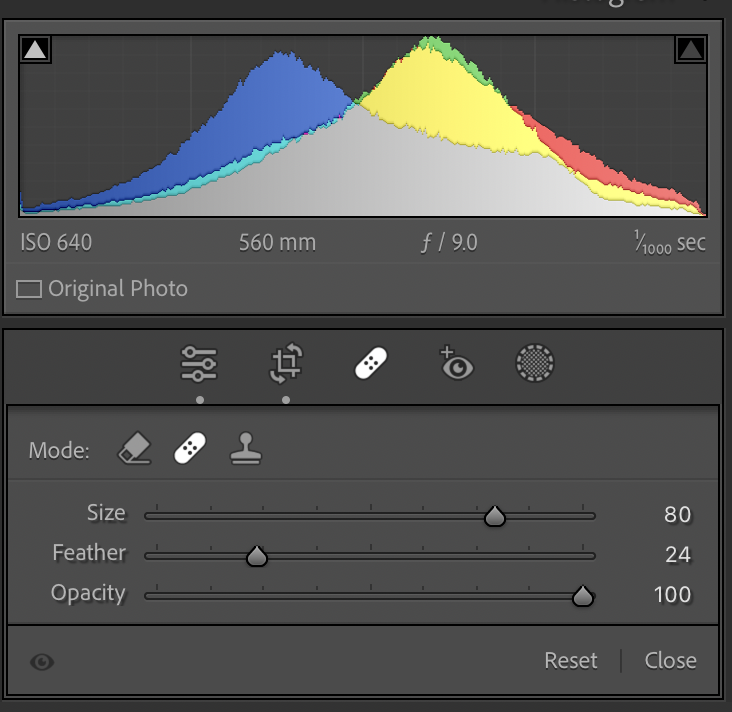
The Healing tool is located in the top right corner of the Lightroom window beneath the histogram and looks like a small band-aid. There are three different healing modes including Content-Aware Remove, Heal, and Clone. These each work slightly differently from one another but ultimately can achieve similar results when trying to remove artifacts from an image. You can also use the Size, Feather, and Opacity sliders to alter the way these tools look and behave. There’s a lot of information here and I won’t take a deep dive into this in today’s article, but I’d recommend experimenting with each one to learn more about how they work.
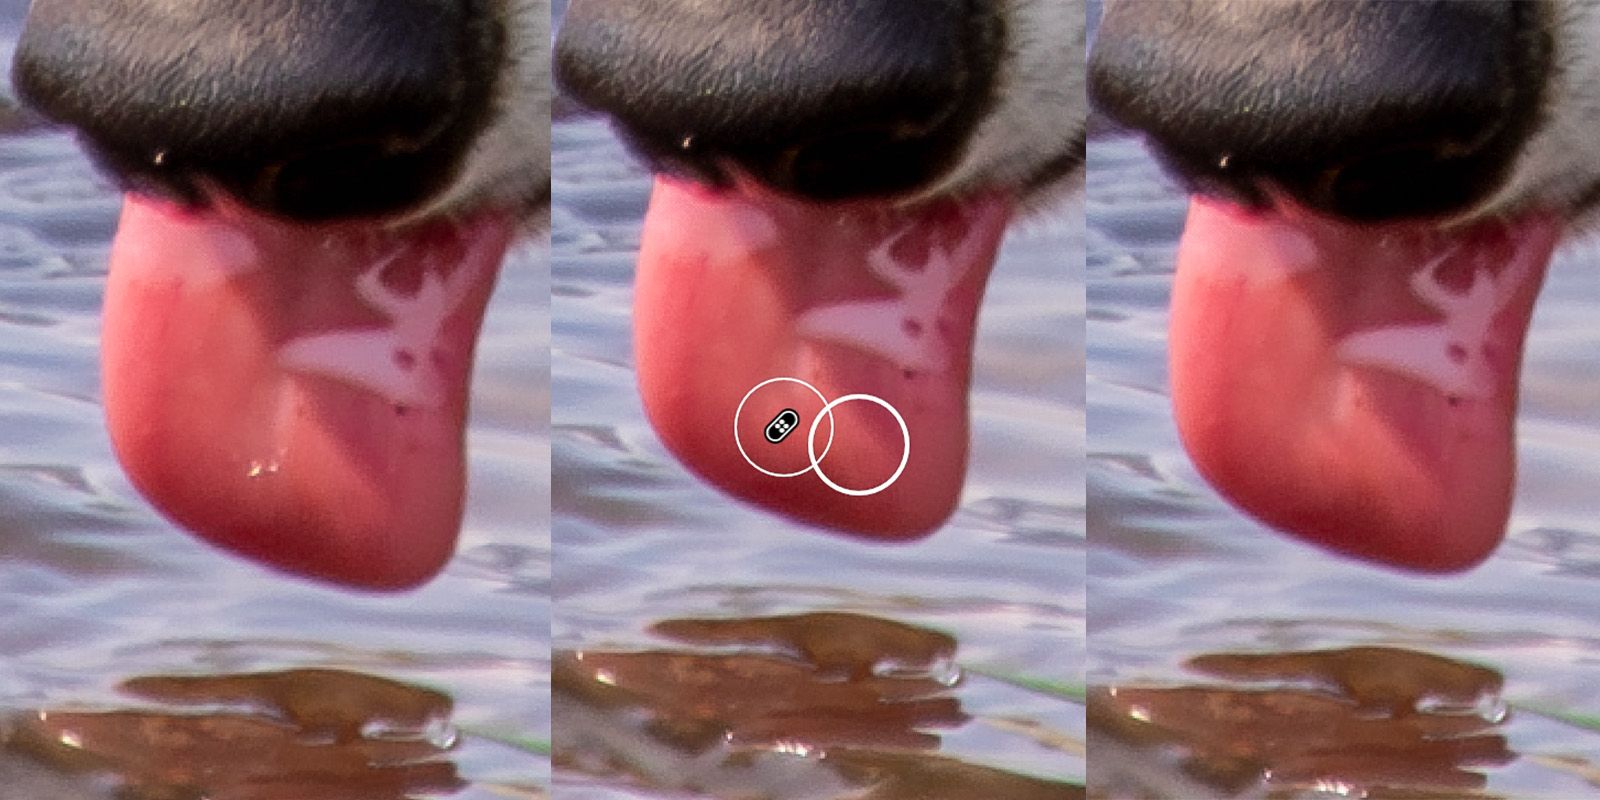
In this example for today’s article, I’m going to remove a small dot of light from the tongue of this coyote. To do this, I’ll select the Spot Removal Tool, set my size, feather, and opacity to what I think looks good, and then I’ll click the area of the image I want to remove. Lightroom will then pull information from an area right next to it and cover up the dot of light. This tool is pretty useful and I strongly recommend trying it out next time you’re editing an image.
Use Masking for Localized Adjustments
And finally, we’ve arrived at our last tip. This is arguably one of the most powerful and useful sets of tools in all of Lightroom. I’m talking, of course, about the art of masking. Masking is a way of selecting specific parts of an image and then having the ability to adjust or edit only the selected areas. For instance, you can select subjects, backgrounds, the sky, or really anything else and edit these selections without altering the rest of the image. It really can’t be understated just how useful and powerful masking can be.
Let’s say you have a landscape image with a boulder in the foreground, a beautiful forest in the background, and a stunning sunset to top it all off. With masking you can select each of these elements independently and alter them separately to create a final result that perfectly highlights each element.
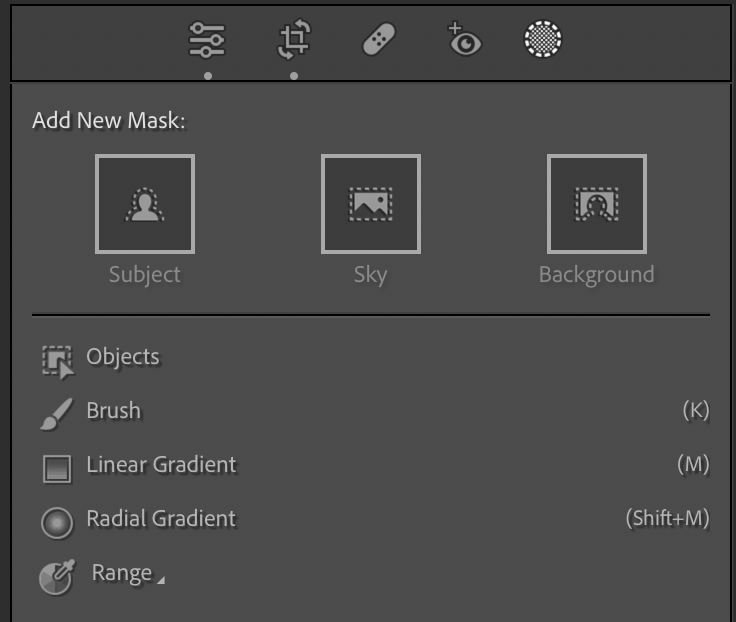
To create a masking layer, you can click the Mask icon at the top right corner of Lightroom underneath the histogram or you can simply press the “Shift” and “W” keys simultaneously. You can then choose the type of mask you want to use. Lightroom is pretty smart and can often automatically mask subjects, backgrounds, skies, and more but you can also use tools such as the Brush to paint your own custom mask. Masking is another complex topic that I could easily write an entire article on, but for the sake of time, we’re only going to scratch the surface today
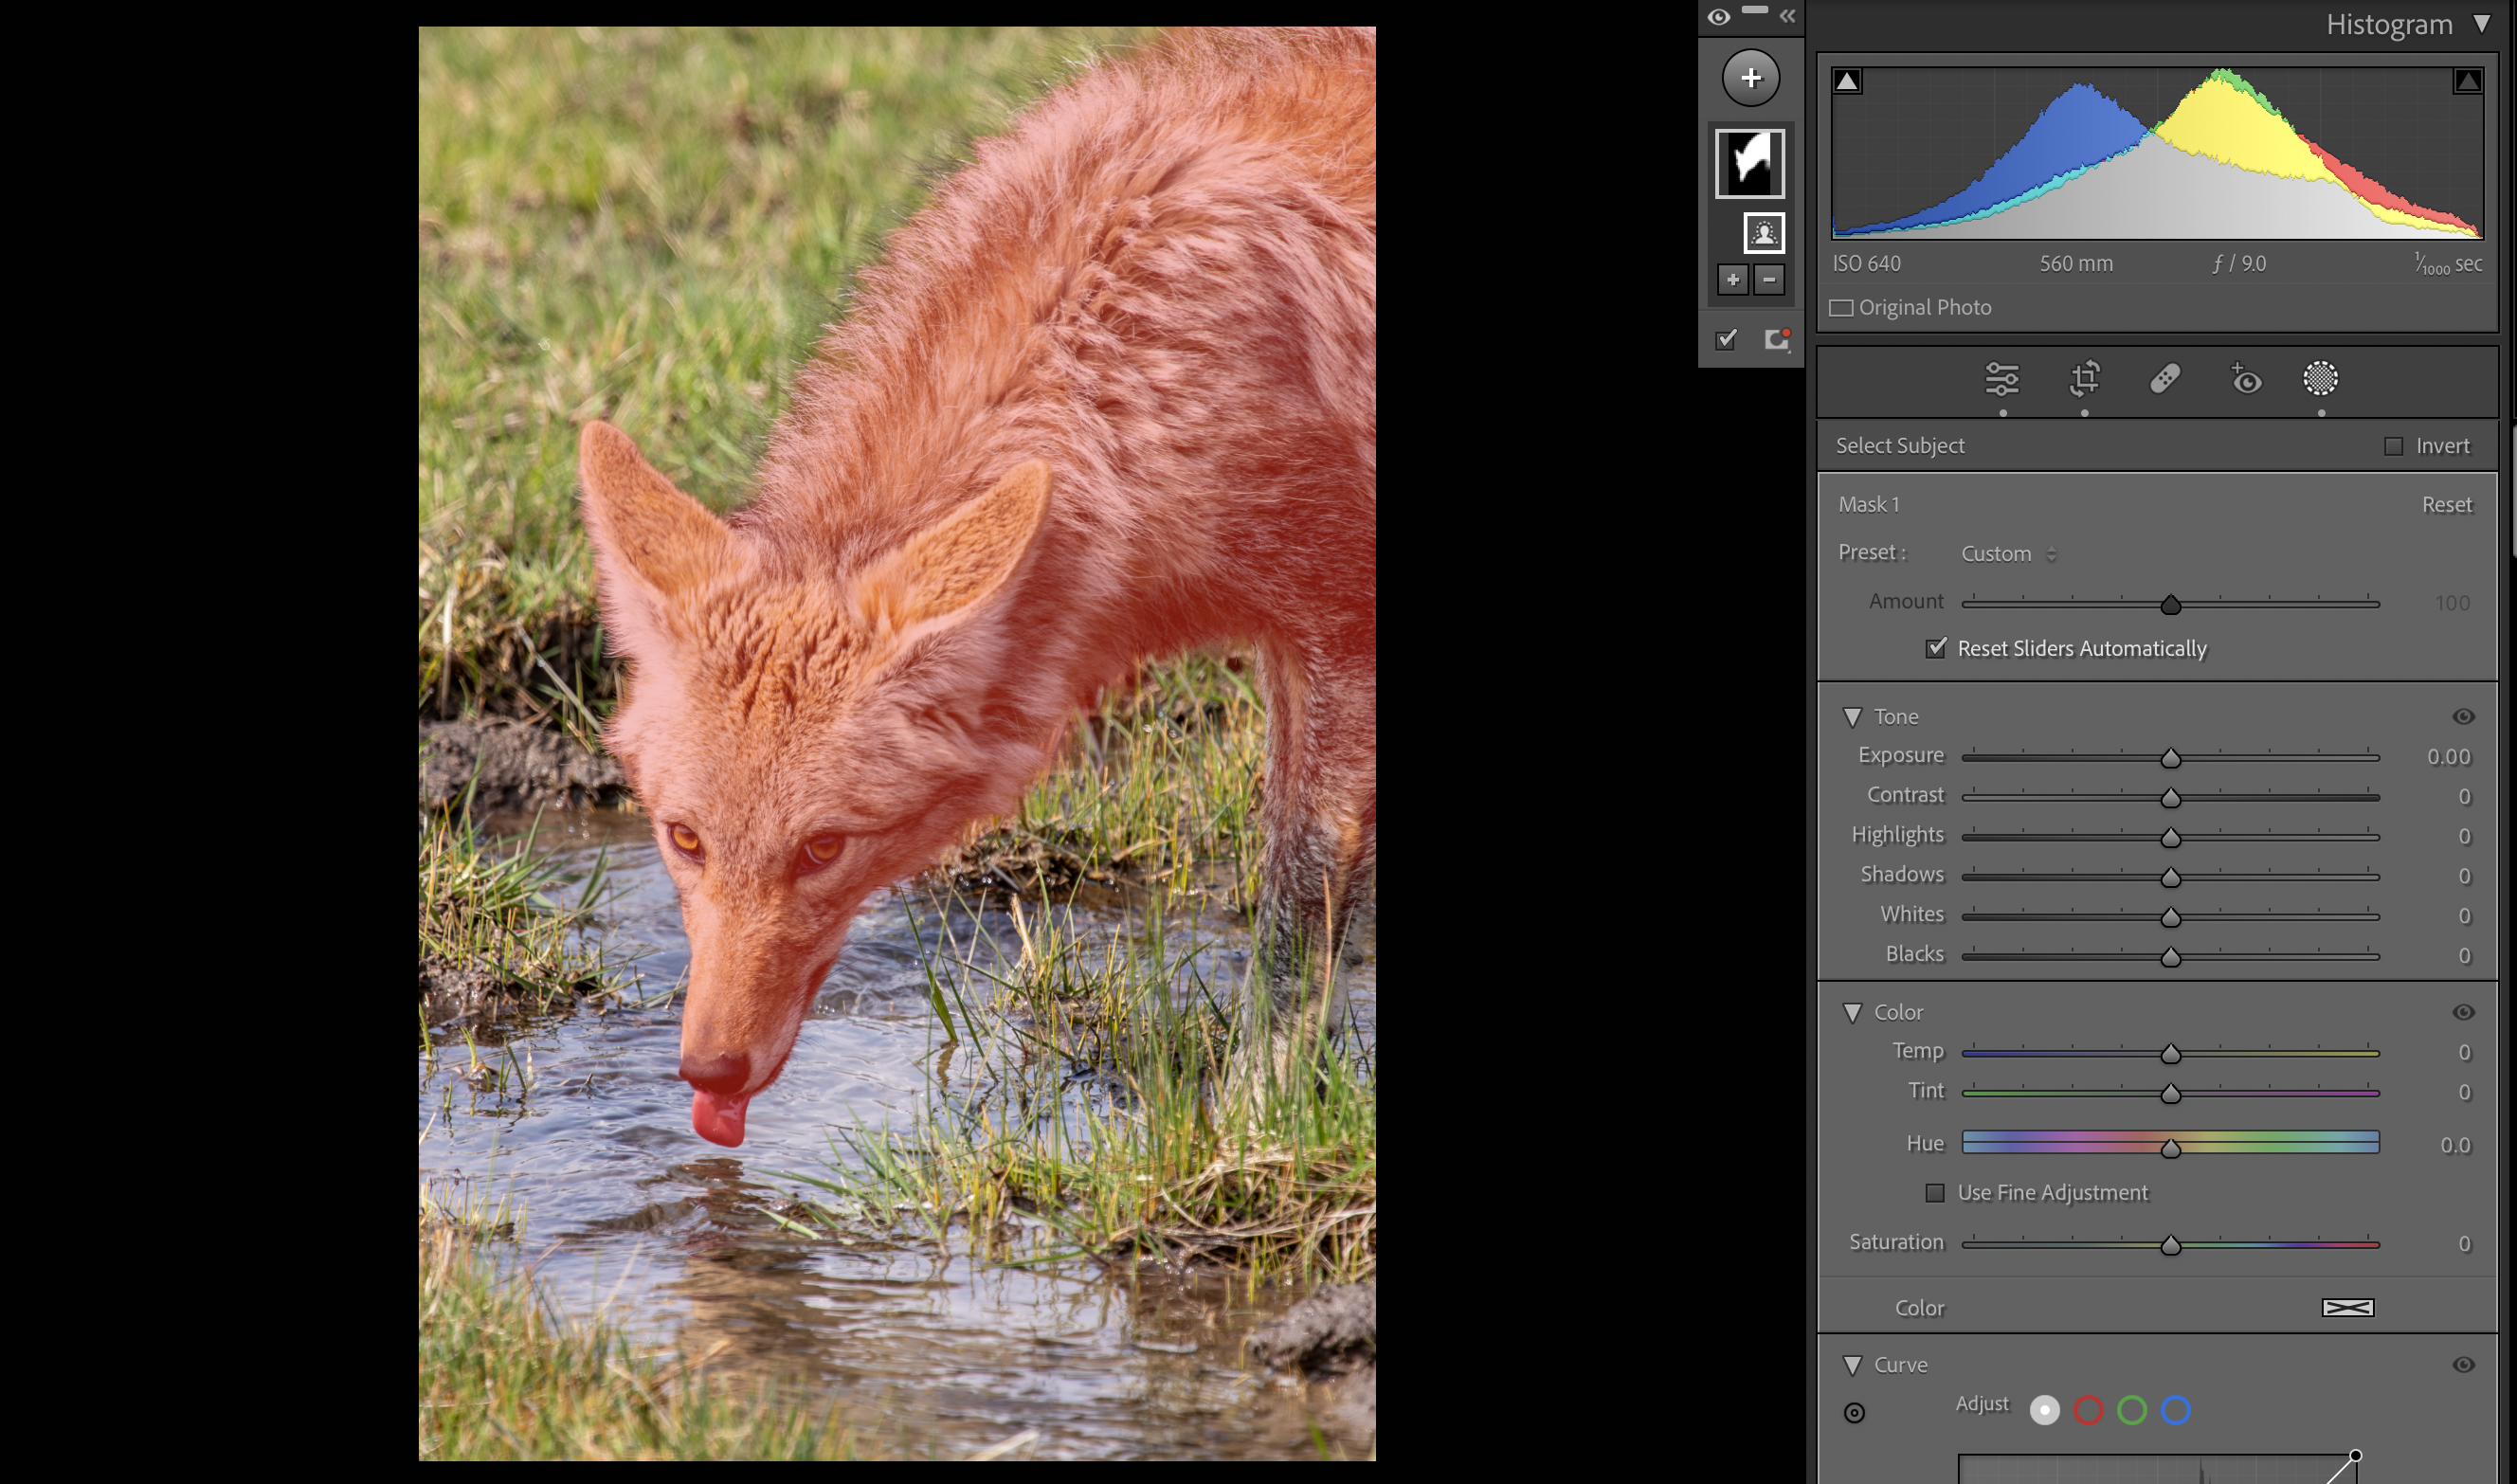
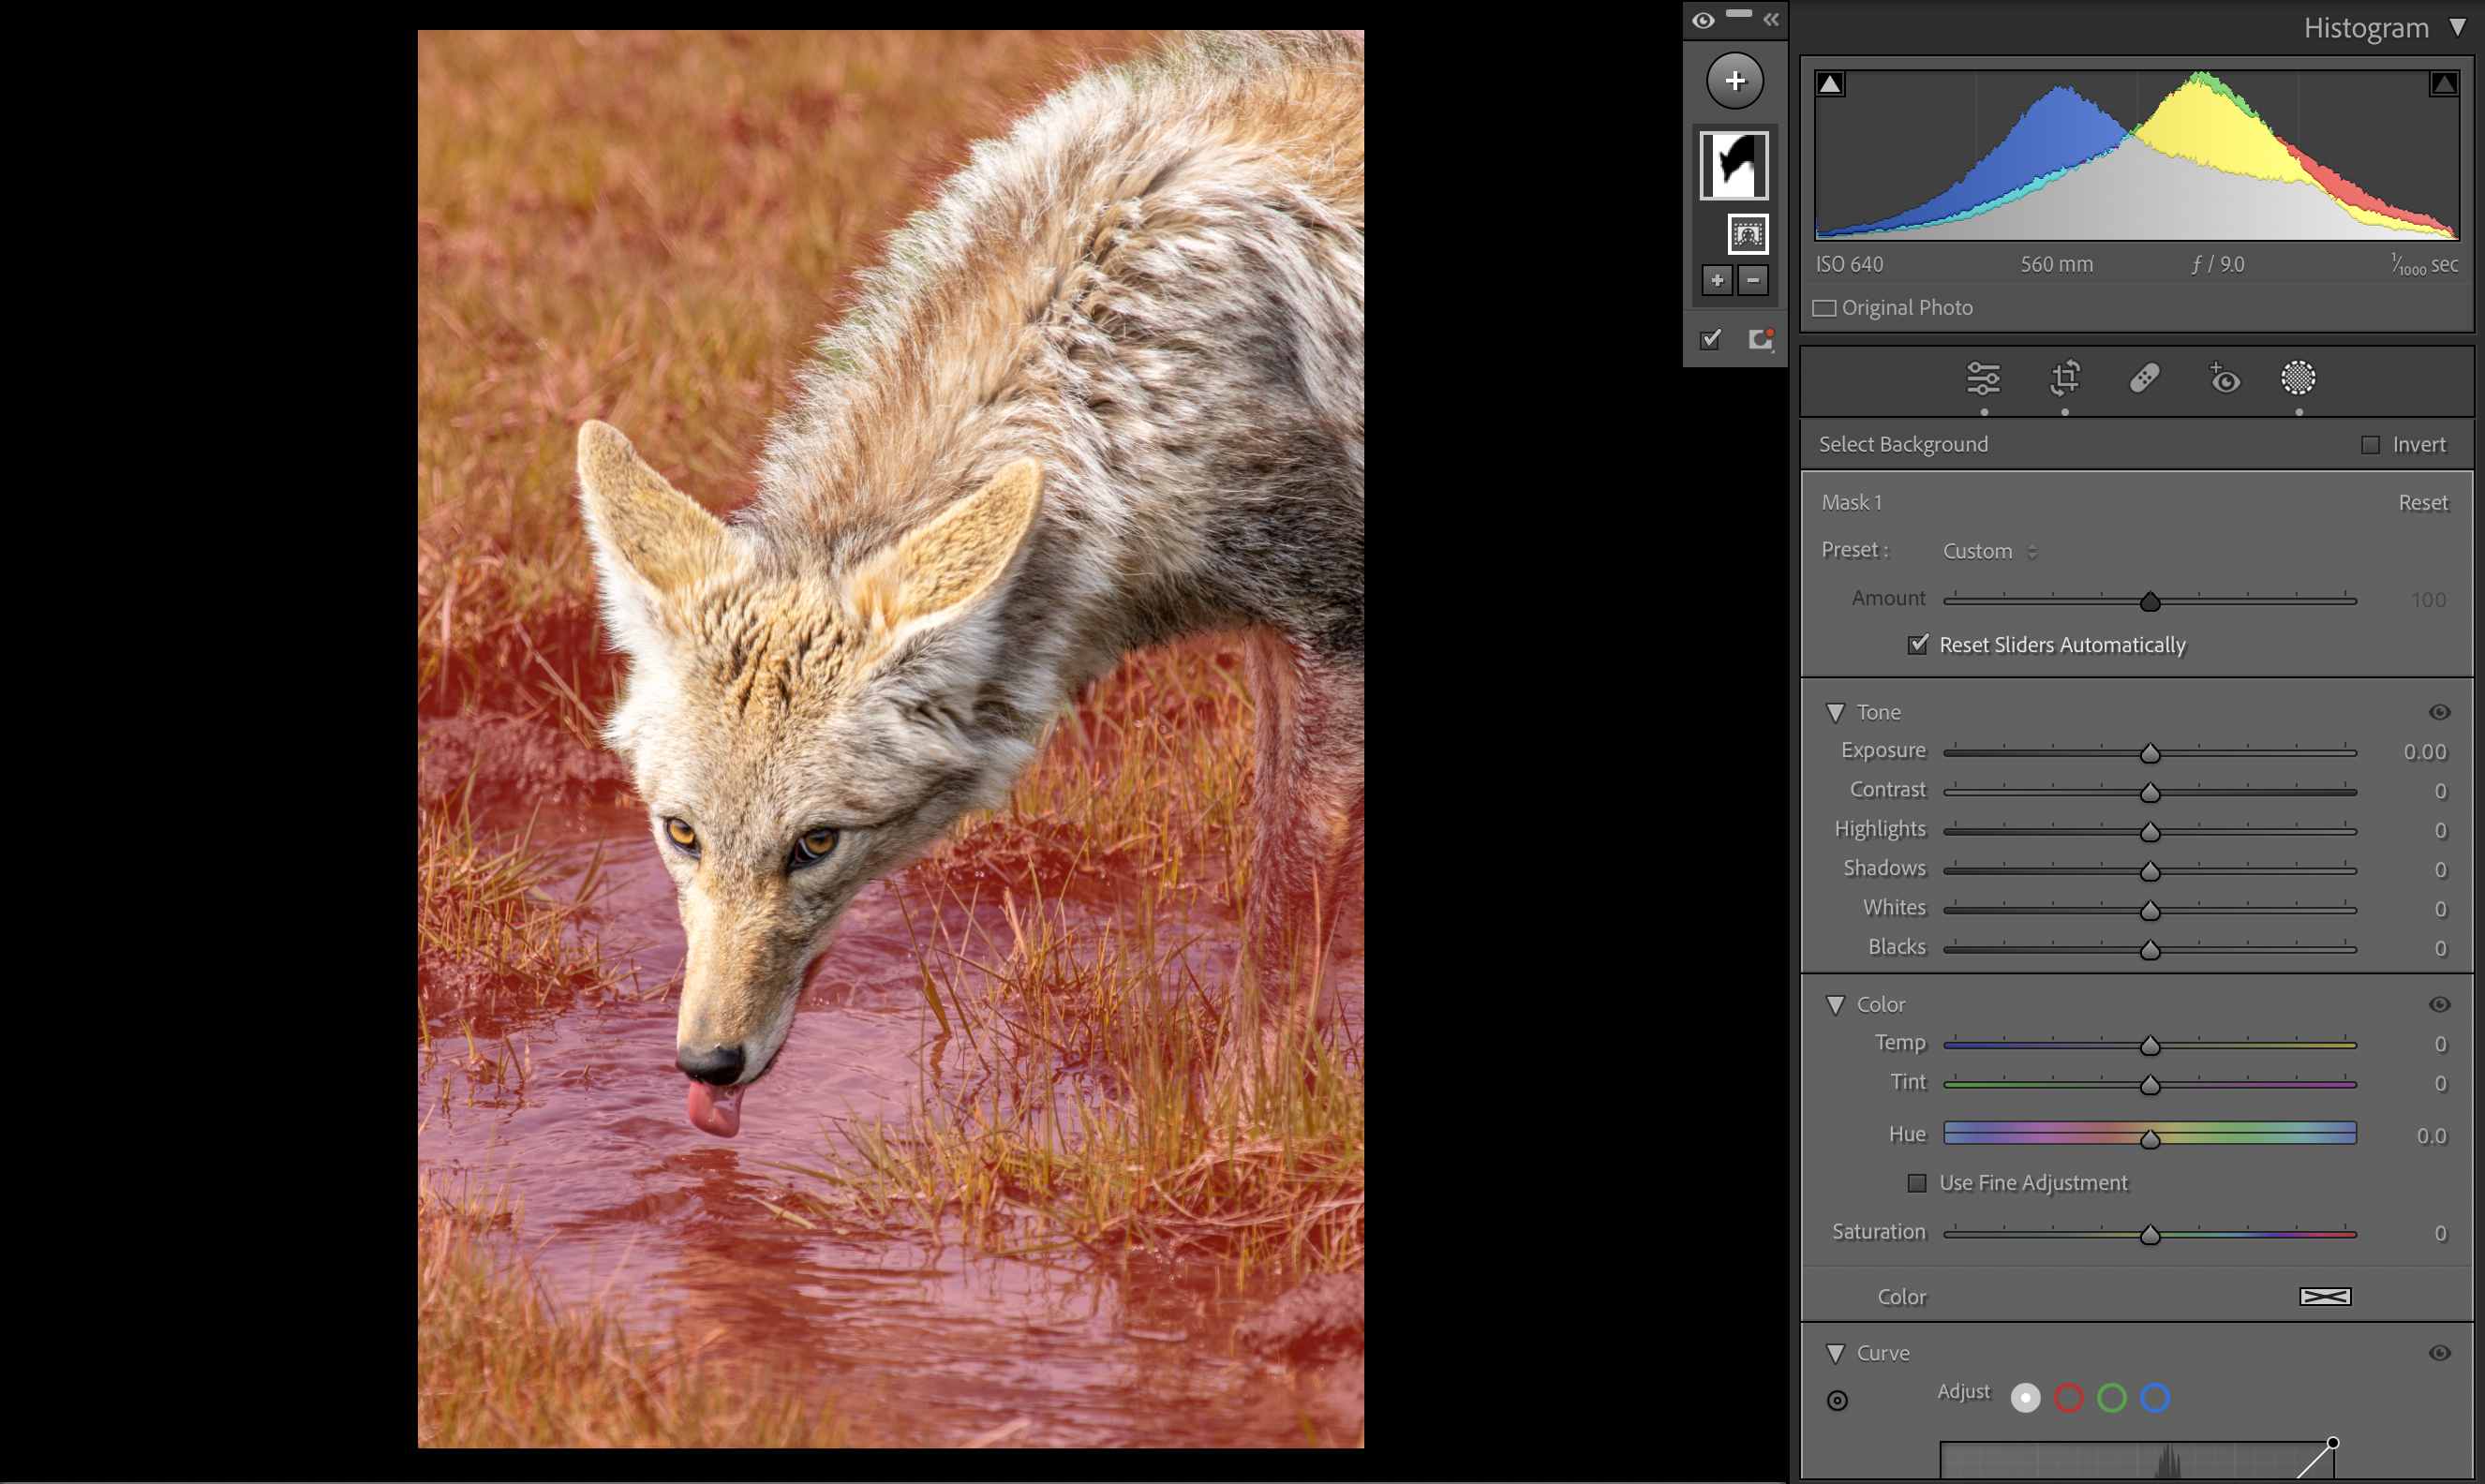
Lightroom will show you the area that will be masked by highlighting it in red. Once you’ve created a mask you can then edit the settings of your selection with the sliders on the right-hand side.
I strongly recommend that everyone experiment with this themselves as the masking tool can completely transform the way you edit your images
I strongly recommend that everyone experiment with this themselves as the masking tool can completely transform the way you edit your images
Conclusion
Once again, Lightroom is a widespread, incredibly popular, and very powerful photo editing software. There are a lot of moving parts but by learning how this useful app from Adobe works and discovering its hidden secrets you’ll be able to edit your images like a pro and take your photography to the next level. I hope this article has been helpful and informative and that it inspires you to try some new techniques the next time you go to edit your images. Until next time!
If you'd like to read more Backcountry Journeys articles discussing Lightroom, check out the links below!
Adobe Lightroom Introduces AI Noise Reduction Feature - Keenan Hursh
Common Lightroom Mistakes and How To Avoid Them - Grant Ordelheide
Ten Lightroom CC Tips for Nature Photographers - Matt Meisenheimer

We offer world-class travel photography
experiences around the world.
Each tour is bundled with lodging, meals, and transportation between workshops included, allowing you to focus on photography instead of the stress of traveling.
experiences around the world.
Each tour is bundled with lodging, meals, and transportation between workshops included, allowing you to focus on photography instead of the stress of traveling.
Get Our Trip Catalog
Receive a trip catalog that highlights all of our upcoming photo tours and workshops.Schedule a Trip Consultation
Meet with a photo experience coordinator, and experience a personal touch to your booking experience.Landscape Guide
Receive a FREE Landscape Cheat Sheet Written By a Pro Photographer.Webinars
Our regularly hosted webinars provide photography instruction from our own guides on a wide range of topics.Education Portal
Explore our library of articles that cover everything from common questions, to in-depth guides on how to achieve that perfect shot.
Backcountry Journeys
Connecting Passionate People To
Exceptional Experiences.
Exceptional Experiences.
Business Hours:
Mon-Fri, 8AM-4PM MT
928-478-1521
adventure@backcountryjourneys.com
Mon-Fri, 8AM-4PM MT
928-478-1521
adventure@backcountryjourneys.com
arrow_drop_down_circle
Divider Text
All Images & Content Are Property Of Backcountry Journeys Photography Tours, Workshops & Safaris LLC - Copyright 2026
About Us
Receive a Digital Trip Catalog
Find an upcoming photography tour with our interactive catalog.